Project 2 - Knockin'
On Heaven's Door
Sketches
Due - 2/29/16 at 8:59pm Chicago time
Final
Design Due - 3/18/16 at 8:59pm Chicago time
Project
Due - 4/18/16 at 8:59pm Chicago time
Project 1 took a look at adding some modern tech to simplify and
enhance the shower / bath experience. In this project we are going
to enhance another area of the home - the front door.
My expectation here is not that you will produce something that
looks as good as a professional graphic designer, but that you
will apply the basic rules of visual design to create an effective
interface for the user.
This project has two phases each with their own due dates.
You will be working in groups. Due to the class size, the group
size will be 3 or 4 people people. You will need to choose your
team, and email me the member names by 2/12. I will randomly
assign the remaining students to teams before the next class. If
you only have a partial team (2 people, 3 people) that's OK, I can
randomly assign people to fill in, or mix and match partial teams.
Sketch
phase
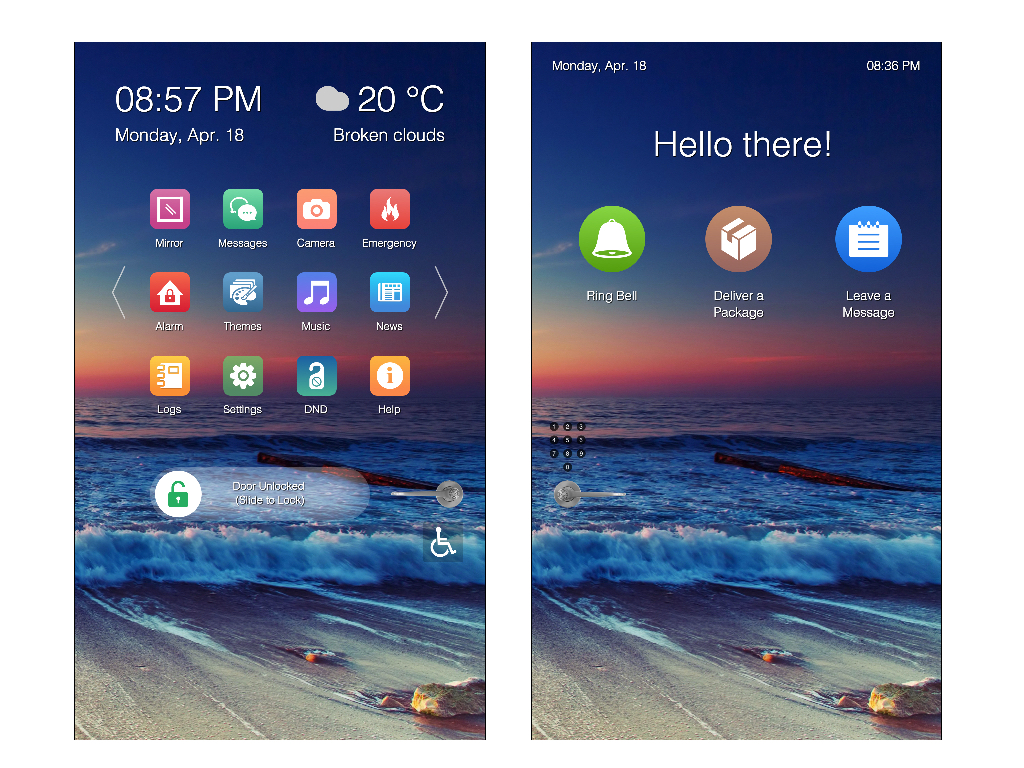
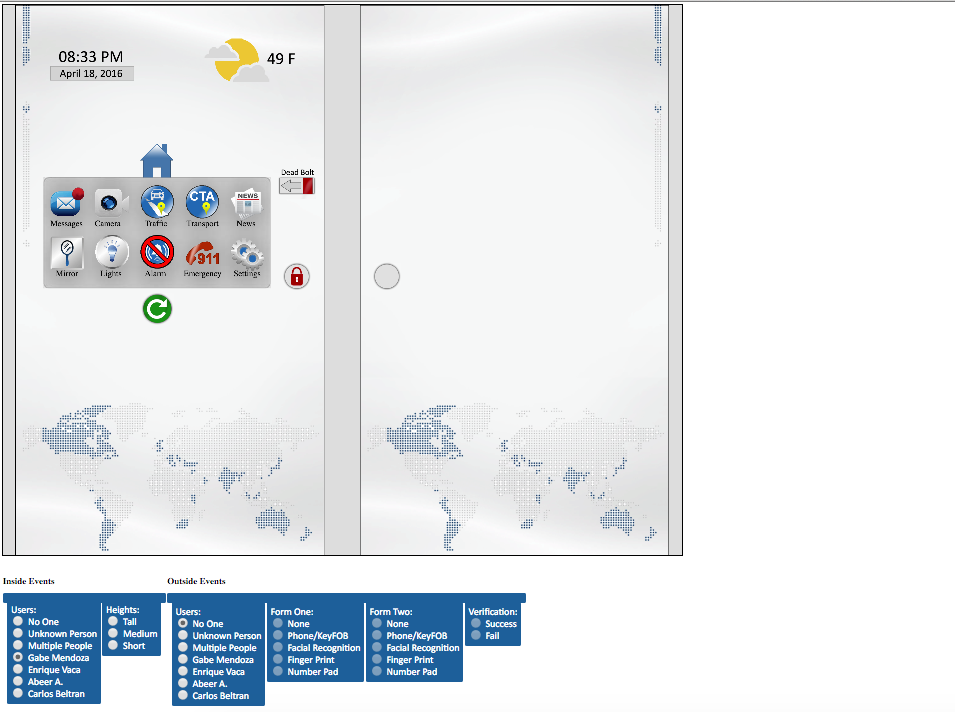
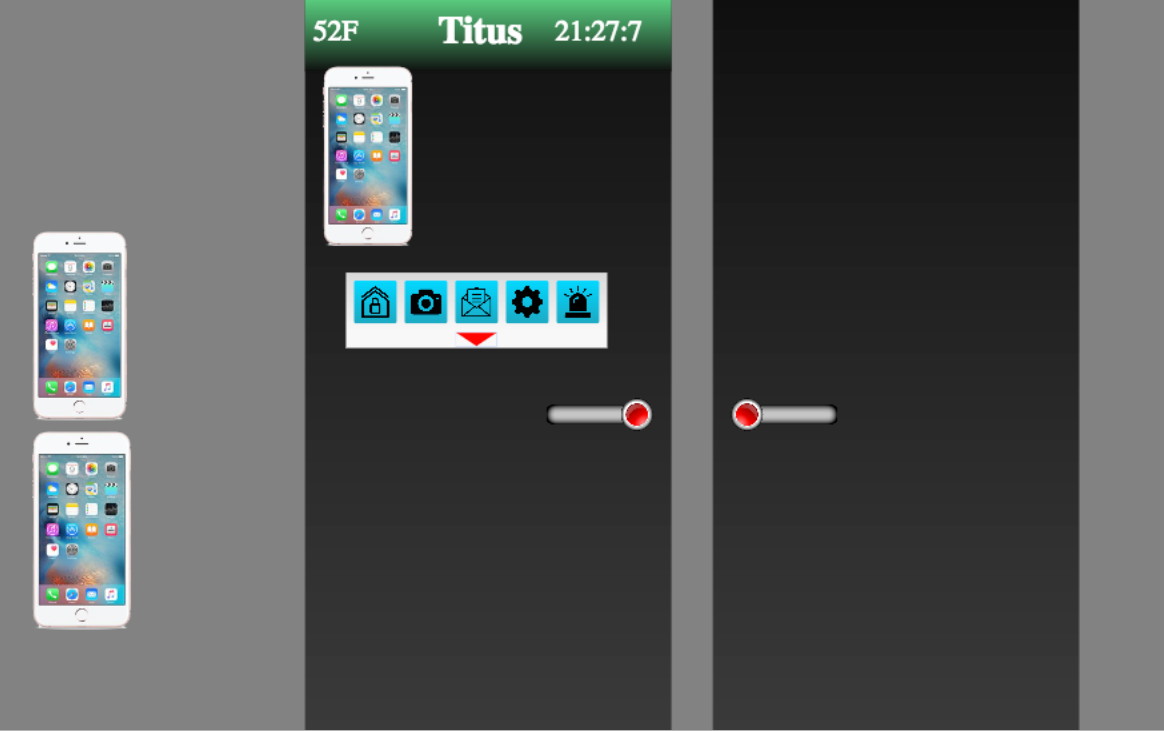
In this phase you are going to think about a user interface to a
front door which has a large networked touch screen display panel
covering both the inside and outside surfaces, combined with
speakers, cameras and microphones. Think of something like a large
4K thin-border LCD TV on both sides of the door. Its main function
is to still act like a door, but with enhanced capabilities.
Assume there is still a physical doorknob (but no physical lock)
on both sides of the door and show that in your interface. In case
of emergency the user can still use the physical doorknob to open
the door and escape. The user opens and closes the door as a
traditional hinged door - it doesn't slide into the wall or the
ceiling or floor. Assume there are microphones and cameras on both
sides of the door (so people can talk to each other without
opening the door).
Additional requirements:
inside:
- show whether the door is locked or unlocked
- ability to lock or unlock the door
- can choose from a set of holiday themes to show on the
outside of the door (think virtual Christmas wreath or
Halloween decorations, birth announcements, etc) or just
standard door themes (wood, metal, different styles)
- change the look of the inside surface of the door (wood,
metal, holidays, birthdays, different styles)
- ability to see who / what is outside the door life-size
using the camera mounted outside
- can turn the inside camera on and off for people on the
outside to 'see through' the door
- door can use your phone (if you are carrying it) to identify
you and provide personalized information
- door can tell you about your appointments / calendar
events / to do list as you are about to leave
- if more than one person is near the door it should try and
help all of them
- door can act as a mirror on the inside for dressing,
checking yourself before you go out
- door can tell you about the weather outside as you are about
to leave
- call police / fire in an emergency
- turn house alarm on / off
- choose the doorbell chime (which would go off at this door)
- can write a message on the inside of the door for general or
specific people to appear on the outside of the door (personal
in that its only triggered by a particular person's phone
getting close to the door, or general so that it appears when
anyone approaches the door)
- can choose to talk to people who are outside the door with
an avatar appearing in the door rather than the view from the
inside camera (so the person on the outside doesn't get to see
what you look like)
outside:
- ability to lock or unlock the door if you have the 'key'
(whatever that is in this case)
- 'push' the doorbell
- ability to write a message and have it appear on the inside
of the door
Your interface should also indicate whether the door is currently
open or closed and the user should be able to open or close the
door in the interface.
You should also think about the initial setup for a person using
the door - how does the door introduce its functionality to a new
user? You need to implement this tutorial.
Both sides of the door
should work for people who are colour blind and at least the
basic functionality should work for someone who is hard of
hearing or deaf.
One issue to consider - do you give the door a ‘personality’ like
Siri / Cortona / genuine people personality, or is it more
of a dumb device?
Implementing that interface well gets you a C. You can use static
imagery, or a set of images to simulate the camera feeds, info
from a phone, and the alarm system. To get an A or a B you need to
add at least five more additional useful functions and create a
really good user interface.
There will be several different ways to accomplish this, so one
major feature of the sketch phase is to create and evaluate
multiple designs. Each of the members of your group should design
a version of the interface on their own independently and then
bring these designs together in a meeting and create your final
proposed design. All of the original designs should be
significantly
different from each other. If each design is done by a different
person then that will probably happen naturally. Each design
should be composed of sketches showing how a user would accomplish
a certain task with text explaining what this sketch shows. You
should be drawing lots of quick sketches at first to get your
ideas out, then a period of refinement. In the end I would expect
there to be at least 40 final pages per design. I would prefer
that the designs that you turn in are done on a computer, but if
you draw _neatly_ and print very cleanly then that is also
acceptable. You will be turning your sketches in via a web page as
a series of PDFs. Anything that looks like it was hastily drawn
and ripped out of a spiral notebook and scanned or photographed 5
minutes before class will not be accepted.
Your sketches should also take into account the constraints the
system needs to work under. It should use current-level
technology, and be something that could be actually created today.
Your sketches should show both the inside and the outside of the
door simultaneously (as will your implementation) since some
things you do will affect one or both sides of the door, and
people can interact on both sides. One possible way of doing the
sketches is shown below. You can also use stick figures to
represent where people are standing, what they are touching, etc.
You can also zoom in for detailed views of parts of the interface.

You should come up with a cool name for your device
Your interface should support multiple languages. It should allow
the user to choose from at least 10 languages, but you only need
to implement English and one other language. That second language
could be a real language (see what languages your group members
can write and speak) but Swedish chef or Klingon are acceptable as
the second language if your team does not have a member that is
fluent in another language, and there are automatic translators
for those available on line.
The door should also support both imperial and metric units, and
multiple time / date formats.
It would also be a good idea to test your designs out on your
friends, parents, or other novice computer users to see if it
actually 'works.' Print out interface elements and tape them to
your door in the morning. Have your friends try out your ideas.
Having first time users talk aloud about what they are thinking
when confronted with your interface can be extremely helpful in
giving your assumptions a reality check.
In the sketch phase your group should create a
well organized public
web page and send the URL to andy. Those pages should contain the
following:
- PDF of scans, screen snapshots or very good photos of the 40+
pages (each) that describe each of your group members' designs
- scans, screen snapshots or very good photos of the 40+ pages
that describe your final proposed design
Important note: I will not be
commenting on your sketches, unless you are going completely off
track. I am not going to tell you what is good or bad about your
design - that is where the value of having many voices on a team
comes into play. Your grade will be based on the completeness of
your information and the quality and variety of your designs.
This project has two critique phases. An important part of user
interface design is getting feedback. Part of this feedback comes
in the design phase where the members of your group critique each
others design and then come up with a final proposed design to
implement. Part comes from presenting your final design to the
other groups. Each project team will give a short 10
minute presentation on their final
proposed design, and the reasons why it looks the way it does, to
the rest of the class, and then answer questions from the class
for another 10 minutes. Each person in the group must speak for
part of that time. Groups will be graded on the quality of the
presentation and the quality of the Q/A session, so I highly
recommend practicing the presentation several times. Really.
Practice it. Several times. Really. And you should focus your talk
only on the final proposed group design.
Members of the audience get points for asking good questions or
making good comments about the interface presented. Each group can
ask at most one question or comment per presentation for credit.
When asking a question or making a comment the group member should
identify their group by name - this is like in a press conference
when the reporter says what paper he/she works for.
Three groups will present each day for three or four days. The
goal here, again, is to see different possible design alternatives
and to get new ideas to improve your own design and
implementation. As such the goal of the question and answer
session is not to pick on people and rip their design apart, but
rather to give constructive criticism on how to improve the design
before people start implementation. The goal is for everyone to
come up with a really good interface for the given problem.
by 3/18/16
at 9pm I would like each group to add
another design to
their public web page. This is the design that you plan to
implement - including revisions based on the comments from the
class. This may be a minor revision to your final proposed design
if it went over well in class and you didn't see features in other
designs that you want to add, or it might be a major revision if
the class presentations gave you a lot of new things to think
about. You can not make any major changes to the design after this
point. That is the design you will be implementing. You can not
make changes to the design after this point, so really think about
this.
1
|
Kyle Almryde
Saumya Solanki
Shiwangi Singh
Krishna Bharadwaj
|
link
final link
|
|
2
|
Devin Lown
Michael Magaha
Tom Leahy
|
link
|
|
3
|
Rakesh Saini
Oscar Sanchez
Marcell Purham
Chris Matos
|
link
final link
|
|
4
|
Rinkal Parikh
James Lave
Karen Bykowski
Ishta Bhagat
|
link
final
link
|
|
5
|
Ryan Jones
Matthew Johnson
(Roman Kim)
(Andriy Serafyn) |
link
|
|
6
|
Sumanth Reddy Pandugula
Gautam Krishnan
Sai Priya Jyothula
Vinit Kumar |
link
final
link
|
 |
7
|
Sahib Bajaj
Ankur Lathwal
Kruti Sharma
Ridhi Rustagi
|
link
final
link
app link
|

|
8
|
Abeer Alsaiari
Carlos Beltran
Gabriel Mendoza
Enrique Vaca
|
link
final link
app
link
|
 |
9
|
Damian Pyzio
Svetoslav Angelov
Edgaras Juocepis
Tianniu Lei
|
link
app
|
|
25
|
Devin Lown
Michael Magaha
Tom Leahy
Ryan Jones
Matthew Johnson
|
see 2 and 5
|
|
Implementation phase
We will use the classroom wall to simultaneously show both inside
and outside of the door at almost life size using
fabric.js again.
You may use other publicly available JavaScript libraries for any
specialized networking, sound, or data handling, but not for
graphics.
The physical size of the door is 36 inches (92 cm) wide by 80
inches (203 cm) tall
As with Project 1 you will be designing this interface to run on
the wall in the classroom.
Here
is a sample project 2 template that uses a window that is 2714 by
2200, which has the front and back of the door shown in actual
scale on the classroom wall. By default it uses a smaller window
for project development and you should set that to an appropriate
size for your development machine (while keeping the same aspect
ratio). We are going to assume that the bottom 15" (38 cm) of the
door house the electronics and are not covered by a screen on the
inside or outside of the door, and those 15" are below the bottom
of the classroom wall so its not visible. That is, you are
creating your interface for a 36" (92 cm) wide by 65" (165 cm)
tall display that begins 15" (38 cm) from the floor.
Your sketches from the first phase should allow you to divide up
the work in the implementation phase, but I highly advise that the
entire group hold regular meetings to look at the current state of
the entire integrated interface. Trying to put components together
at the last minute is a really bad idea. They rarely mesh
programatically or visually.
Come in during office hours and test on the actual wall.
Regularly.
You should also implement a tutorial to introduce a new user to
their new door that shows them how to use all these features. This
tutorial would probably be a really good thing to use for your
final presentation.
In this phase you should add to your web page:
- a version of the interface that runs from a webpage in the
current version of Chrome
- a link to all of the source code and required files
- a web page describing the important features of your
application and how to use it, who did what, and links to any
other libraries, media, or tools you made use of. The web pages
should include a series of screen shots, highlighting all of the
features of your interface, with descriptive text, and a 2-3
minute YouTube video with narration showing your interface in
action.
Any code,
images, or other elements borrowed from others must be cited
clearly in the interface itself and in the documentation.
As with the
sketch phase, this phase will also have a public critique of
your completed project with the same rules as the sketch phase.
We will use the classroom wall to show your interface life-size
through a modern chrome browser.
You should
also take advantage of sites such as
http://www.vischeck.com/vischeck/ to make sure that your
interface will work for colour blind people.
I will be
linking your web page to the course notes so please send andy
a nice representative jpg or png image of your application for
the web. This should be named
p2.<someone_in_your_groups_last_name>.jpg or p2.<someone_in_your_groups_last_name>..png
and be roughly 1024 x 768 in size.
On April 19th, 21st, 26th, and 27th each
of the groups will present their solution for 10 minutes.
Each group should spend an additional 5 minutes discussing
how their final implementation reflects their final design
(i.e. how similar it is to the final design, changes that
needed to be made after the final design, etc). We will then
have 15 minutes for questions and comments from the
audience.
By the end of the first week the project is out your group
should set up a public web page, then email the location to
andy, where each member posts weekly progress reports on what
they have done that week. This shows how the various tasks
were broken up, and who was getting things done. At the end of
the project each project team member will give a rating for
your co-workers which will be taken into account at grading
time, and the weekly progress reports are good evidence for
those ratings.
When the project is done,
each person in the group should also send Andy a private email
with no one else CC'd ranking your coworkers and yourself on the
project on a scale from 1 (low) to 5 (high) in terms of how good
a coworker they were on the project. If you never want to work
with them again, give them a 1. If this person would be a first
choice for a partner on a future project then give them a 5. If
they did what was expected but nothing particularly good or bad
then give them a 3. By default your score should be 3 unless you
have a particular reason to increase or decrease the number.
Please confine your responses to 1, 2, 3, 4, 5 and no 1/3ds or
.5s please.
last updated 5/2/16