More on Project 1
For the assignments in this class you have a choice of user interface toolkit that you wish to use. Good options are Swing for Java, fltk for C or C++, or wxWidgets for a c++ or Python. The limitation is that we need to be able to check your program on the CS department linux machines on the second floor of SEL.
Project 1 will give you a chance to program a small interface and get used to the UI toolkit of your choice before we proceed onto the main project in the course: Project 2.
Each person will work individually on this project. This project is NOT a team project.
It is expected that all of the code used in these programs will be written by you. You can use code from the web as examples and a guide to writing your code, but the code must be your own. We will be using computer software to compare people's programs and it is very good at finding similar programs.
Any code, images, icons, or other elements borrowed from others must be cited in the work and in the README file.
Now onto the project itself.
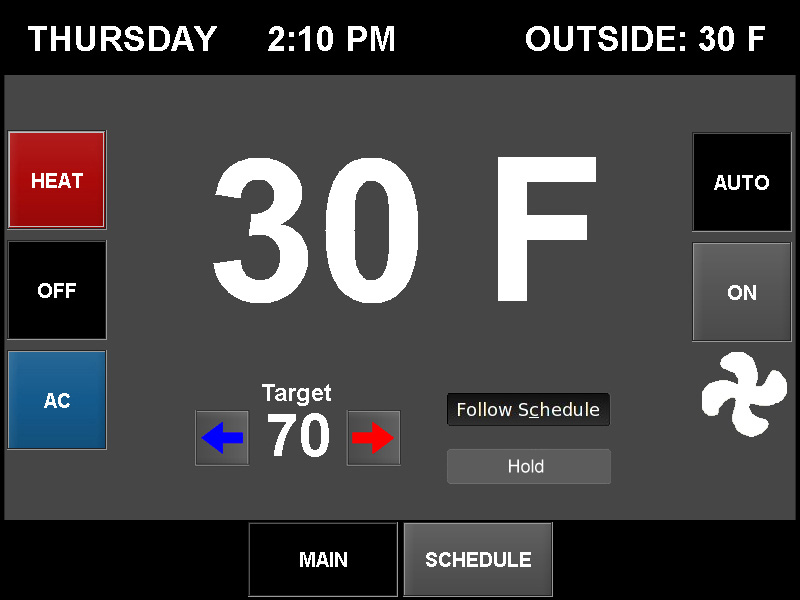
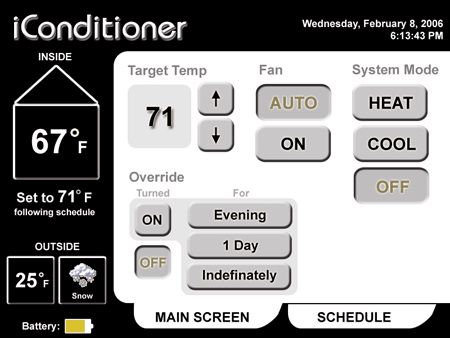
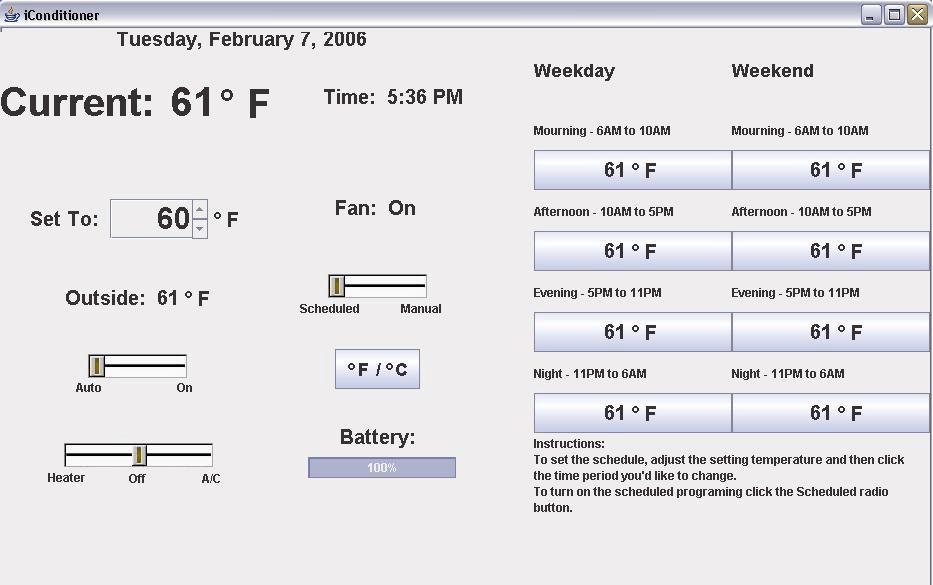
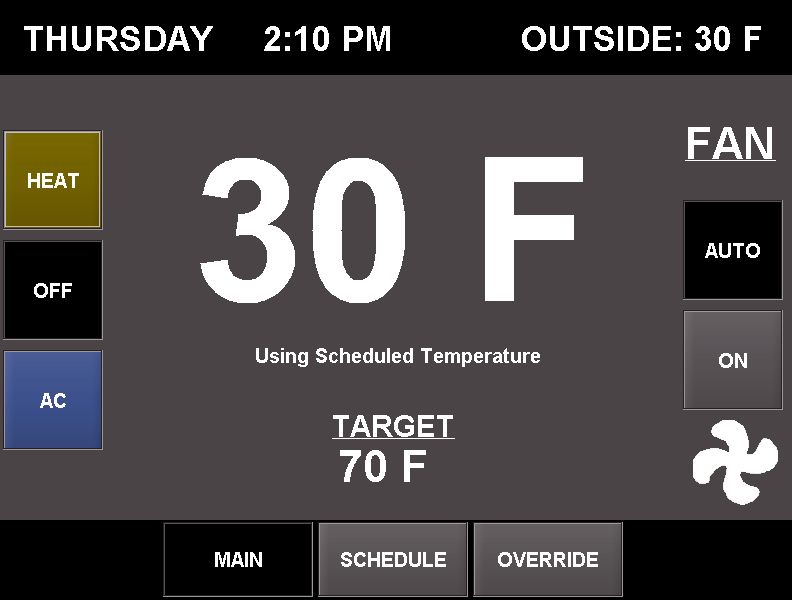
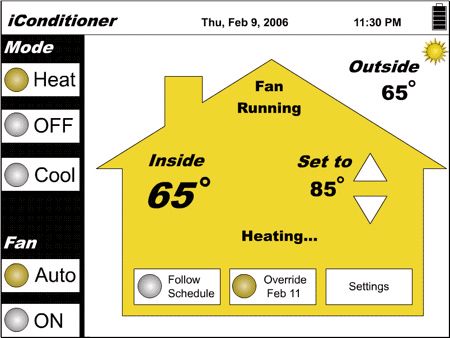
The iConditioner is a Computer controlled thermostat.
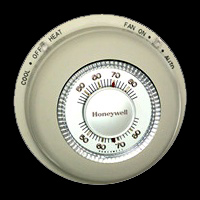
Thermostats to control central heating and cooling in a house or apartment used to look like this:
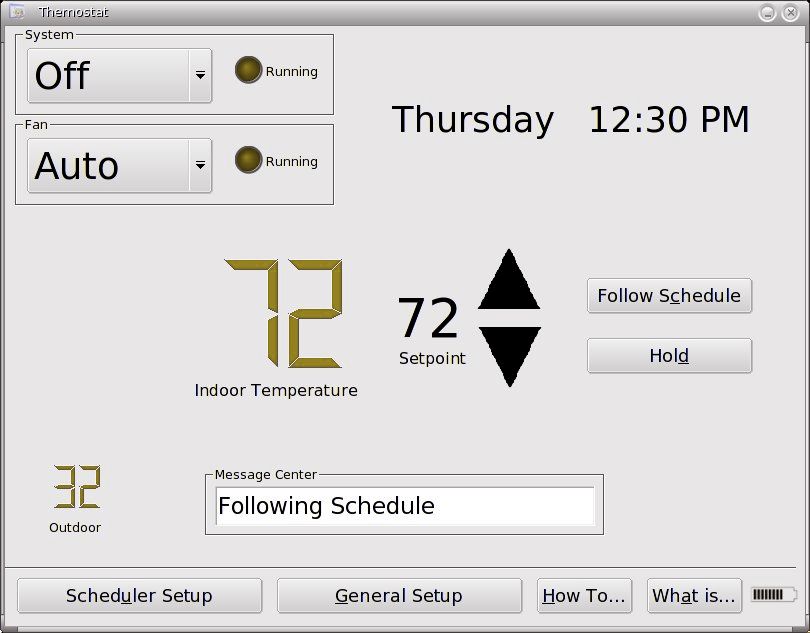
Now
programmable
digital ones are becoming more common with small b/w LCD screens and a
few physical buttons, and some even with touch-screens.
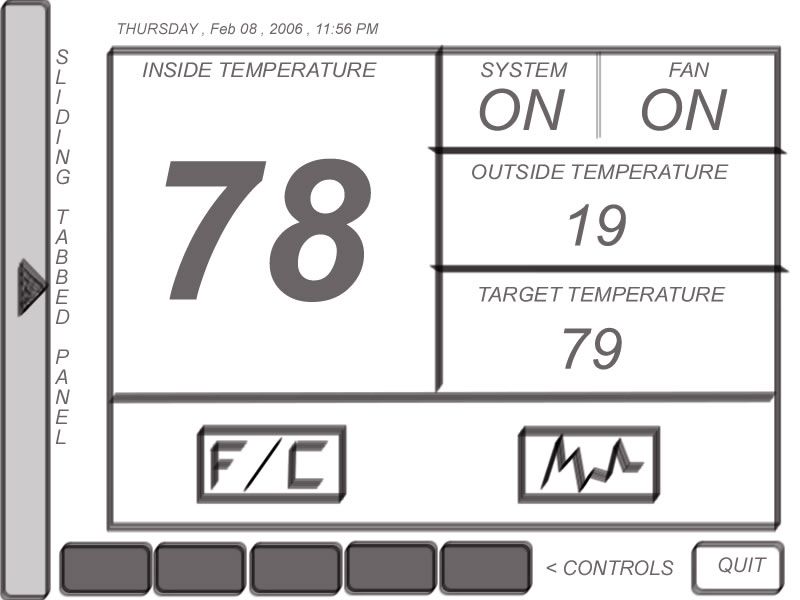
It is also possible now, and more likely in the future, that you will
be able to control your thermostat remotely and wirelessly from a
tablet-PC-like device. This device could be used within the apartment /
house or it could be taken with you to control the temperature at home
while you are on vacation somewhere else.
The
interface hardware:
- assume you have an 800 x 600 pixel full-colour screen (your choice: lanscape or portrait mode)
- assume the screen is roughly 72 pixels per inch resolution
- the app takes over the entire screen area (ie there is no menu bar)
- the screen can be used as a touch screen with a pen or finger
- this allows you to click or click and drag, but no right-clicking
- and no other buttons or modifiers (ctrl, shift, alt, etc)
- you can simulate this with a mouse (but keep in mind the size of a finger)
- there is no keyboard, or other physical buttons
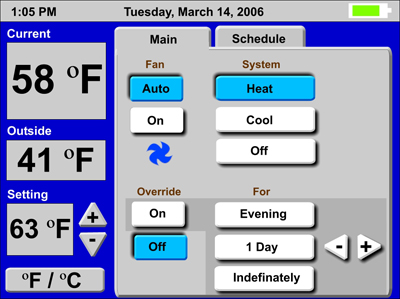
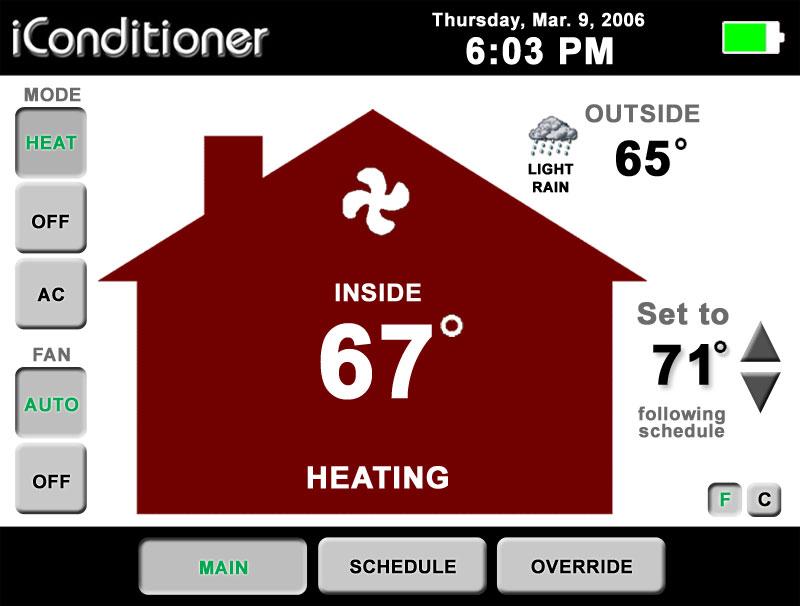
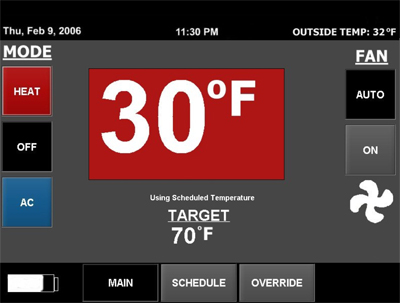
The
user interface
- typical displays (minimum requirements)
- show the current time and day of the week (which it can figure out for itself)
- show the current inside temperature
- show current state of battery power in the tablet
- show what the system is currently doing
- heating / cooling / neither
- fan on or off
- typical controls (minimum requirements)
- set the system to either 'cool' or 'heat' or 'off'
- 'cool' the system will try to cool the house
- 'heat' the system will try to heat the house
- 'off' the system will do nothing
- set the fan to 'automatic' or 'on'
- 'on' the fan is always on
- 'automatic' the fan comes on with the heater / A/C
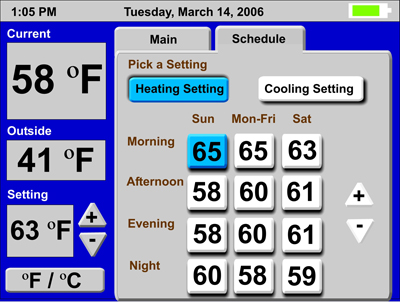
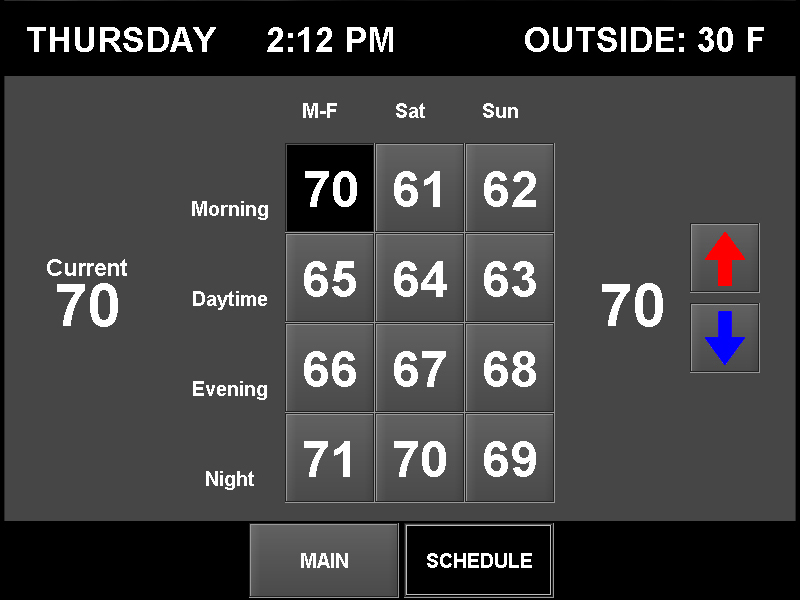
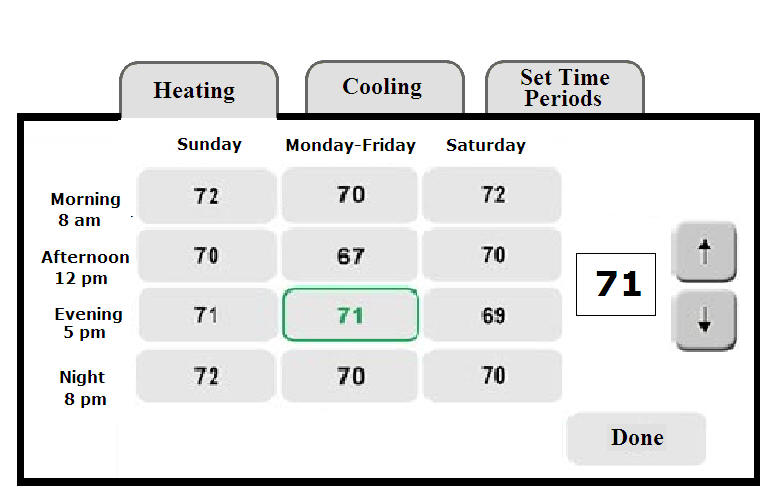
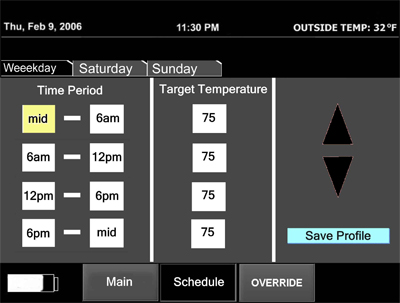
- set the desired temperature for each time of the day
- typically the week is divided into three sections: weekdays / saturday / sunday
- typically each section can have 4 independent periods: morning / daytime / evening / night each with their own desired heating temperature and cooling temperature
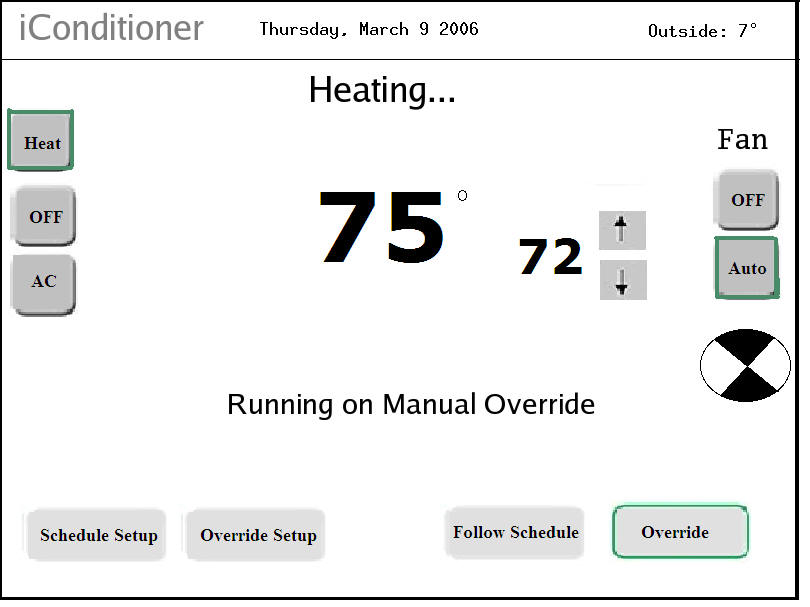
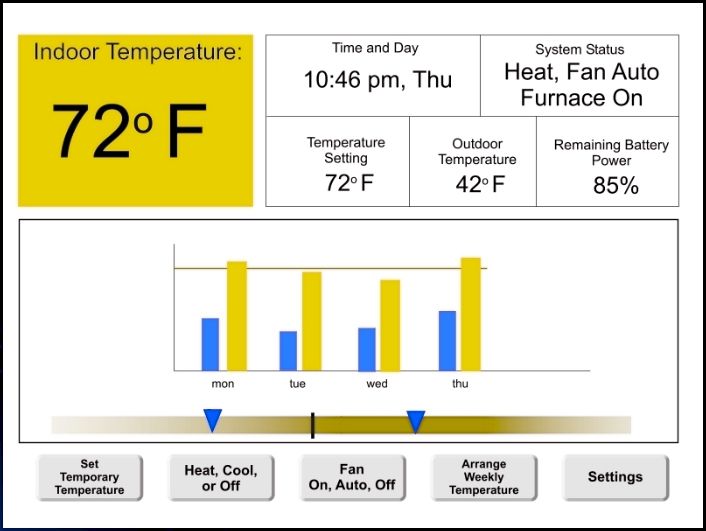
- ability to temporarily override the current temp setting
- giving a new target indoor temperature for the current period
- giving a new target indoor temperature for the next n days
- giving a new target indoor temperature until told otherwise
- You should also think about adding some newer features like maybe
- choosing between degrees C and F
- showing the current outside temperature
- graphs showing indoor/outdoor temperatures
- wizard to do the initial settings
You also need to write a simulated furnace / air conditioner to run in the background:
- get real current outside temp through a shell script every 5 minutes (see below, or write your own)
- get the current system time as the current time
- get the current date and use that as the current day of the week
- set the inside temp initially set to the outside temp
- if furnace/ A/C is not on then
- temperature tends to outside temp at a rate of 1degree F per 10 secs
- its not very realistic but good for a simulation
- if furnace/ A/C is on then
- virtual furnace/air conditioner can raise/lower 1degree F per 5 secs towards the target temperature set by user
- its not very realistic but good for a simulation
- the system ahould try to keep indoor temp within +/- 2 degrees of target, i.e. when heater is on it will heat until indoor temp is at least 2 degrees above target, and not come on until the temp is at least 2 degrees below target
- the simulation should update its state once per second, regardless of the speed of the CPU
You may want to look at some real programmable thermostats (including some touch-screen ones) for ideas, but in general they do not have very intuitive user interfaces - so don't pick up bad habits from them. Remember that the user might be seeing/controlling the interface from work or from the beach, so feedback will be important. Keep the concepts from class in mind: making things visible, good mappings, good feedback, designing for error.
I would suggest writing the simulation code first, but I would also think about the kind of controls the user will need to have as hooks into the simulation.
The project will be graded on whether it works, as well as whether it has a reasonably good user interface given what we have talked about in class so far. Both are required to get a C or above. So, for example, writing a fully functional application that gives the user a touch screen keyboard and a command prompt to interact with the system would not get a very good grade.
Turning in Project 1
The project is due at the beginning of class on 2/7/06
Make sure your project works on the linux machines on the 2nd floor of SEL. You can develop this on whatever machine you prefer, but that is the platform that we will be testing on, so be sure that it compiles and runs there.
Be sure to have a README file that explains what your program does, and what it does not do so that while grading we know what to expect. I would suggest using an html-based readme file so you can include images in it.
We will be using the traditional CS turnin system. Projects are due by the beginning of class on the due-date so please be sure you have your program turned in before then. For more information on turnin you can do 'man turnin' on any of the CS machines, but basically if you have a directory called 422 containing your project you would go to the directory level above 422 and type:
turnin -c cs422 -p Project1 422
were the -c tells which course and -p tells which project. Turnin definitely works from bert.cs.uic.edu
Presenting Project 1
An important part of creating user interfaces is getting feedback and using it to improve your design. Given the class size, this can be a bit of a challenge. On 2/7 and 2/9, after the project has been turned in, we will have some group discussions and presentations about the solutions to Project 1.
On Tuesday 2/7 the class will break into 8 groups. Each group will compare notes on their solutions to the problem and come to an agreement on a single interface design. This design does not have to be implemented; it should be presented as a series of screen snapshots/mockups for the major functions.
Before Thursday's class each group should create a web page with the team members' names, the screen snapshots, and a description of how the interface will be used. The address of this page should be emailed to Andy before class begins on Thursday.
On Thursday 2/9 each of the 8 groups will give a 8 minute presentation on the combined interface that their group came up with, using their web page, showing the snapshots and giving a brief description of its functionality.
| Chris Rick Felix Joe |
http://www.rickdogg.com/cs422/cs422.html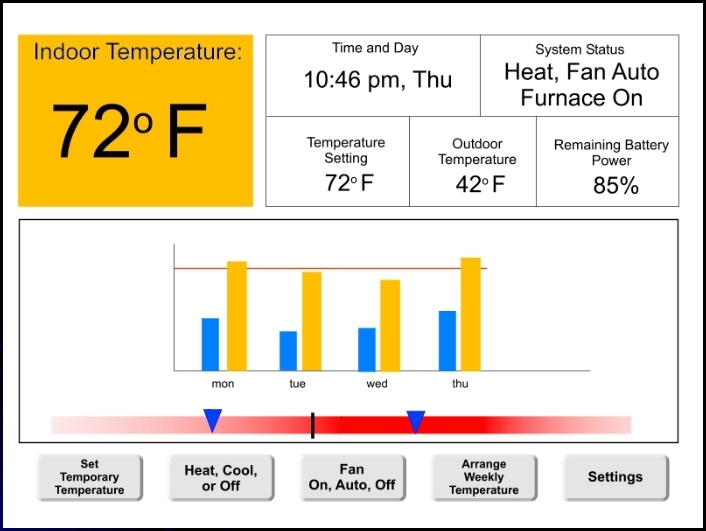 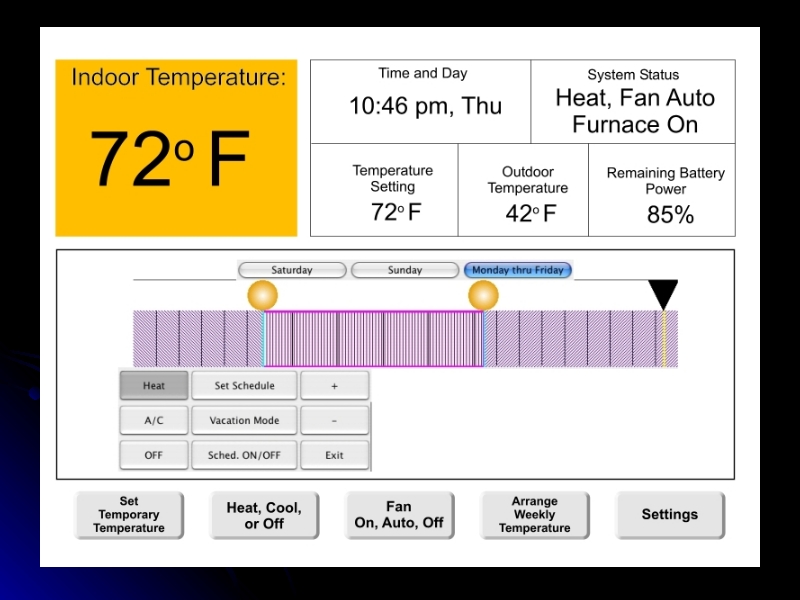 |
| Samuel Mandeep Dubi |
http://www.cs.uic.edu/~spro/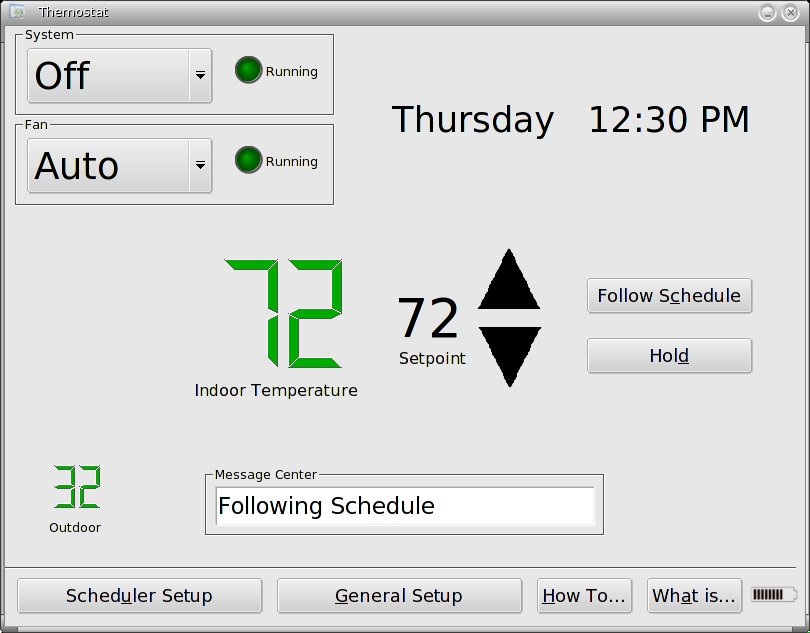 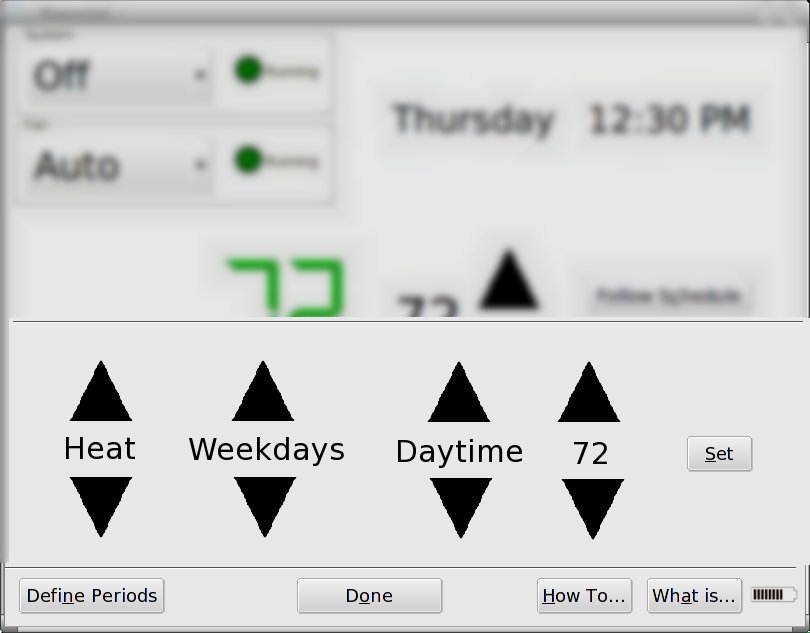 |
| Arunan Marco Vijay |
http://arunan.50webs.com/cs422p1.html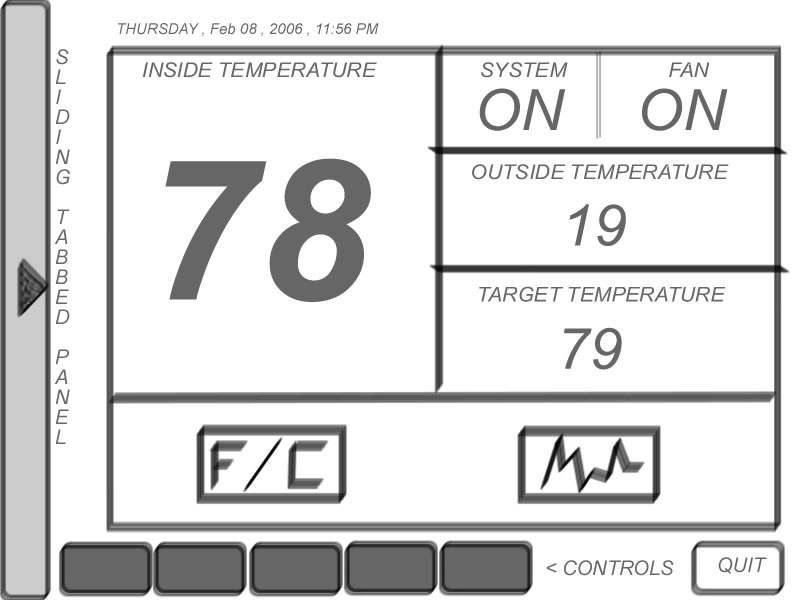 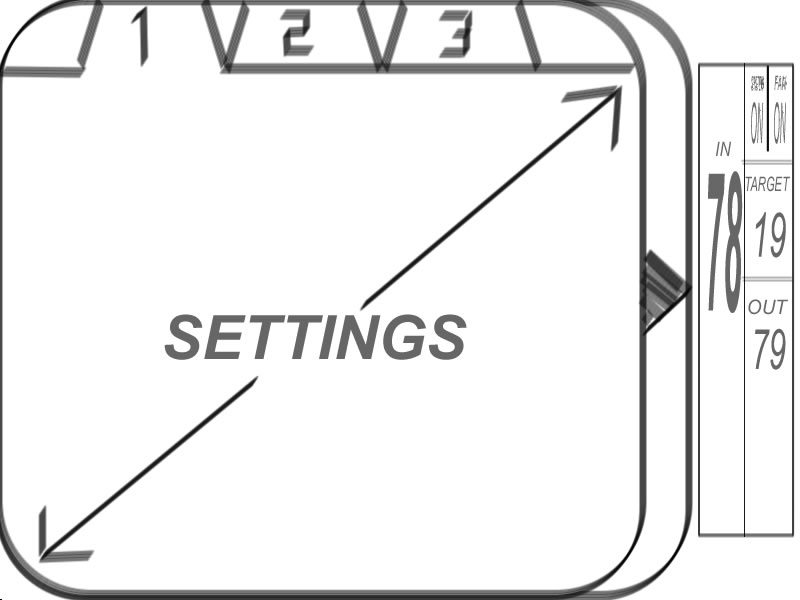 |
| Brian Sana James B. |
http://www.amaze-inc.com/Brian/CS422/GroupProject1/GroupProject1.htm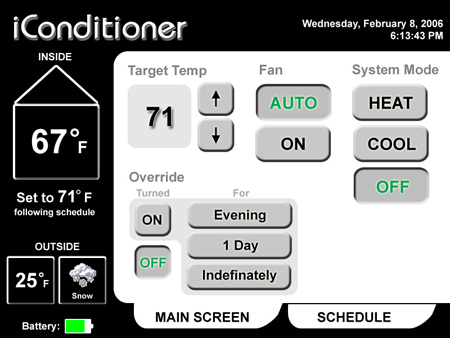 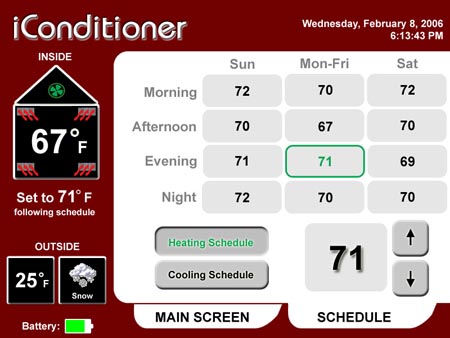 |
| Bindu James J. Manisha |
http://www2.uic.edu/~mrajku2/cs422/proj1.htm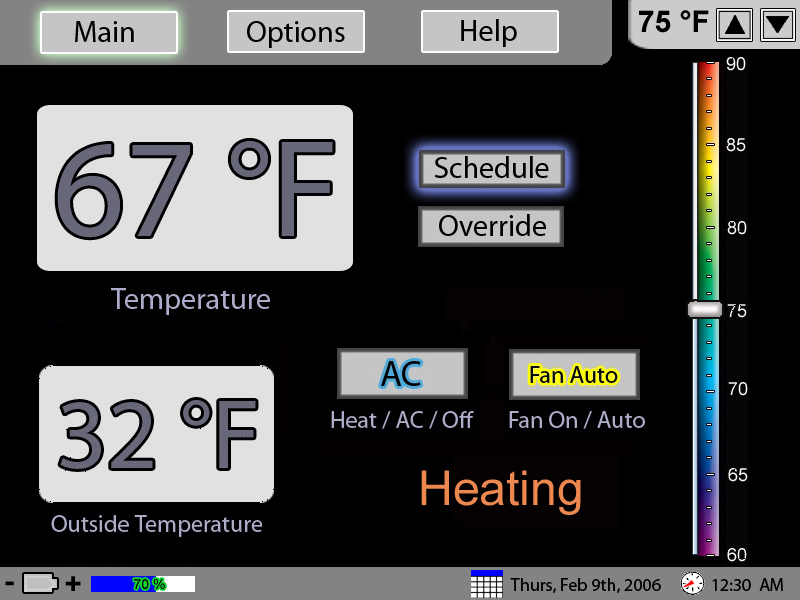 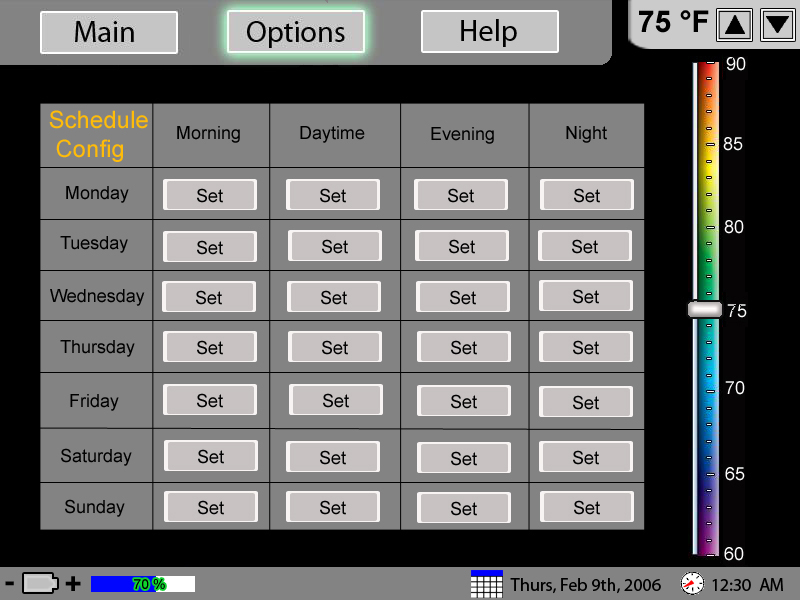 |
| Cristian Benjamin Cara |
http://home.earthlink.net/~dxvii/422/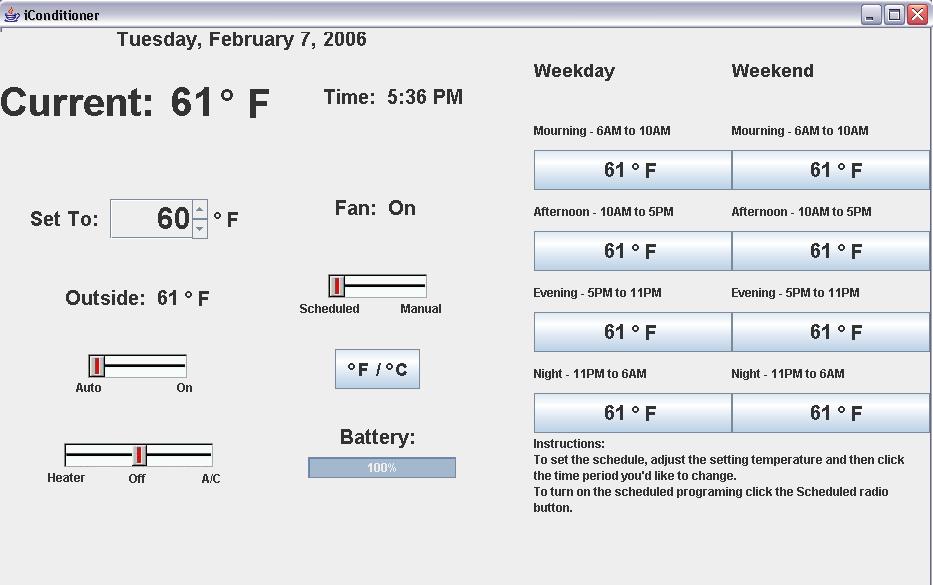 |
| Dat Darshan Greg |
www.sapne.net/datdarshangreg.html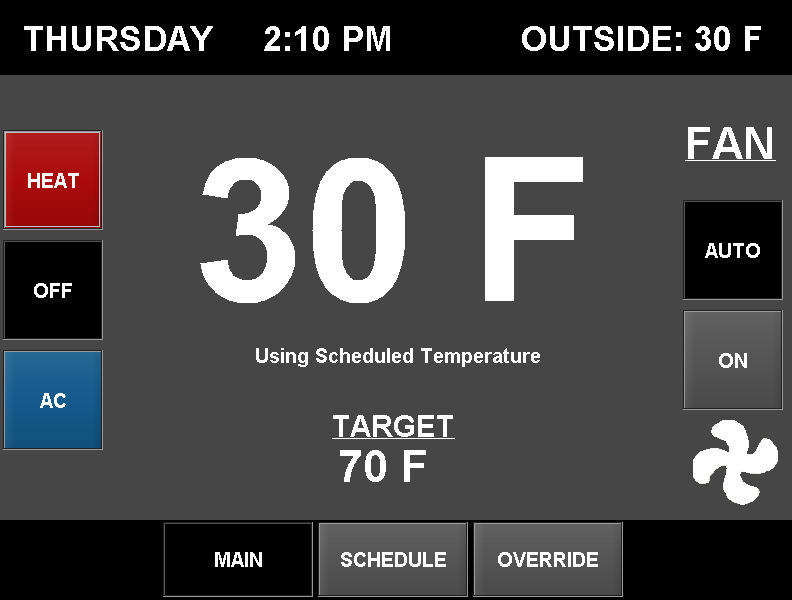 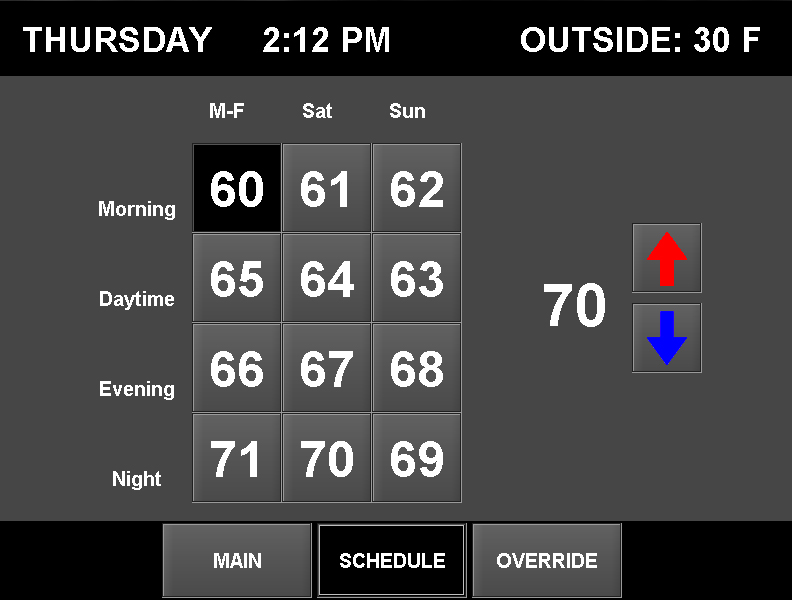 |
| Satya Eric Bharath |
http://www.cs.uic.edu/~eho/cs422/project1/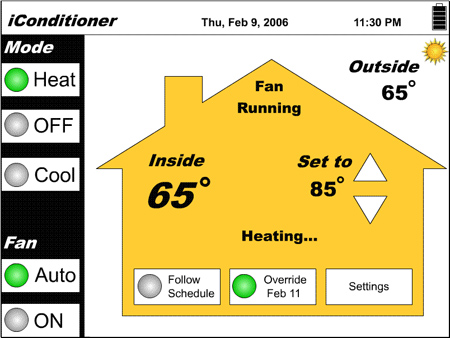  |
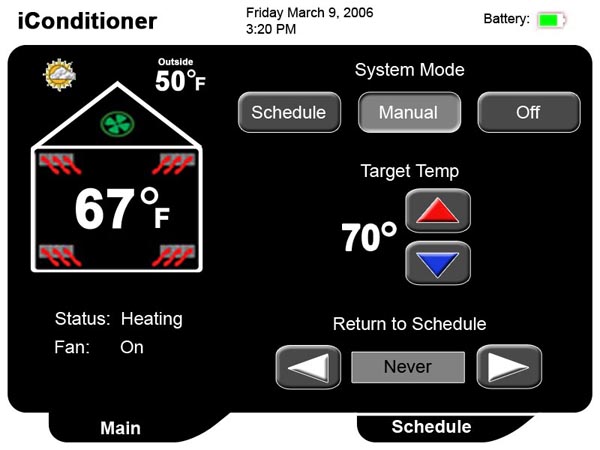
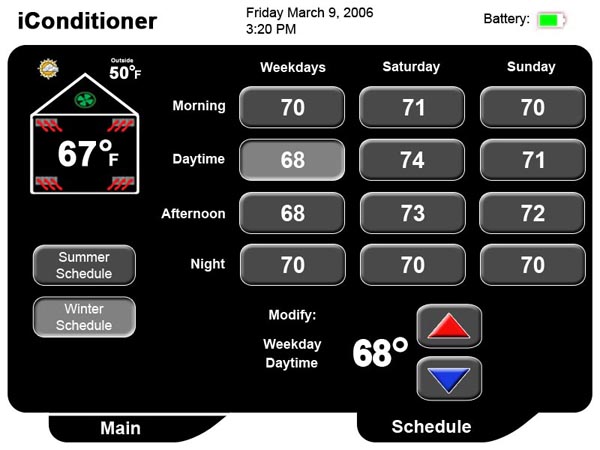
On 3/9 the class broke into new groups and revised the designs, coming up with the following:
| Cristian Chris Ben |
 |
 |
| Brian Marco Manisha |
 |
 |
| Darshan Dubi James Vijay |
 |
 |
| Mandeep Arunan Satya James |
 |
 |
| Sana Joe Eric Dat |
 |
 |
| Bharath Greg Rick Bindu |
 |
 |
and here is a shell script to get the current outside temperature using wget which is available for unix/linux asnd windows ...
#!/bin/sh
# uses wget: http://www.gnu.org/software/wget/wget.html
# cities: http://my.aol.com/weather
# Chicago: USIL0225
city="USIL0225"
wget -q -O toto.txt "http://my.aol.com/weather/index.psp?city=$city"
grep 'Current Temperature' toto.txt | awk '{print $3}'
/bin/rm -f toto.txt
Fall 02 Project 1