Alpha Due Saturday 9/12 at 8:59pm Chicago time Application Due Saturday 9/19 at
8:59pm Chicago time
Documentation Due Monday 9/21 at 8:59pm Chicago time
Project 1 is focused on Augmented Reality. In the
future when everyone is wearing their AR enabled eye-wear most
of the time, what kind of future will it be? We are going to
explore this a bit by looking into some AR widgets to help
people keep track of what's going on around them - think of them
like menu bar widgets in the real world. Back in the olden days
people would buy physical things like desk clocks or calendars,
or mini weather stations and they would scatter these around
their environment. Some were serious, some were tchotchkes or
vacation souvenirs. With the internet and laptops and tablets
and smartphones etc. these things have mostly become obsolete,
but maybe in an augmented world they will make a comeback in
augmented form where you could scatter these little information
displays around your apartment or just toss one out in front of
you as you walk.
here
are a couple simple ones that I created ...
In the future people may be wearing lightweight trendy
glasses, or contact lenses, or ocular implants, but for now we
are going to use a webcam attached to a computer to simulate
this AR eye wear. Make sure you have regular access to a modern
webcam that you can plug into your development computer. There are also several apps out
there that let you use your smartphone as a webcam, so you may
also want to try those (e.g. DroidCam) while developing. We are
also going to use fiducial Markers with Vuforia to locate these
virtual objects in the real world, so we can be compatible with
a wide range of students, but the idea still applies for a
modern phone or headset where it locates a plane and you tap to
position a virtual object.
The
goal here is to give everyone experience in coding an AR
application, to see how these virtual objects interact with the
real world, and how people can interact with them.
This is an individual
project.
Implementing the
Project
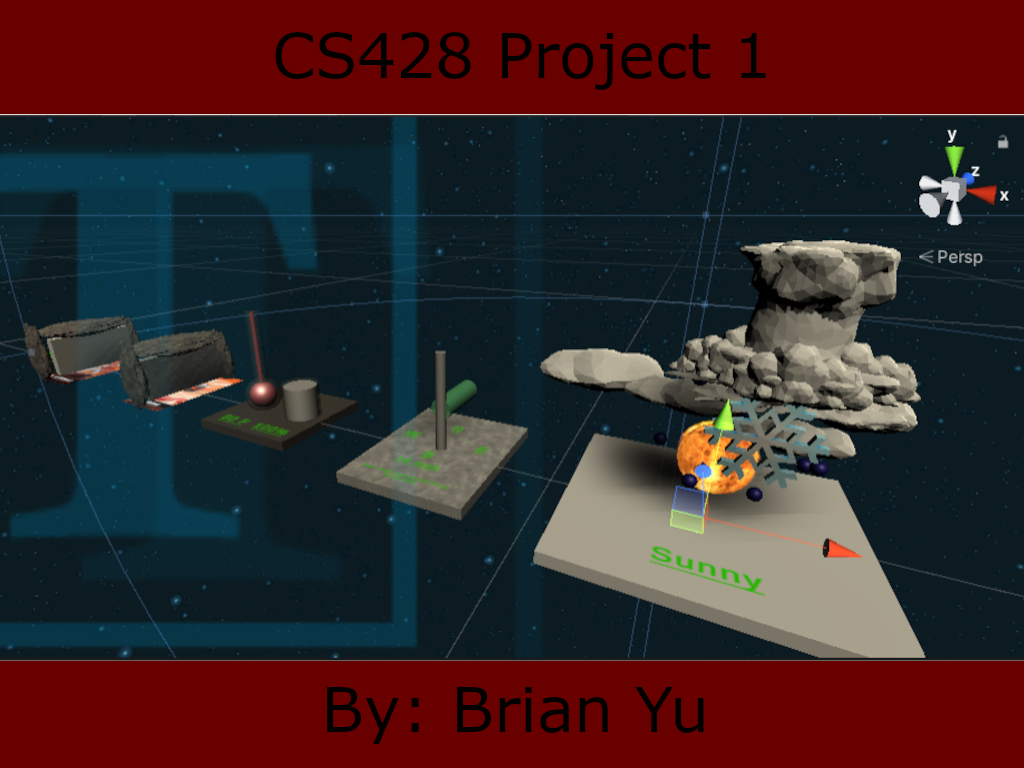
You will be implementing the project in Unity 2019.4.1f1 and Vuforia 9
and making use of the standard Vuforia Mars Image Target
Database. The Week 2 notes show how to set up Unity and
Vuforia and a start on the project.
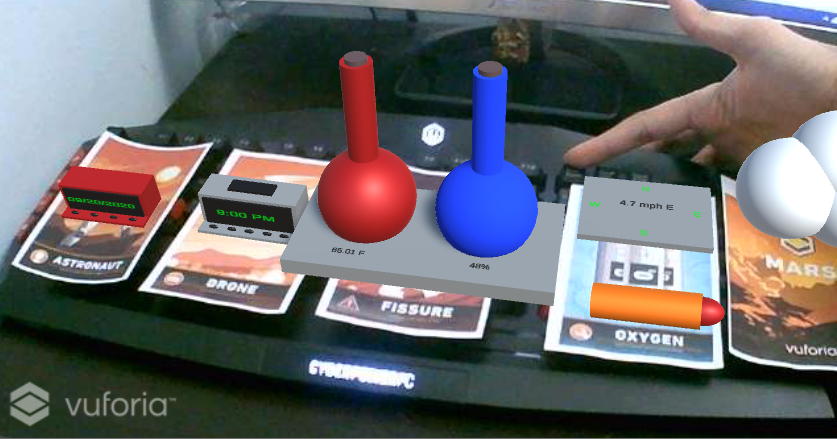
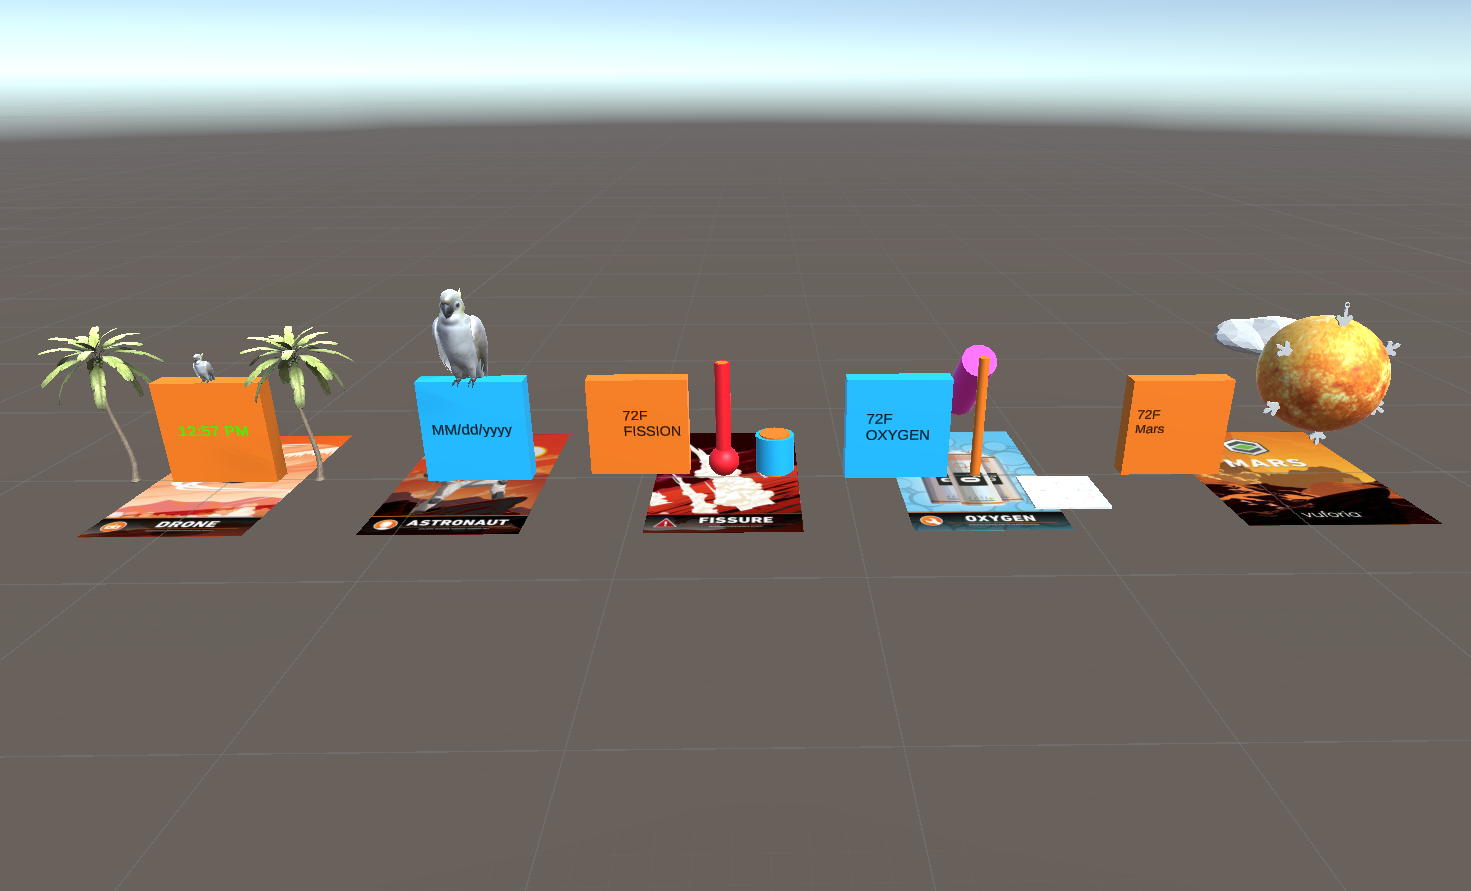
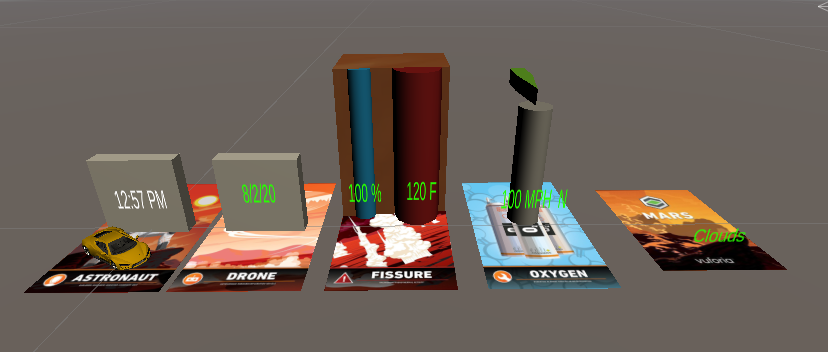
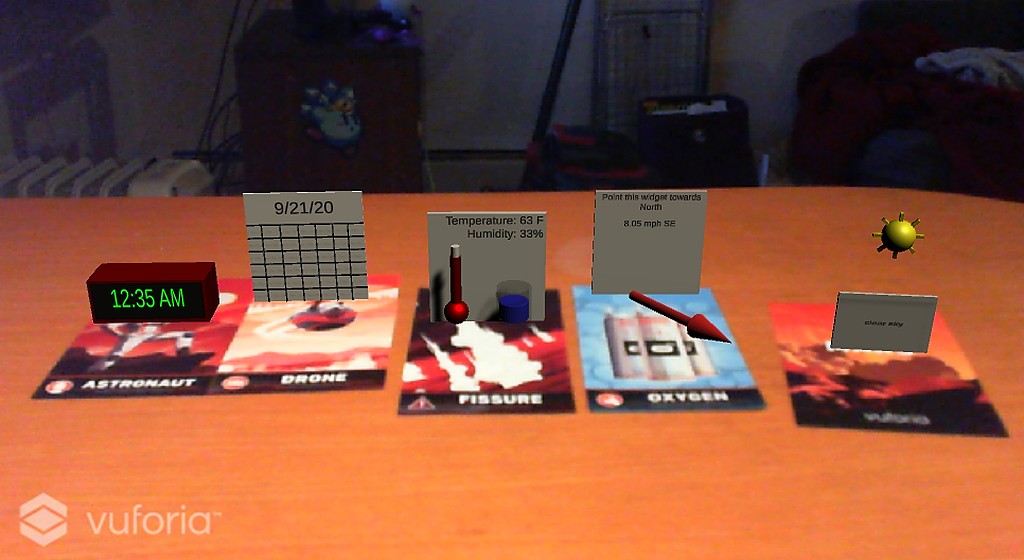
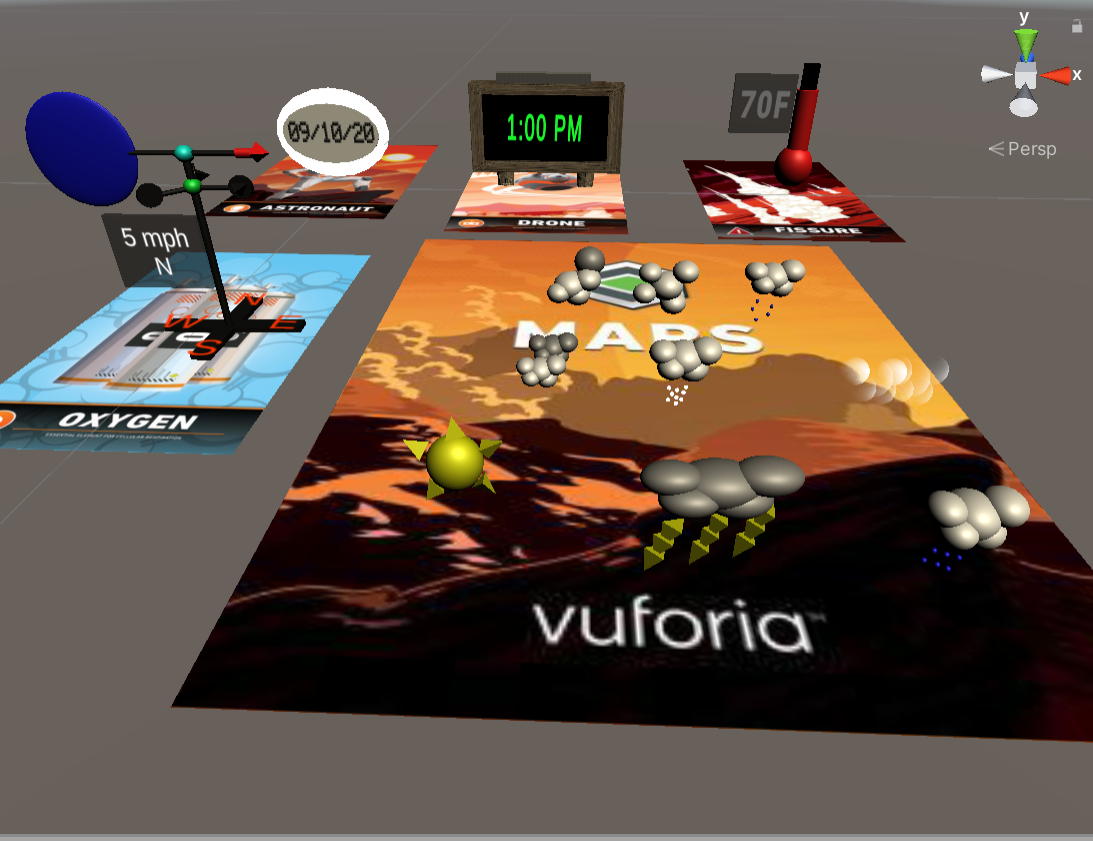
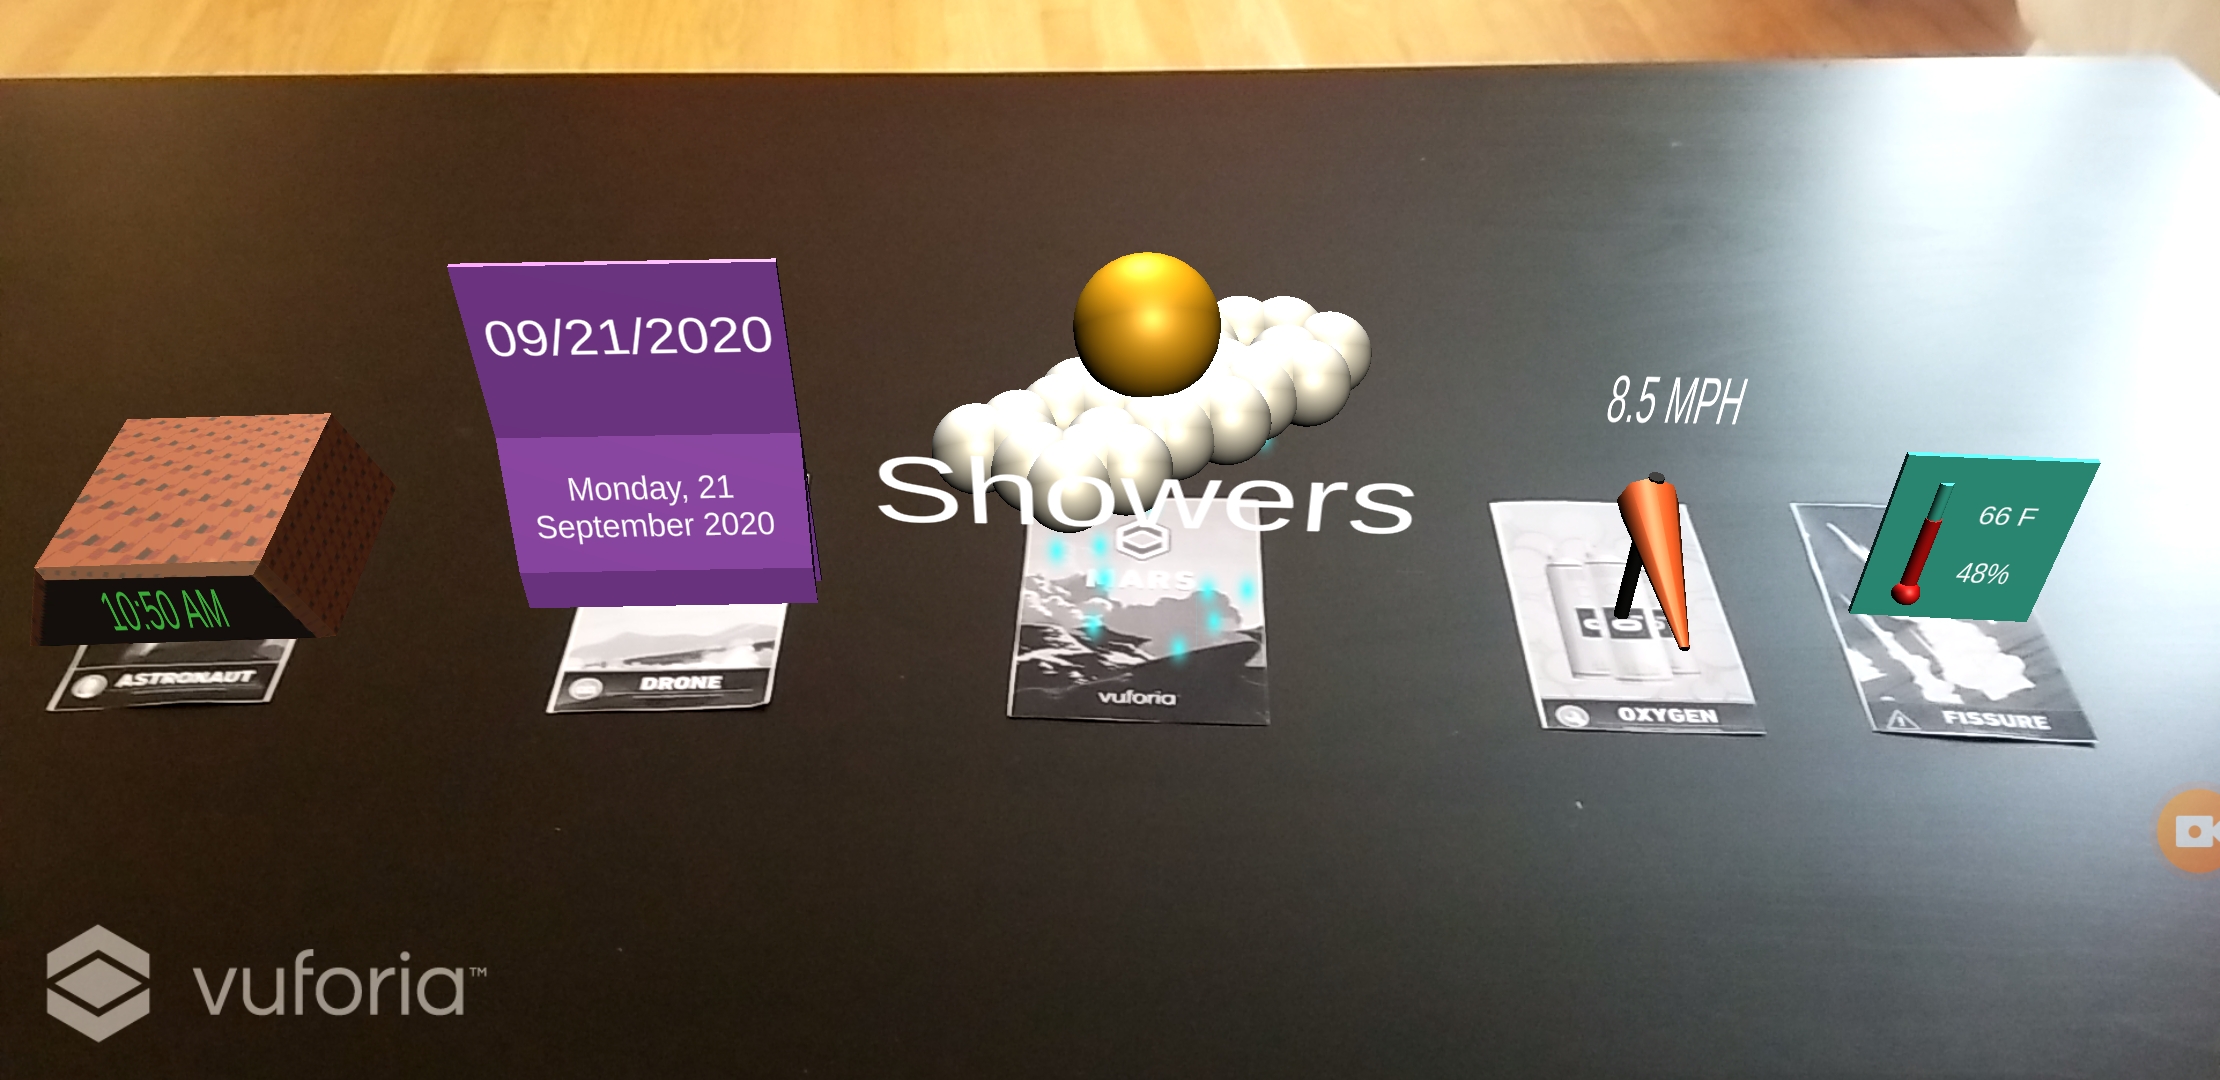
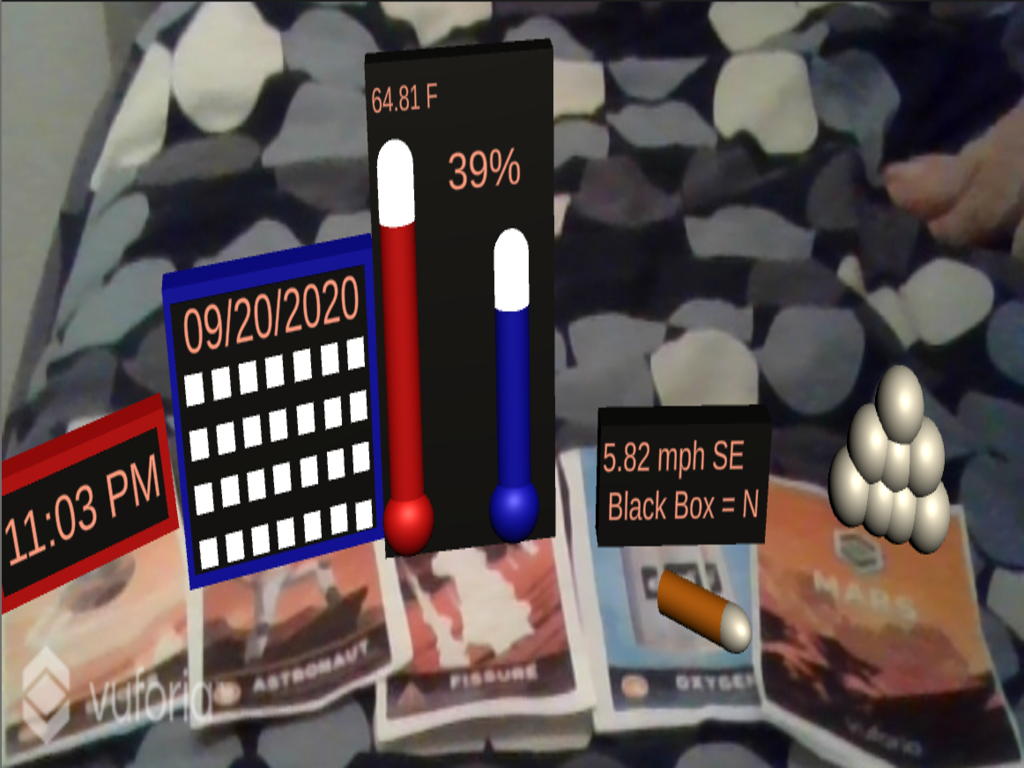
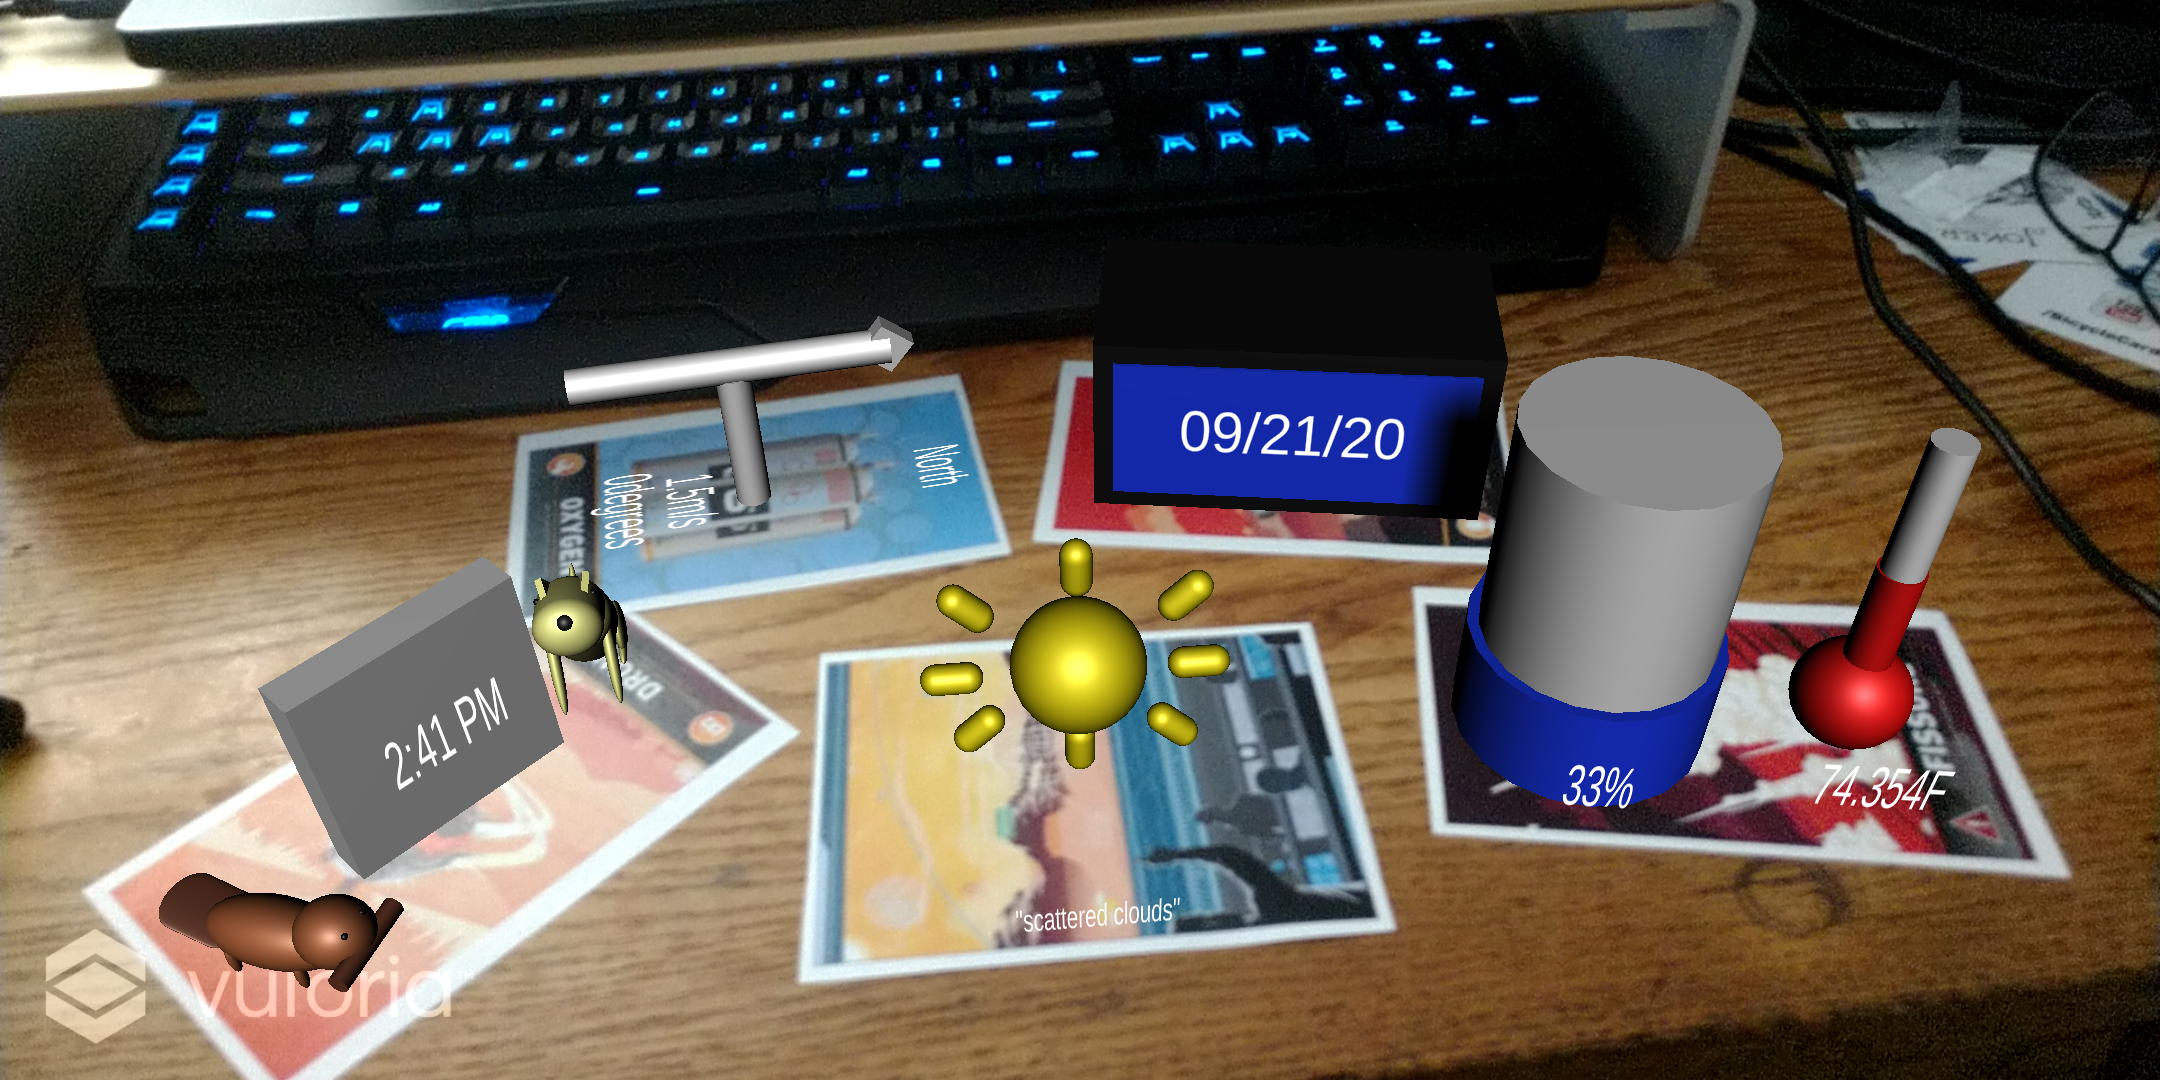
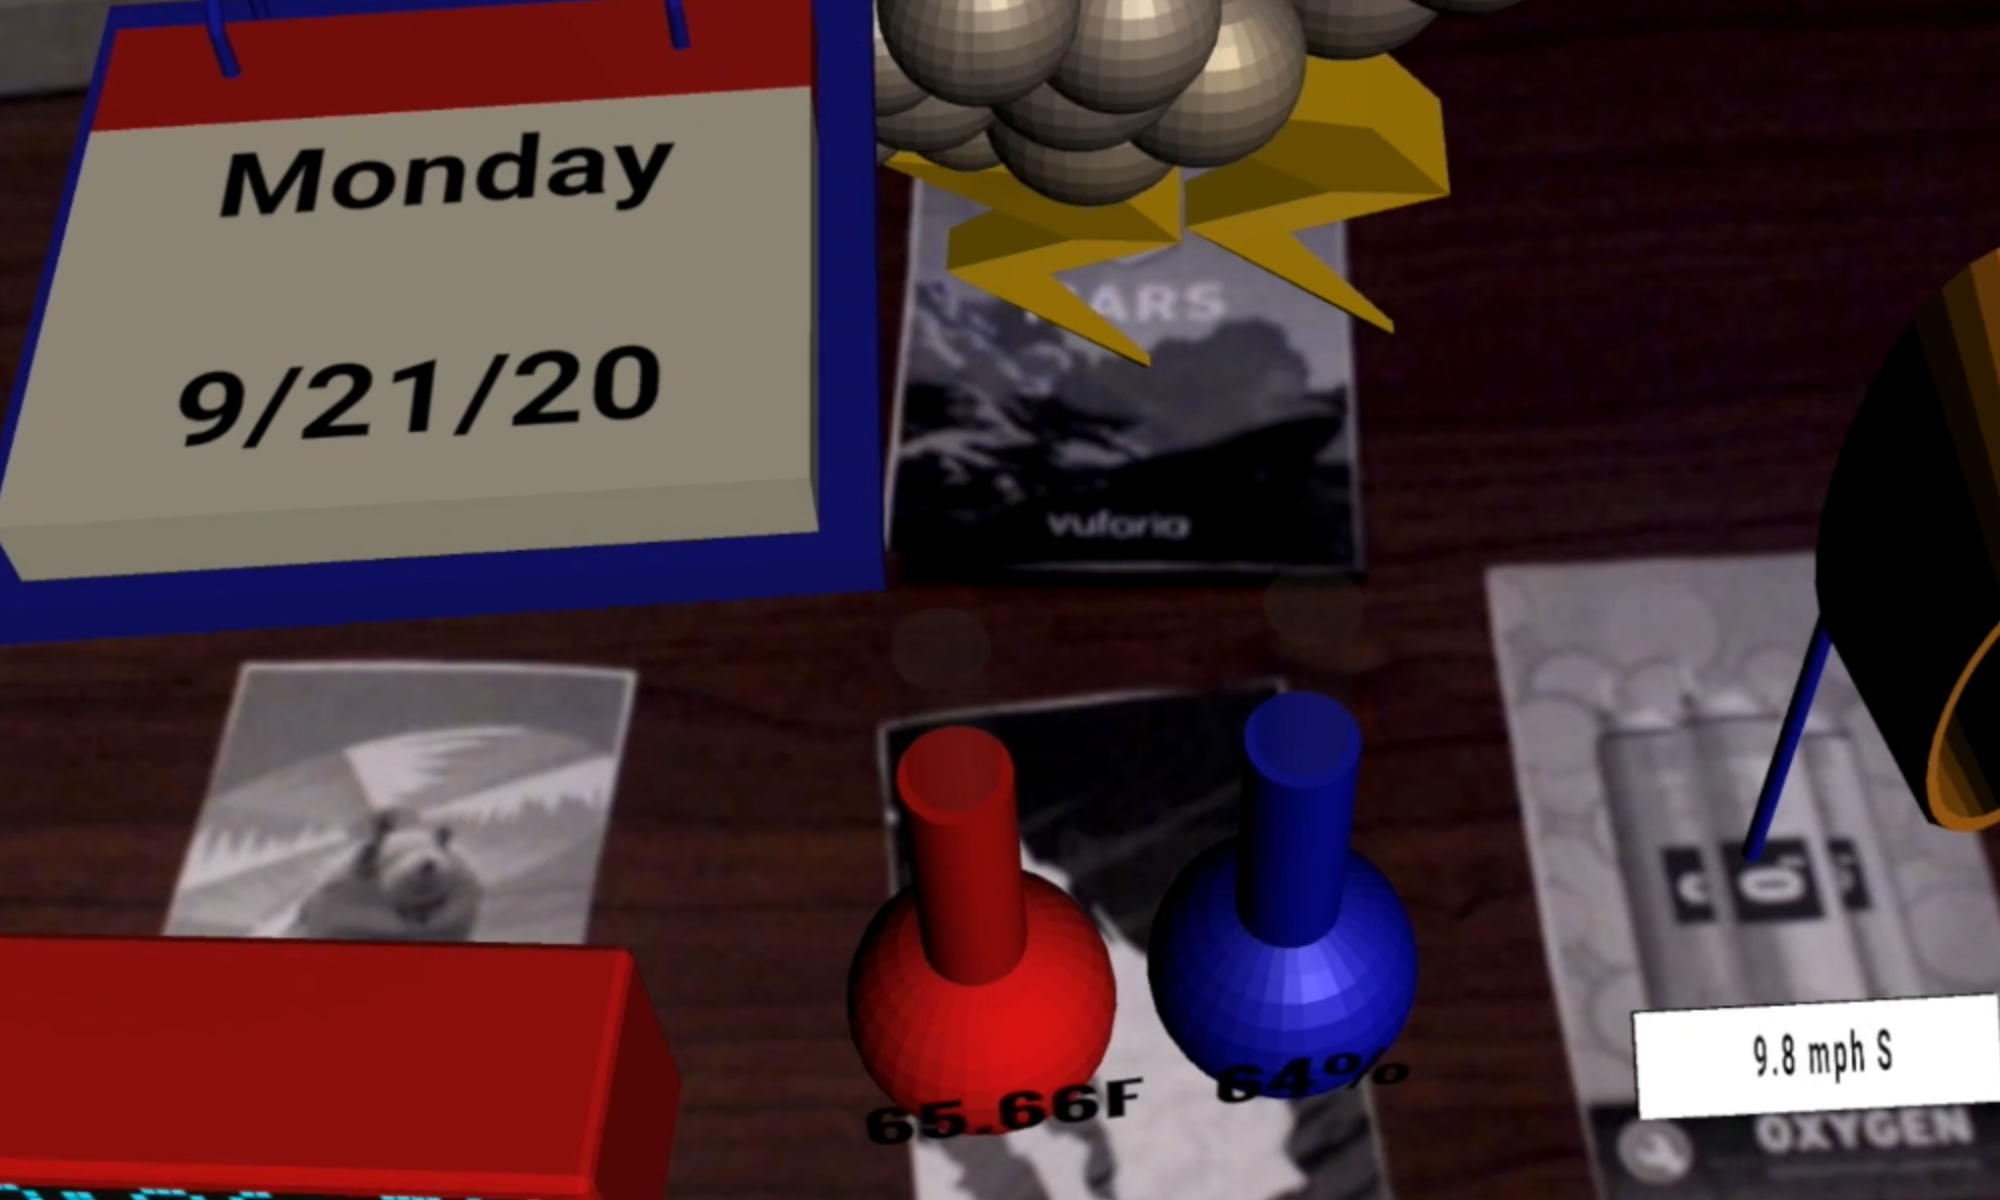
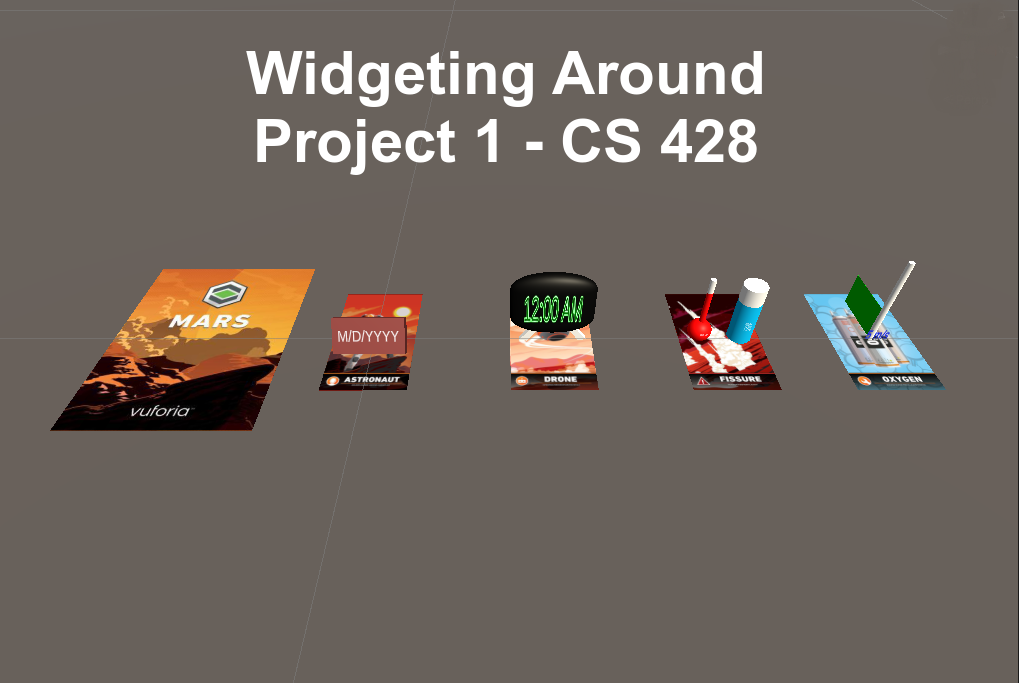
You will need a set of the
main Mars Fiducial Markers (Astronaut, Drone, Fissure, Oxygen)
and Markers for the Front and Back of the Mars Box in an
appropriate size. Copies of these on 2 pages are located at the
links below if you want to print them out onto 8.5 x 11 paper
and then cut them out. You can also print them at UIC with your
student credit.
Each of
the widgets you create should be roughly 4 inches by 4 inches by
4 inches in size (10 cm by 10cm by 10cm) and be designed to be
placed on a desk or table. The widgets should look like what
they represent (clock, calendar, thermometer etc.) with the
level of complexity being similar to what you would see on a
phone / desktop icon, so you should be able to build them out of
simple Unity primitives. You need to make all the models
yourself. You can make them in Unity itself from primitives
(which is what I suggest), or use ProBuilder, or if you are
familiar with Blender or Maya or another more powerful tool that
is fine as well. In the real world you will often be making use
of placeholder models that you create yourself while you wait
for your colleagues to create the more polished versions for the
final product.
40% of the points on
the project are for:
each widget
is controlled by a unique mars database fiducial marker
the user
should be able to place all the unique markers (up to 6) on
your desk at the same time and they all should work
simultaneously
widgets are
of appropriate size and look like what they represent
the user
can move around each of the markers and the widgets should
re-position themselves appropriately
the frame
rate should remain high (> 30 fps)
there
should be good virtual lighting to see the widgets as they are
moved around the table surface
the widgets
should all appear to be solid 3D objects with no strange
graphical glitches
all of the widgets should
update the information that they show every 30 seconds
any text should be
readable and not overflow the object
20% of the points on
the project are for widgets that show current system
information.
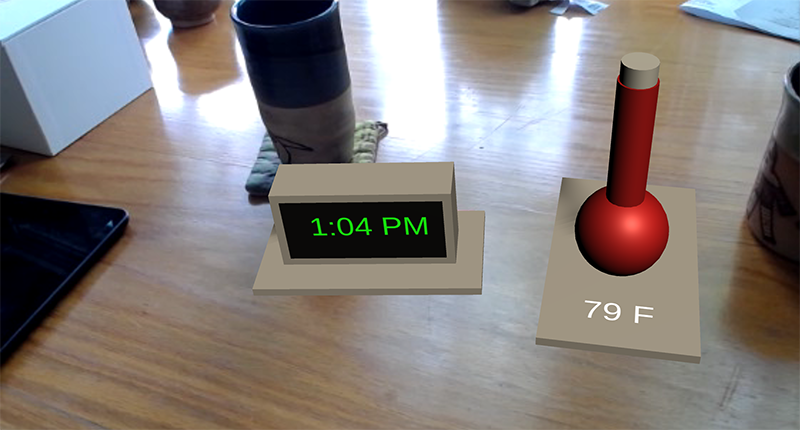
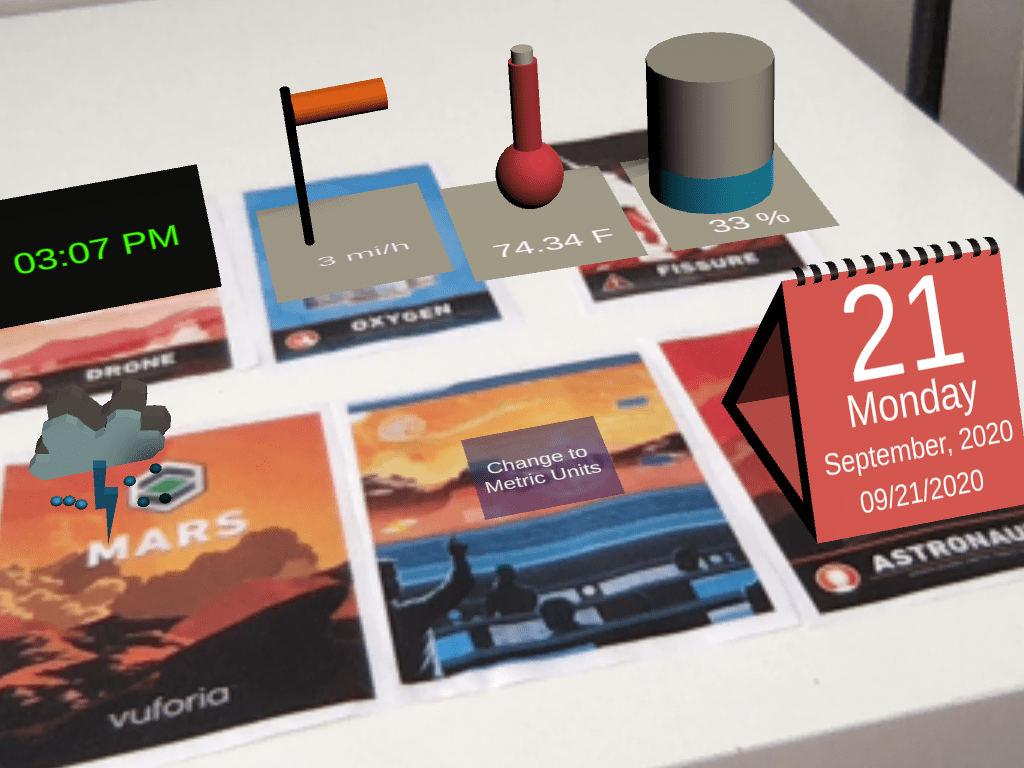
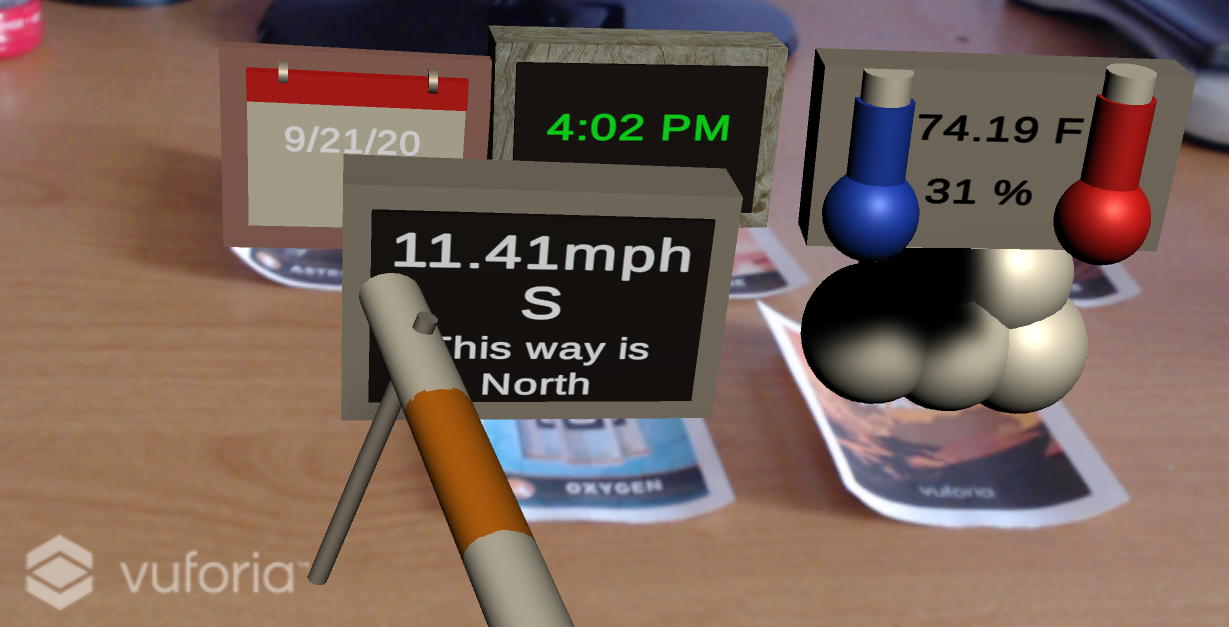
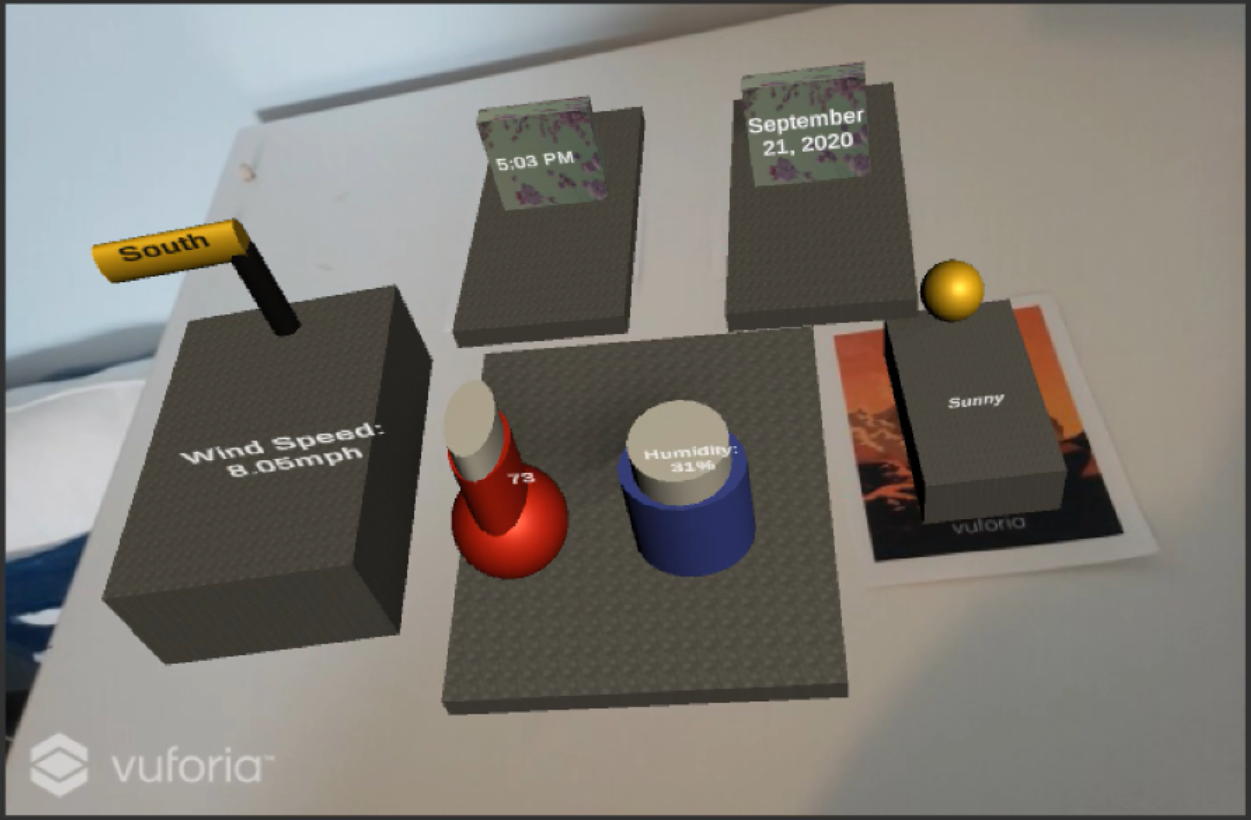
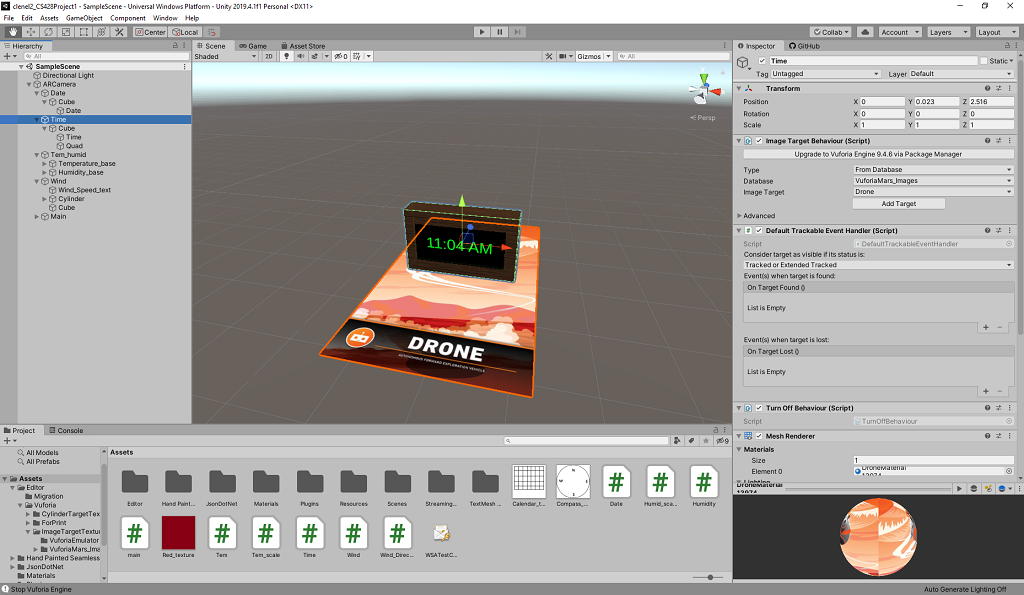
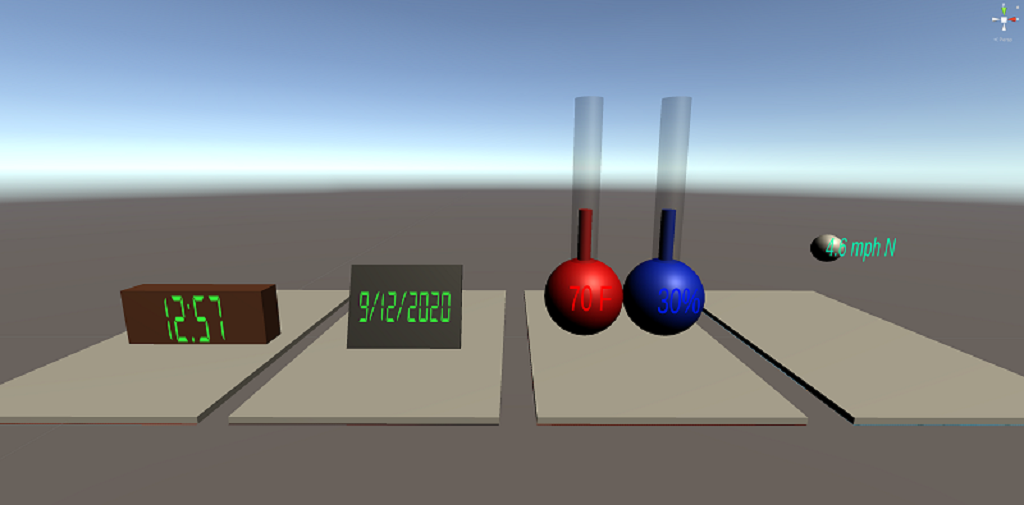
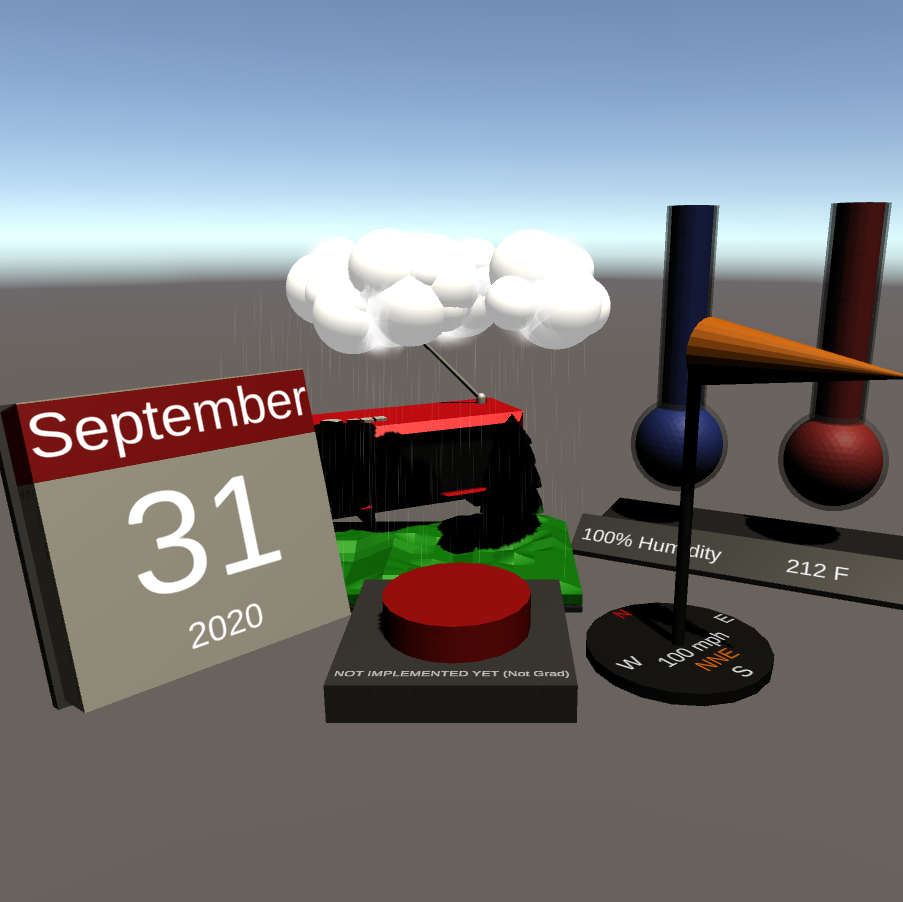
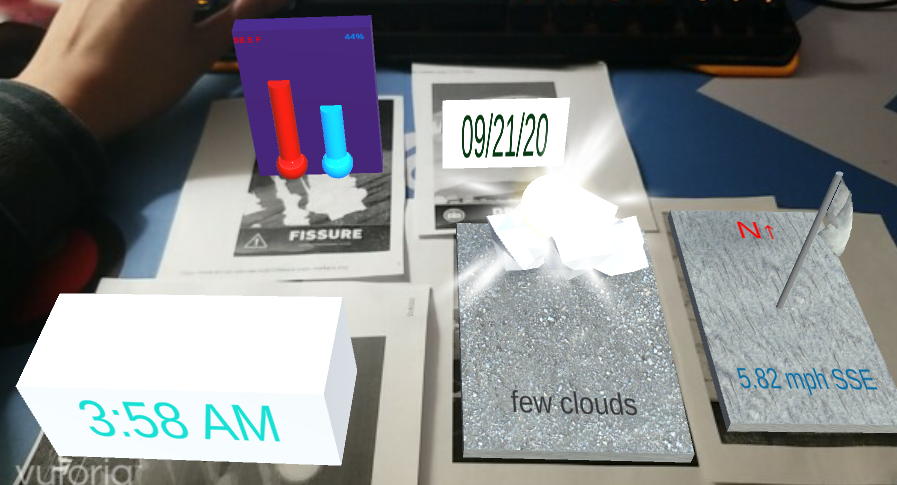
astronaut marker - date widget (shown as text
e.g. 8/2/20)
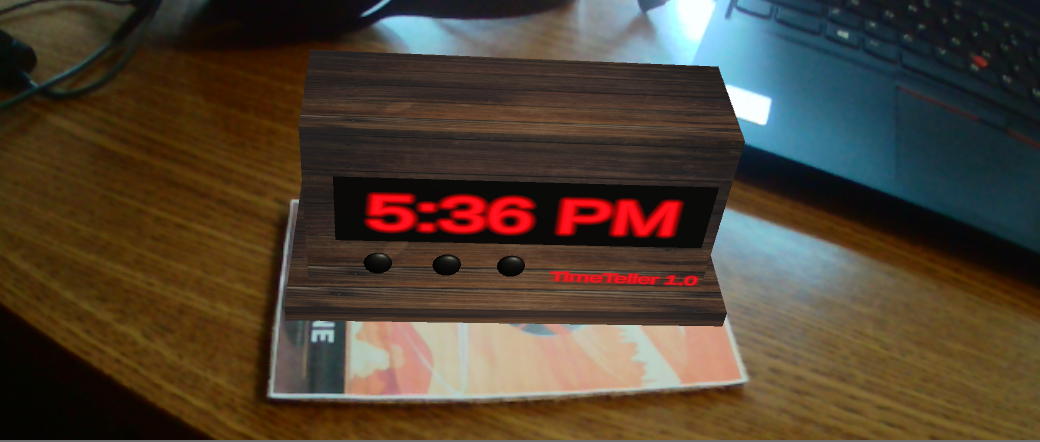
drone marker - time to the minute widget (shown as
text e.g. 12:47 pm)
20% of the points on the project are for widgets
that show current weather data for Chicago from the web.
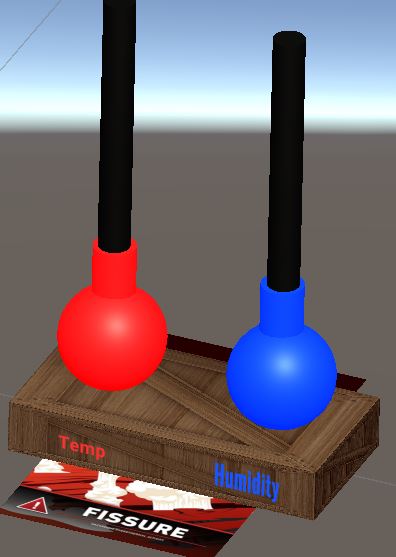
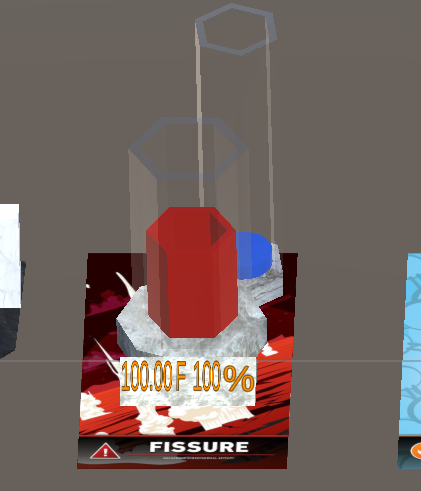
fissure marker - temperature (in
degrees shown as text e.g. 82 F) and humidity (percentage
as text, e.g. 72%) widget. The temperature and humidity
widgets must also reflect the temperature and humidity in
their 3D form (i.e. like mercury rising in a thermometer
or water in a beaker)
oxygen marker - wind speed and
direction (shown as text, e.g. 10 mph N) widget. The wind
speed and direction widgets must also reflect the speed
and direction (i.e. like a wind sock that points in the
appropriate direction and height). Note you will need to
tell the user how to place the widget with regard to
North so it will work.
20% of the points on the project are for widgets that show
current weather data for Chicago from the web in additional ways.
mars marker - current main condition (there
are 9 of them as shown at
https://openweathermap.org/weather-conditions) as a 3D icon
widget. e.g. if its sunny out there should be a 3D sun
floating there. You can re-use the basic sun and cloud
building blocks across different conditions.
each of the 3D icons should have a unique
looping sound effect that is audible, and not annoying, as
you get closer to it. SoundBible and other sites may be
useful for finding sounds that you have the right to use for
free. Be sure to cite the creators and follow their rules
for use. You can also record sounds yourself for this.
at least 3 of the 3D icons need
to be animated (rays from the sun, rain falling, snow
falling, lightning moving, etc.)
for debugging, as well as
grading, you should allow the user to press the arrow keys
to cycle through all of the 9 conditions
Graduate
students in the class also need to be able to adjust the
settings
control
room marker - button for the user to control whether the
data for all the widgets is shown in metric (+ 24 hr +
everyone else's date format) or imperial (+ 12 hour + US
data format)
If the Mars (MarsBox.Front) and Control Room (MarsBox.Back)
are giving you errors (e.g. Could not associate
DataSetTrackableBehaviour 'MarsBox.Front' - no matching
Trackable found in DataSet!) then you can change the Type for
that particular target from 'From Database' to 'From Image',
drag a texture for the mars front or mars back image (see
below) into the Texture 2D box that appears when you switch to
'From Image'.
all
the markers are available in digital form as part of
Vuforia that you loaded into your project in:
Assets/Editor/Vuforia/ImageTargetTextures/VuforiaMars_Image
For
this to work you need to set an App License Key in Window /
Vuforia Configuration, which is why I had people sign up for a
developer account just in case.
Unity's built in
string parsing code should be enough for dealing with the JSON,
but your parsing should be robust and not break (e.g.
temperatures could be 75 or 75.1 or 75.12 so be careful how you
parse the data). Unity's built in text rendering should be
helpful.
Note that there is a very big difference between
getting something working and getting it working well. The first
is not that hard. The second takes much more time. You are
expected to have things working well.
Turning in the
Project You should create a GitHub page
for your project. You can integrate Unity with git so that
it will track all your changes, or just regularly push
files to git. The final project will need to be turned in
via git so we know the timestamp on the files, but it can
be also helpful to have regular commits in case something
goes wrong so you can get partial credit. Initially this repository
should be private to yourself.
There are three
due dates for the project.
The
alpha is due first. At this point you
should have all the basic functionality for the Date
and Time widgets working. Add the TA as a
collaborator to your GitHub repository so she can
have access to your work, and email a link to the
repository to her.You should also create
a short 1 minute YouTube video showing that basic
functionality of your application working, probably
captured through a screen capture program. Send a link to
the video to the TA by the alpha deadline. The alpha helps
ensure you are making progress on the project and aren't
going to have any last minute issues with Git or YouTube
when you do your final turn in.
The unity
source and application is due next. This will
be turned in via GitHub by making your repository public
to at least everyone at UIC. Be
sure to email the location of your repository to Andy and
the TA before the deadline.
The third deadline is
for the documentation.
You should create a public web page with visible to at least
anyone in the course for at least the duration of the course
that describes your work on the project. You can host your
web page at UIC(http://people.uic.edu),
GitHub, or the provider of your choice,
as long as it remains available. You can use any publicly
available templates as long as you cite them, or create your
own.
This page should have several sections including:
introduction and
description of how to use your application and the things
you can do with it
link to your git page
that allows someone to easily download the source code to
your entire project to be built and run. This page should
have instructions on how to build your application and
list the supported version numbers of all relevant
software (Unity, Vuforia. etc.).
listing of the source
for any assets (models, textures, sounds) that you used
that you didn't create yourself
link to a 5 minute
video showing off your project (see below)
at least a one
page / 500 word discussion on whether you think
these kinds of widgets would be popular in several
years when people are regularly wearing AR glasses,
and if so which ones (not necessarily the ones you
implemented) you would like to have and where you
would use them. If you do not think they are useful
then why not?
all of which should haveplentyof
screenshots with meaningful captions. Web pages like this can
be very helpful later on in helping you build up a portfolio
of your work when you start looking for a job, so please put
some effort into it.
You should also create a 5 minute YouTube video showing the
use of your application including narration with decent audio
quality. That video should be in a very obvious place on your
main project web page. The easiest way to do this is to
capture video from your webcam while interacting with your AR
widgets. You can try to narrate while interacting but you will
most likely find its useful to do some editing afterwards to
tighten the video up. This video is helpful for us to know
which parts of your project work, and may be useful in the
future when you are tying to get a job and want to show off
some of the projects you worked on.
Once you have your webpage done, send the URL to
Andy and the TA before the deadline. We will respond to this
email as your 'receipt'.
We will be linking your web page to the project page
below so please send Andy a nice representative jpg or png
image/photo of your application for the web. This should be
named p1.<your_last_name>.jpg or
p1.<your_last_name>.png and be roughly 1024 x 768 in
size. If you take a photo with your phone please make it
horizontal.
Presenting the Project
An important part of creating
AR applications is getting feedback and using it to improve your
design, and learning to give quality feedback to others.
Normally we would be spending time in class for each person to
show off their work and get feedback. This term we will be doing
this asynchronously. See the course notes for week 5 and 6 for
more details.