Week 1 we
showed off a bunch of different sample VR / AR worlds, so this
week we are going to talk about how to build them, in particular
with respect to Project 1.
The three
projects in the class we will be using Unity3D so people can
share experiences and issues.
Unity3D runs
on windows and OS-X so you can do much of your development on a
laptop and then move over to a machine connected to a VR / AR
display for testing. I highly suggest that you
test on the actual hardware regularly so you
don't go too far down a development path that wont work for the
final deployment. In the lab, there will be multiple Quests and
Quest 2's available in the classroom.
To get
started go to https://unity.com/ and click the
big blue Get Started button at the top, then click on the
Individual Tab, Under Personal click another big blue Get
Started button. Then you can choose to download Unity Hub for
your preferred platform (Windows or Mac. Linux is also possible
but is a more hands-on install process.
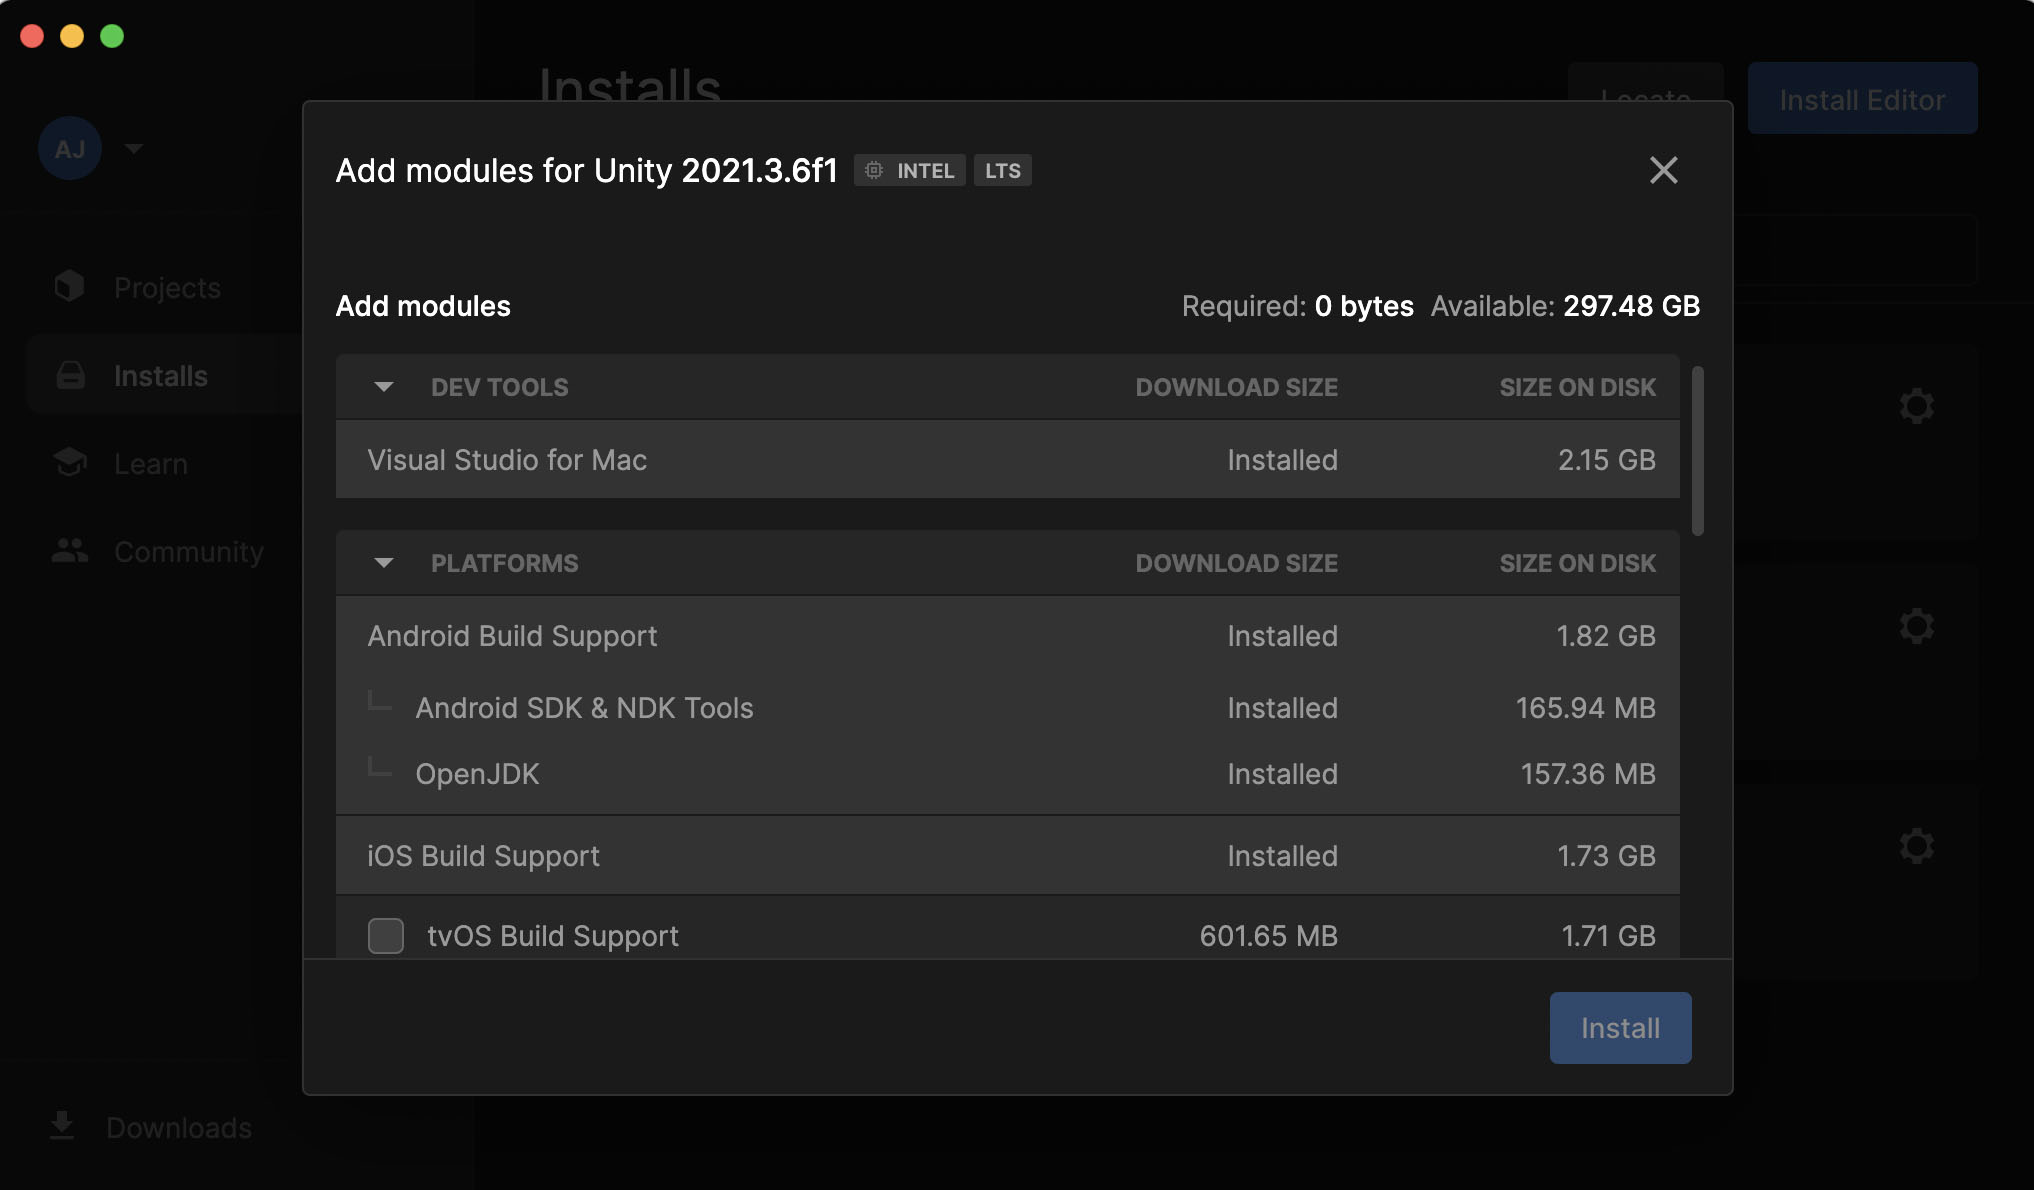
Install Unity
Hub. Unity Hub gives
you a central place for your various projects (click on Projects
in the left tab pane), and a place for various installs of Unity
(click on Installs in the left tab pane). Once you have the Hub
running you should click on Installs and then Install Editor to
add a new Unity version. The version we want is not one of the
ones in the short menu so click the Archive button near the top
and then the Long-Term Support text to visit the download
archive, click on LTS Release 2021.3.6f1 and then Unity
Hub to let Unity Hub install that version. Note that there is a
new release of Unity roughly every week, and things can quickly
get unmanageable if everyone is using a different release, so
that is why we are standardizing on one version. Unity will take
about 10-11 gig of space.
You will need to be admin / root to install
Unity in the default location, otherwise Unity Hub will
download the files and then fail (mostly silently) on the
install. To get around this you can click on the gear on the
left pane of Unity Hub, click on Installs, and then change the
Installs Location to a place you do have write access to, say
somewhere in your home directory.
You should have it install:
If you forget to install
something now you can always come back later and use the gear
menu to add or remove modules. You can have multiple versions of
Unity installed at the same time accessible through the Unity
Hub in case you need to have different versions running for
different classes or projects.
With Unity
you will be using a combination of an IDE and writing C# code,
so its a good idea to go through the introductory tutorials if
you haven't used Unity before (e.g. in the CS Video Game
course).
The tutorials
at https://unity.com/learn are a good
place to start learning the Unity3D IDE, and there are quite a
few intro tutorials on YouTube such as https://www.youtube.com/watch?v=gEARZ20M-Zc
Unity
can launch a variety of external editors for working with code -
a good multi-platform one is Microsoft's Visual Studio Code - https://code.visualstudio.com/ Unity's preferences allow you to
set an external editor under External Tools.
Note
that VR and AR libraries are also changing regularly and often
rapidly, so when you look for documentation online please be
sure to check the version number.
Personally,
when creating applications with Unity I like to have a fair
number of separate accessible backups. Time Machine on the mac
is really nice for this, and there are similar programs on
Windows and Linux, but if I am being really careful, once I get
a part of my project working, I quit Unity and make a backup
copy of the entire project directory before moving on to the
next part. Its really easy to make one simple change somewhere
that breaks the entire project and its often much faster to just
go back to a prior version of the code than to hunt down the
problem. I make these kinds of regular backups every 30 minutes,
to an hour or two once I have gotten to the point that I have
something worth keeping. I highly suggest investing in a big USB
drive and just keeping lots of backups until you are sure you
don't need them.
Augmented
Reality / Vuforia (which we will use in Project 1)
There are
currently a variety of AR platforms under development. Apple has
ARKit https://developer.apple.com/augmented-reality/,
Google has ARCore https://developers.google.com/ar/.
There is the venerable ARToolkit http://www.hitl.washington.edu/artoolkit/.
Unity is trying to unify them with ARfoundation but
cross-platform development is still tricky, so we are going to
stick with Vuforia for the class, which is less powerful than
the most modern libraries but works on a wider variety of
hardware and is easier to develop cross-platform apps.
You should:
Create a
new 3D Project in Unity Hub using the Projects tab on the
left, and then New Project of type 3D core. Please name you
Project 428.P1.your name so everyone has a unique project name
and its easy to find yours as opposed to having 35 variations
on 'Project 1' or 'my project'.
You can
download Vuforia 10.9 from https://developer.vuforia.com/downloads/sdk
... if necessary use the dropdown menu to choose 10.9. There
may be a newer version available, but we will stick with the
more stable version for the class. Then click on 'Add Vuforia
Engine to a Unity Project or upgrade to the latest version'.
Vuforia should download as
add-vuforia-package-10-9-3.unitypackage, though sometimes I
have had to go through this process twice to get it to
download.
Add Vuforia
Engine version 10.9 to a Unity Project by following the
instructions at - https://library.vuforia.com/getting-started/getting-started-vuforia-engine-unity
Click
Import and give it permission to update.
On the mac
you may get a warning that it cant do the install if you don't
have the Xcode command line tools installed. One way to do the
Xcode installation is to open up a terminal window and type
xcode-select --install
In the
Unity Scene Hierarchy delete the Main Camera since Vuforia
will add its own camera.
Under the
GameObject menu you should now see Vuforia Engine and from
there you can pick an AR Camera to add to the scene, and an
Image Target.
Clicking on
the ImageTarget in the hierarchy you can look over in the
Inspector and look under the Image Target Behaviour (Script) and
set the Type from 'From Image' to 'From Database' and allow it
to import the default database. and it should automatically pick
the astronaut target. If not pick the VuforiaMars_Images
Database and the Astronaut Image Target. If you zoom in on the
scene you should see the astronaut image target.
You can use GameObject to create a new 3D Object / cube (which will initially be 1m by 1m by 1m) so scale it to 0.02 by 0.02 by 0.02 and move it a little above the astronaut image.
In the
hierarchy make the Cube a child of the ImageTarget so the cube
will only appear when the camera sees that specific image
target.
Under Window
/ Vuforia Configuration check the Play Mode Camera Device. Make
sure it is the correct one for the computer you are using.
Having a dedicated webcam can help in development as its easier
to reorient a hand-held webcam than the one at the top of your
computer screen.
Have a copy
of the astronaut image target on hand, either a printout or
bring it up on a pad or phone. There is a copy of the image
available here.
Click Play
and point your camera at the astronaut image and you should see
a little virtual cube floating on top of the actual marker.
Hit the Play
button again to stop the app from running. You can make
changes while the app is running, which can help in testing,
but those changes are not permanent, so you want to remember
to stop the app from running before you do major
development.
We are now
going to turn this into an AR widget to show the current time
but lets do some organization first. Click on the ImageTarget in
the Hierarchy and rename it Clock. From GameObject Create Empty
to create an empty GameObject and rename it ClockWidget. Make
ClockWidget a child of Clock. Click on Cube from before and make
the box bigger (say 0.1, 0.03. 0.01) and rename Cube to Clock
Front Panel and make it a child of ClockWidget.
From GameObject / 3D Object, create a new Text - TextMeshPro and call it TimerText. If you haven't used TMP before you will get a prompt to Import TMP Essentials. Let Unity do that. Make TimerText a child of ClockWidget as well. At this point you should have:
SampleScene
Directional Light
AR Camera
Clock
ClockWidget
Clock
Front Panel
TimerText
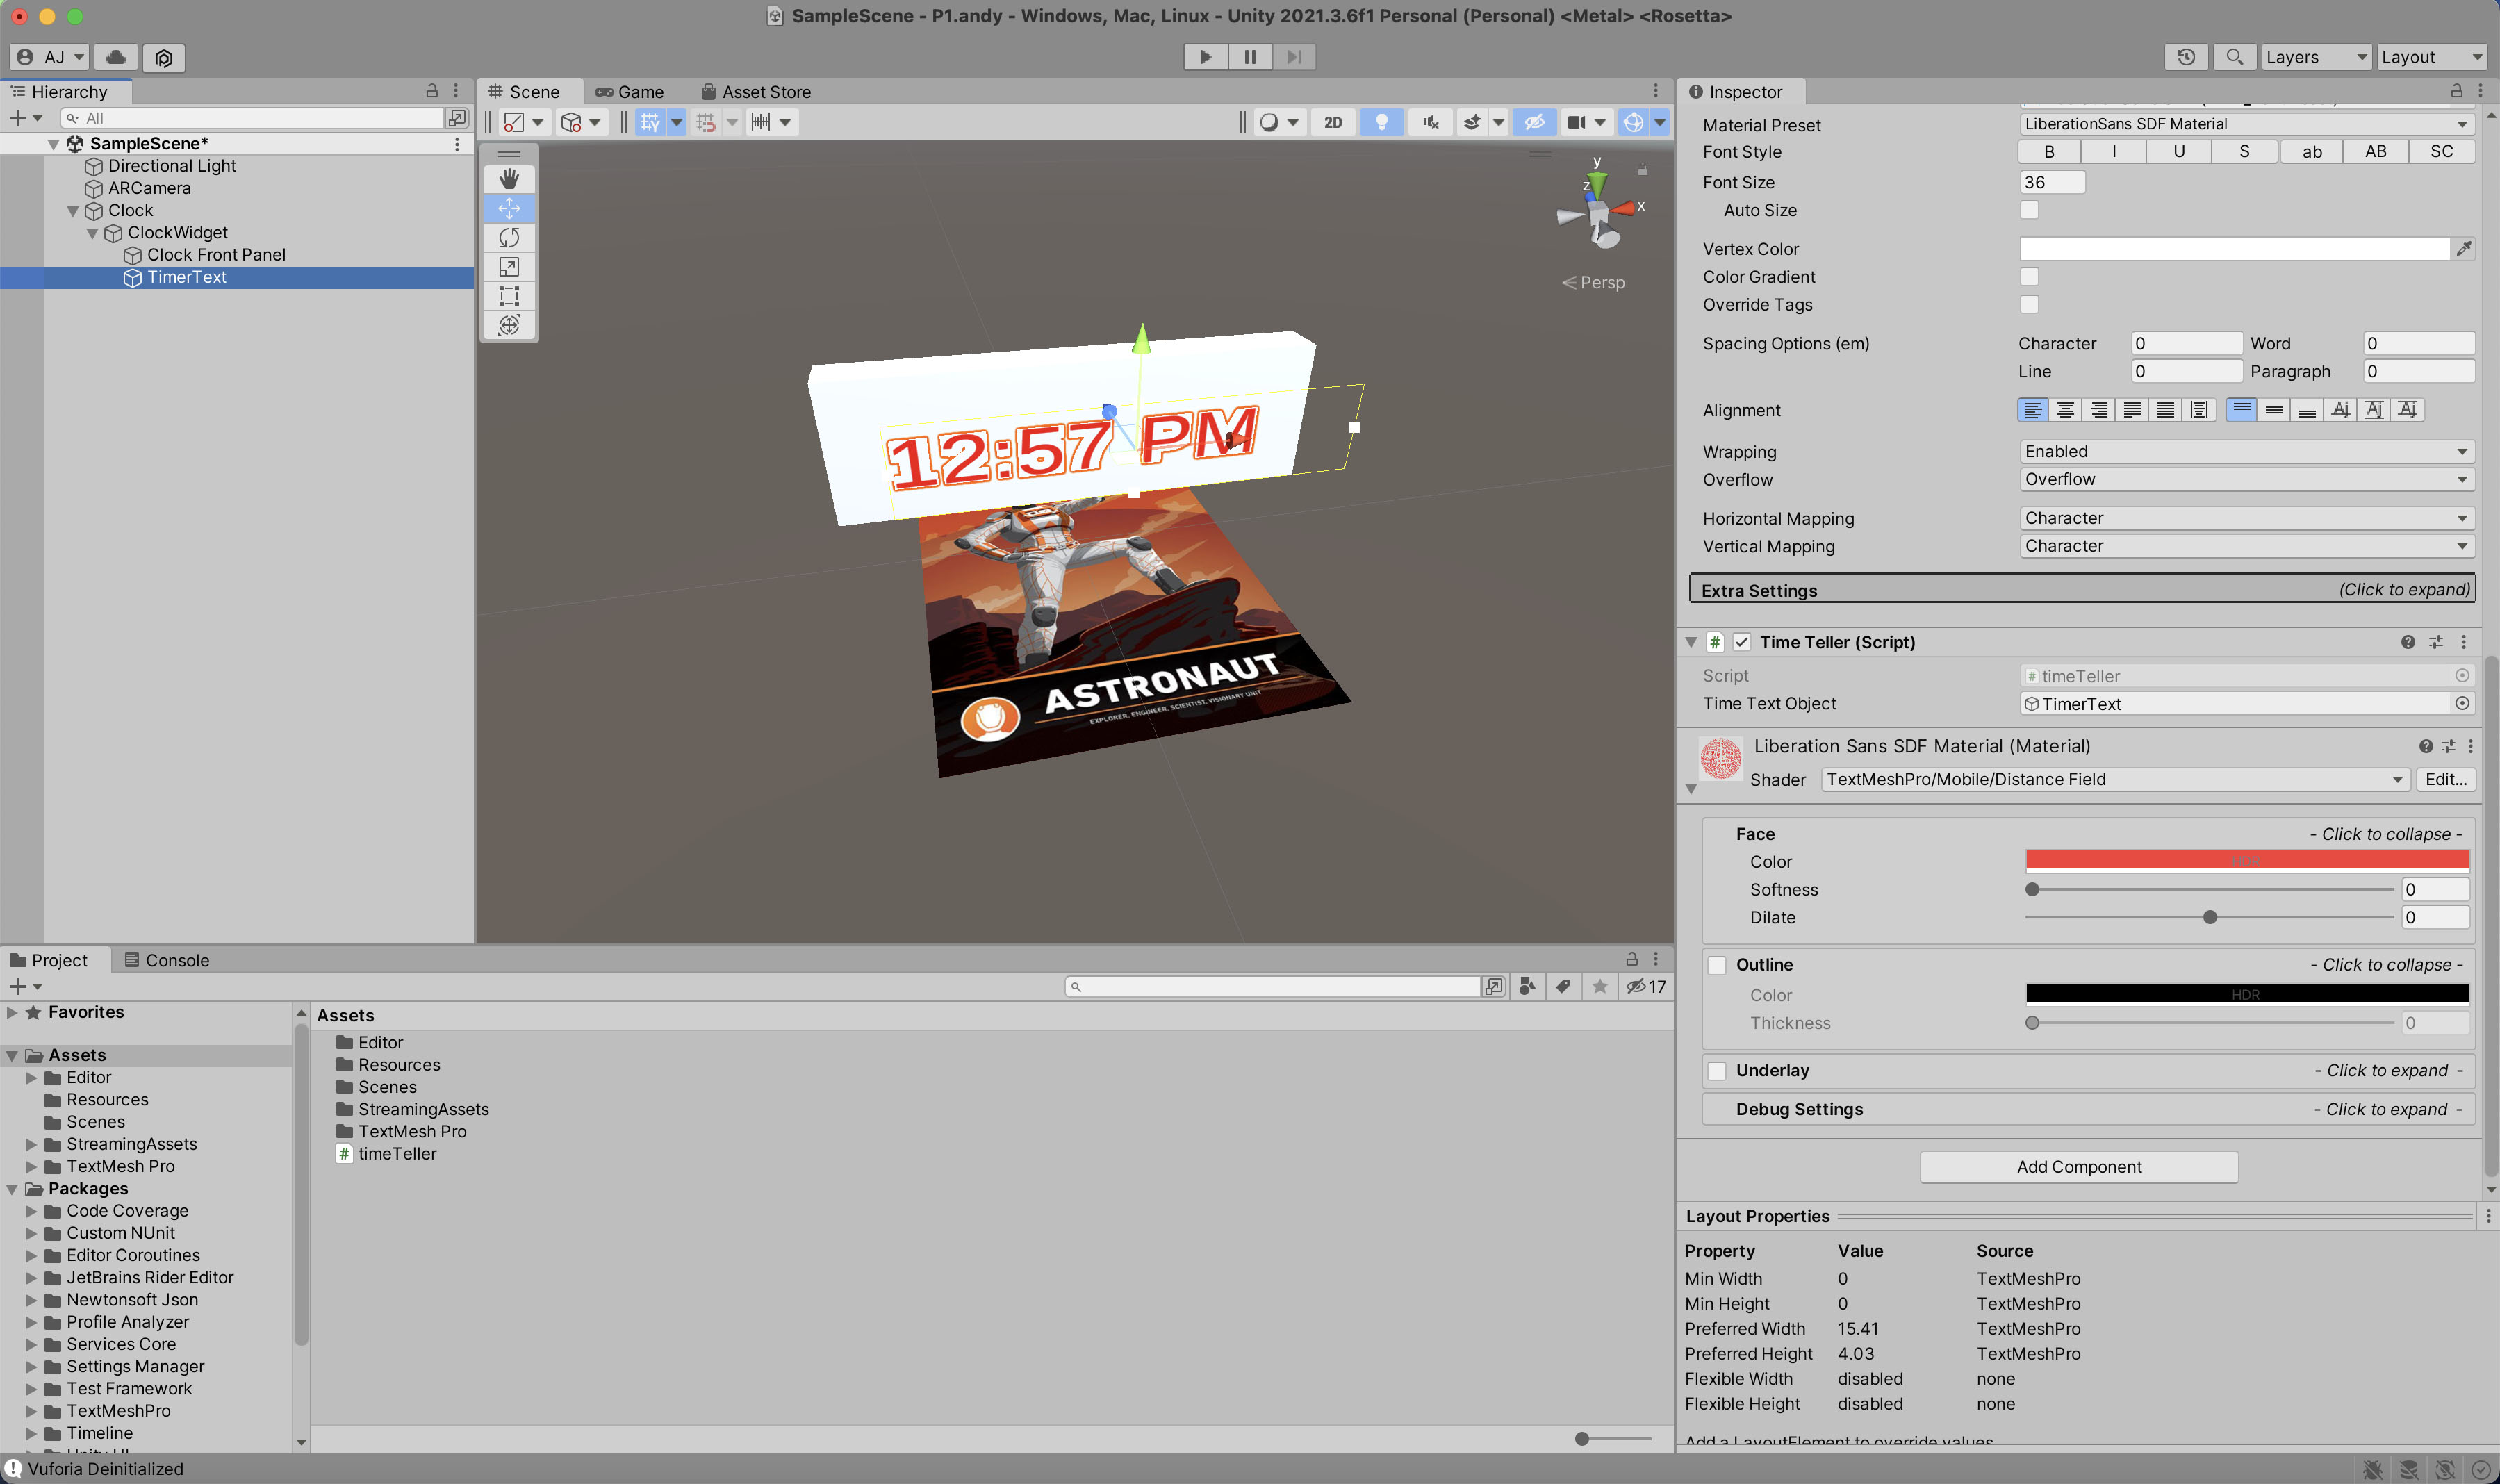
Now if you click on the TimerText item in the hierarchy you can type
some text into the TextMeshPro -Text / Text Input field and you
should see it. Since we are going to use the
text for a clock, type a time like 12:57 PM to get the size
right until we start getting the actual time. By
default the text will be huge so scale it down to something like
0.005, 0.005, 0.005
so it fits in front of the cube you just resized. Click on Extra
Settings Face / Color and pick a color for your text.
More details
on TextMeshPro here
If you press play, pointing the camera at the Image Target should now show a box with the static time text you added. Hit the Play button again to stop the app from running. Now to make it actually give the current time.
With
TimerText element selected in the hierarchy go over to the
Inspector and Add Component and add a New Script called
timeTeller. Open up the script and past in the following code
which will regularly get the system time, format it, and display
it on our AR clock.
using
System.Collections;
using System.Collections.Generic;
using UnityEngine;
using TMPro;
public class timeTeller : MonoBehaviour
{
public GameObject timeTextObject;
// Start is called before the first frame
update
void Start()
{
InvokeRepeating("UpdateTime", 0f,
10f);
}
void UpdateTime()
{
timeTextObject.GetComponent<TextMeshPro>().text =
System.DateTime.Now.ToString("h:mm tt");
}
}
then in the Inspector for TimerText you will have a new Time Text Object (Script) field which currently has 'None (Game Object) as it is empty. Click and drag TimerText from the hierarchy into that field so the field says TimerText and the code knows where to put the formatted time (into the Text field of the TextMeshPro - Text of this object)
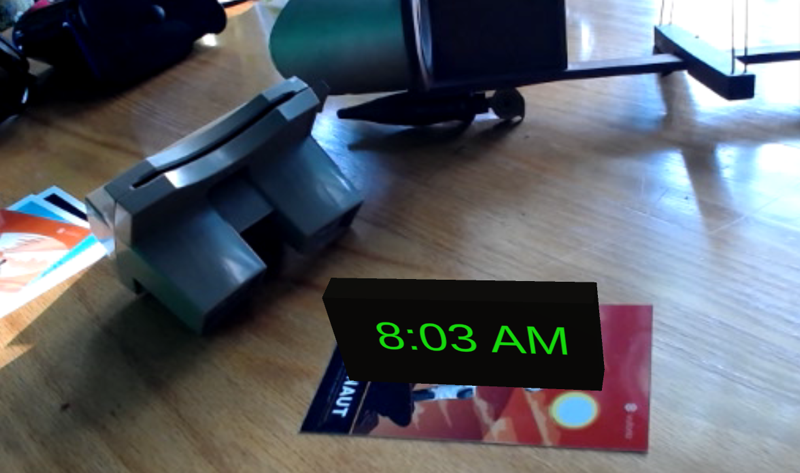
Pressing play
again and pointing the camera at the astronaut marker should now
show you the current time formatted US style.
But if I take
the marker away the object doesn't disappear. Vuforia defaults
to Extended Tracking to deal with brief loss of tracking, and
that can be a good thing in the real world, but for now it looks
goofy. Hit the Play button again to stop the app from running.
We can fix
that by clicking on Clock in the hierarchy and looking at the
Default Observer Event Handler (Script) in the Inspector. With
this we can set 'Consider target as visible if its status is:'
to 'Tracked'.
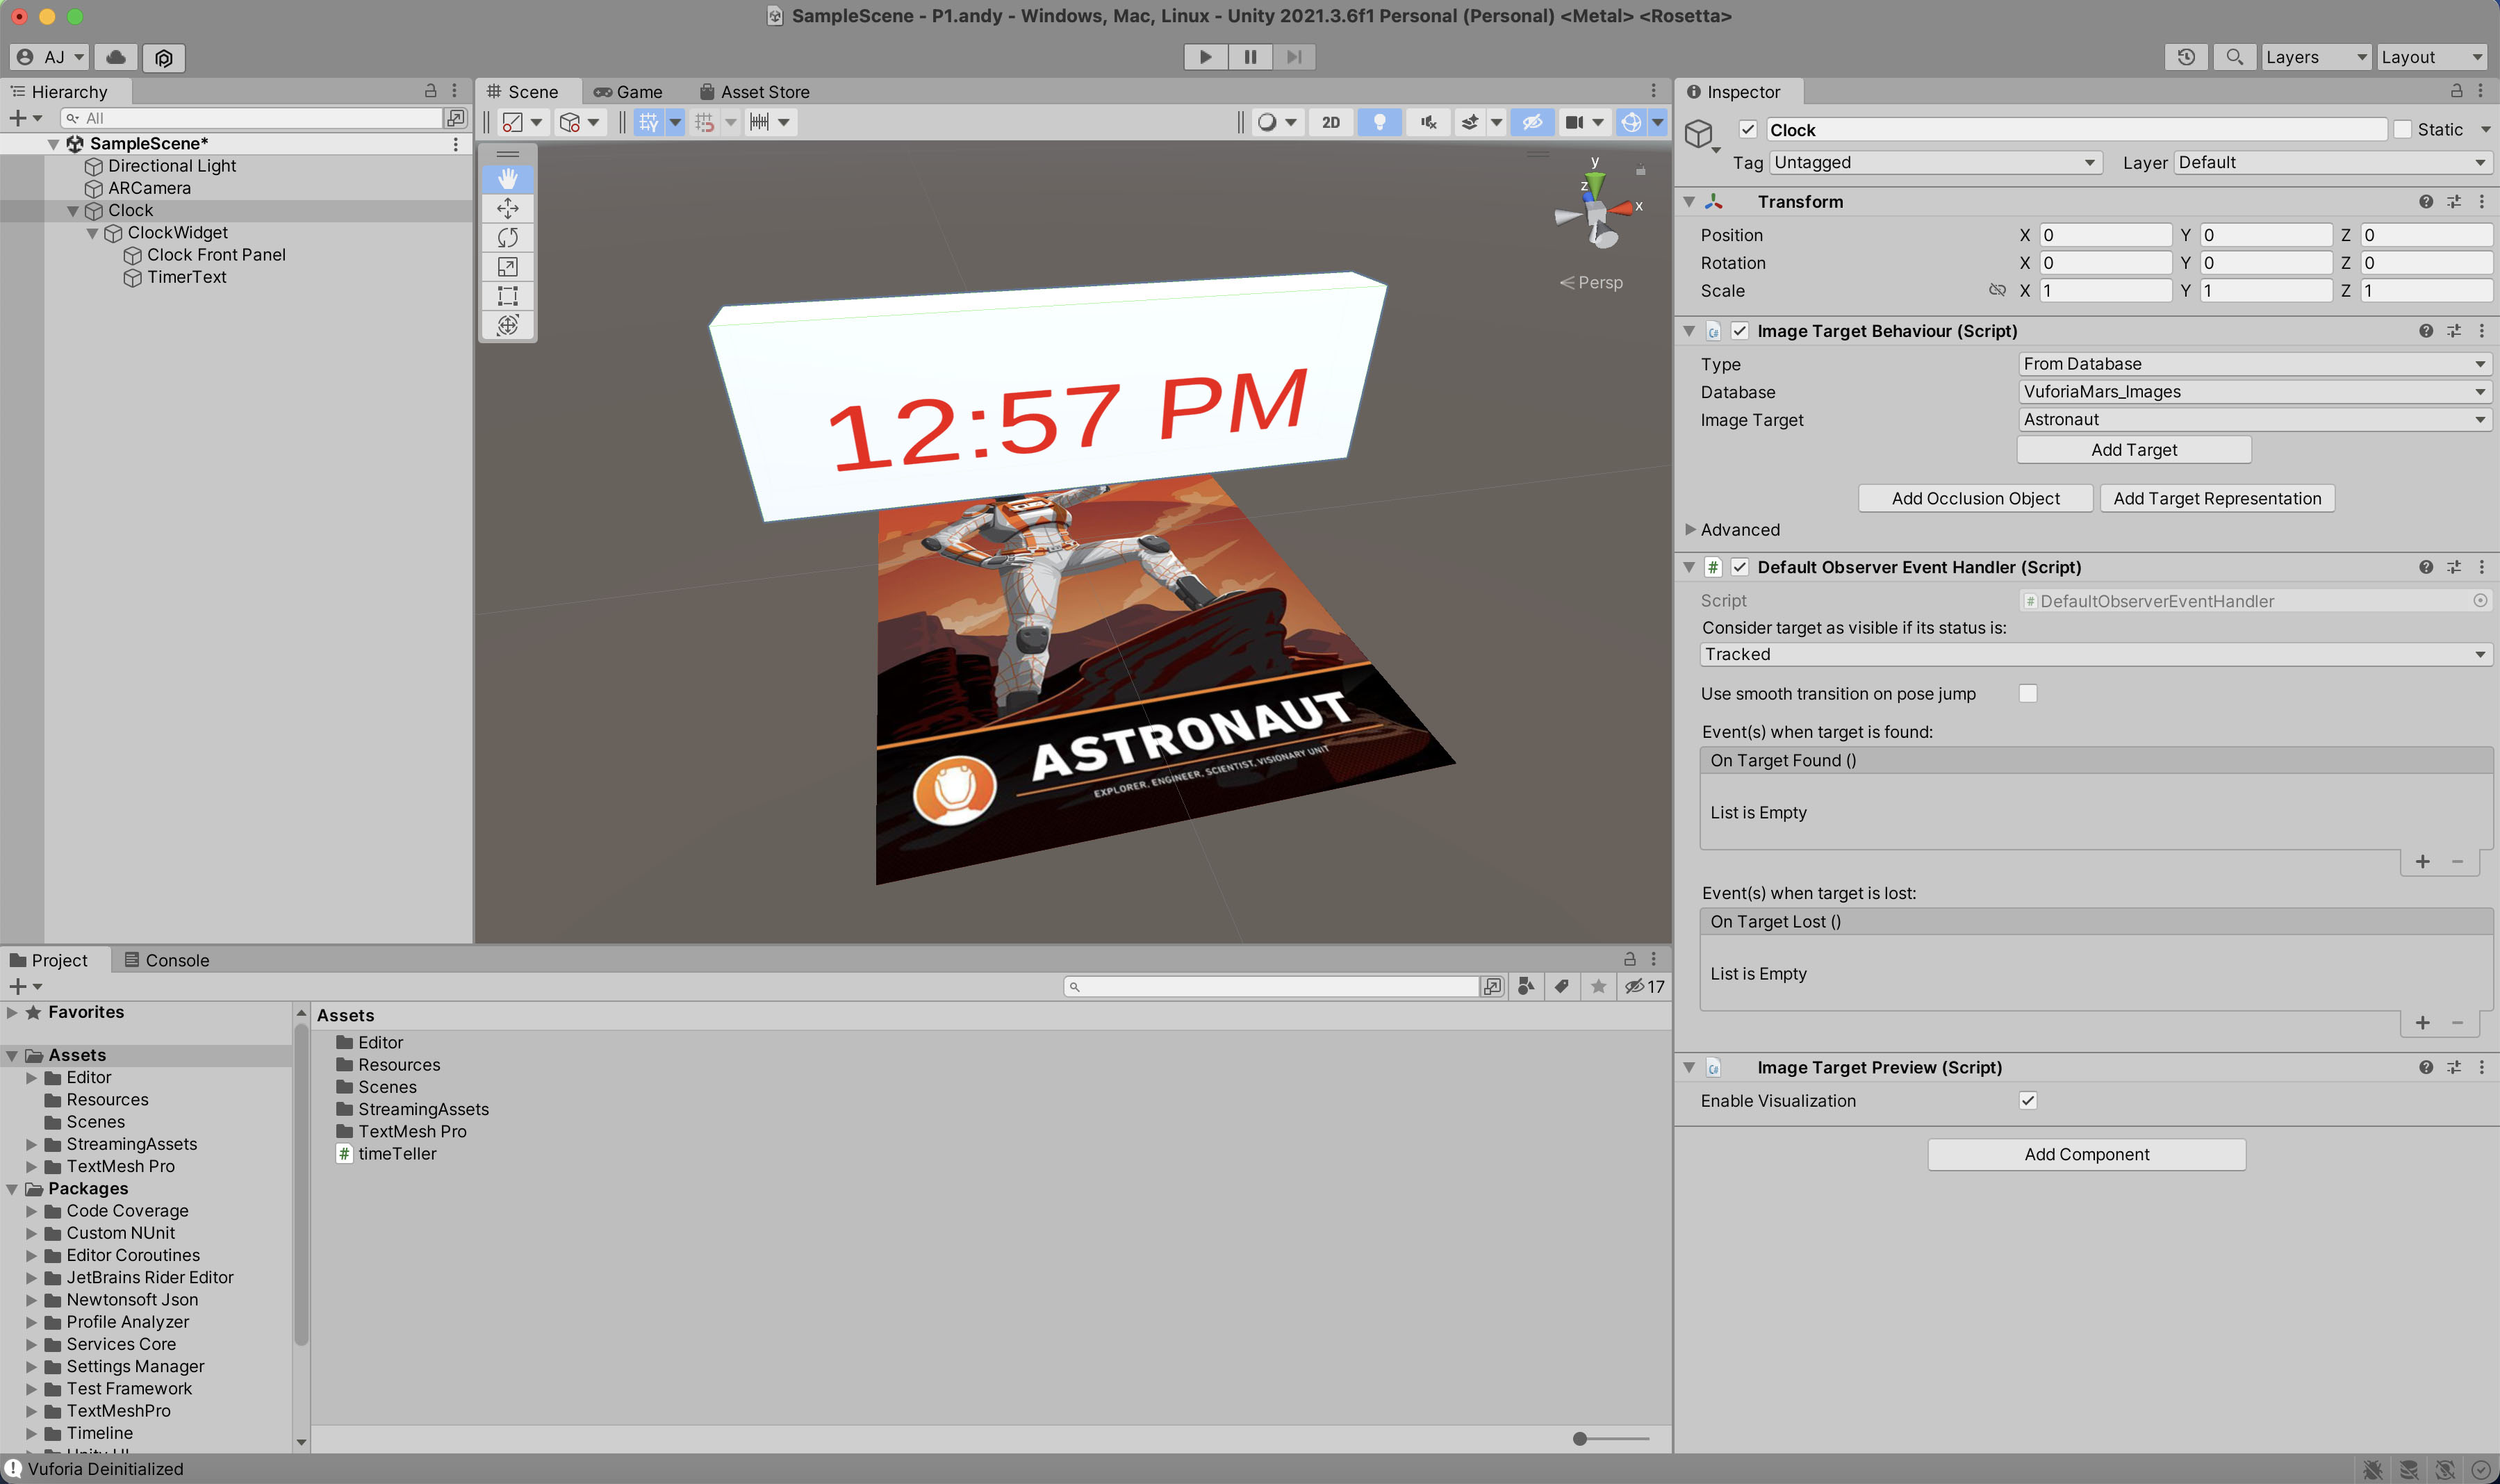
and then
looking through the webcam the clock will appear on the table
where the marker is located, in this case with a bit more work
to make it look like a traditional clock. Moving the marker
moves the 3D augmented reality clock. Moving the webcam you
should be able to look around the back of the clock as though it
was a real object. Note that the augmented reality clock will
always be visible in front of any real objects on your table as
the camera isnt taking depth into account.
What if I
want another AR widget. First we need to go to Window / Vuforia
Configuration and set the Max Simultaneous Tracked Images to
something bigger than 1, lets set it to 3. You would think '2'
would be enough but for some reason '3' seems to work better.
Add a new
GameObject / Vuforia Engine / ImageTarget, and again the Type is
From Database. Pick the VufotiaMars_Images as the database but
this time pick the Drone Image Target so we can have both of
them active at once. Move the new ImageTarget away from the
first one in the scene so we can see them separately. Rename the
new ImageTarget to Weather. For now we can duplicate the same
Clock Front Panel that we used for the time and make it a child
of the new ImageTarget, and then move that cube over on top of
the drone image. Rename the copied Clock Front Panel to Weather
Panel and make it a child of Weather. We should also click on
Weather and change the 'Consider target as visible if its status
is:' to Tracked.
If you press play and have both the Astronaut and the Drone target visible you should see two AR cubes.
Lets go over
and sign up for a free account over at OpenWeather - https://openweathermap.org/
and then verify your email address, and then I get my API key.
This will basically be the same procedure for any site willing
to let you have access to some of their data at some limited
rate of speed without paying.
You can check that the key is
working by asking for the weather in the Chicago area using your
key in place of <Key>. Note that it may take a few minutes
for the key to be active.
https://api.openweathermap.org/data/2.5/weather?lat=41.88&lon=-87.6&APPID=<Key>
Giving you
something like this:
{"coord":{"lon":-87.6,"lat":41.88},"weather":[{"id":804,"main":"Clouds","description":"overcast
clouds","icon":"04d"}],"base":"stations","main":{"temp":295.68,"feels_like":296.34,"temp_min":294.89,"temp_max":296.58,"pressure":1011,"humidity":90},"visibility":10000,"wind":{"speed":4.47,"deg":196,"gust":4.92},"clouds":{"all":100},"dt":1658670103,"sys":{"type":2,"id":2075214,"country":"US","sunrise":1658658977,"sunset":1658711833},"timezone":-18000,"id":4887398,"name":"Chicago","cod":200}
We can specify whether we want imperial or metric results by adding &units=imperial or &units=metric
Click on the
Weather Panel in the hierarchy and then Add Component at the
bottom and add a new script component and call it WeatherAPIScript and add some code
so it prints out the same data on the Unity console. You will
need to replace <key> with your key.
Unity has a
nice example here
using System.Collections;
using System.Collections.Generic;
using UnityEngine;
using TMPro;
using UnityEngine.Networking;
public class WeatherAPIScript : MonoBehaviour
{
string url =
"http://api.openweathermap.org/data/2.5/weather?lat=41.88&lon=-87.6&APPID=<key>&units=imperial";
void Start()
{
// wait a couple seconds to start and then refresh every 900 seconds
InvokeRepeating("GetDataFromWeb", 2f, 900f);
}
void GetDataFromWeb()
{
StartCoroutine(GetRequest(url));
}
IEnumerator GetRequest(string uri)
{
using
(UnityWebRequest webRequest = UnityWebRequest.Get(uri))
{
// Request and wait for the desired page.
yield return webRequest.SendWebRequest();
if (webRequest.isNetworkError)
{
Debug.Log(": Error: " + webRequest.error);
}
else
{
// print out the weather data to make sure it
makes sense
Debug.Log(":\nReceived: " +
webRequest.downloadHandler.text);
}
}
}
}
When you run
this with the Drone target visible you should see the box
appear, and if you click on Console and make sure that Messages
are being shown along with Warnings and Alerts, you should also
see the same text string. The Console can be really useful.
Then the JSON
needs to get parsed into something useful. You can just use C#'s
string manipulation code (IndexOf, Substring, Parse, etc.) in
this simple case and then display the text you want as in the
clock example where we regularly used the UpdateTime function to
update the time.
If you have
multiple cameras attached to your computer then you may need to
go to Window/VuforiaConfiguration and see which Camera Device
Vuforia wants to use and make sure its the one you want it to
use. When you play your application it should show the view from
the camera you want.
That gets you
started with Vuforia. A little further down in these notes we
will take a look at moving this simple application over to a
smartphone.
Virtual Reality / VRTK (which we will use in Projects 2 and 3)
With several different manufacturers of VR HMDs there has been a lack of standardization in the libraries to drive them, which continues on, though pretty much all the libraries tie into Unity or Unreal. We are also starting to see browser-based VR solutions such as WebXR to try and create more widely distributable applications, including a Unity export Plugin, but WebXR itself is still not sufficiently cross-platform yet.Given this current state we are
going to use VRTK version 4 for our VR work. VRTK is a nice
cross platform library for Unity with a built in simulator and a
decent amount of online documentation.
There
is a nice 5 minute YouTube video showing off its capabilities at
https://www.youtube.com/watch?v=KFre9lyLswQ
For
now I am going to show what is likely to be the starter project
that you will be adding onto for the second project. I
will show how this looks in the simulator, and how it looks
using a VR headset. Again this will make use of Unity, but VRTK
will be handling the stereo visuals, and the interaction.
Along with the main engine there are a variety of
tools that can be used to create models, sounds, textures,
etc. Here you are free to use the tools of your choice. The
following are pretty decent free ones.
There are also various
websites that provide Open Source / Royalty Free resources, just
be sure to cite the creators and where you downloaded the
assets. Soundbible is a nice place for free sounds http://soundbible.com/.
There are several lists on-line for good 3D model repositories,
here is one:
https://all3dp.com/1/free-3d-models-download-best-sites-3d-archive-3d/
In all your projects, make sure you have the rights
to use any assets you find on the internet, and make sure you
properly cite their creators. Any code should be your own.
We will be using GitHub for turning in the projects - https://github.com/
If you don't have a git
account yet you should sign up for one
You should create a separate
repository for each project in the class
Some Tutorials
GitHub has their own getting started page which is a nice intro
- https://guides.github.com/activities/hello-world/
This is a nice intro for the
basics - https://rubygarage.org/blog/most-basic-git-commands-with-examples
Quick Command List - https://rogerdudler.github.io/git-guide/
GitHub and Unity - https://thoughtbot.com/blog/how-to-git-with-unity
At
minimum you will be using git to turn in all your code and
assets in your Unity project, but I would also recommend
regularly updating your code on git so there is some external
proof of when you submitted, as well as having backup copies at
various checkpoints. git can also be a nice place to store a
copy of your website files to prove they were done on time, and
you can host your website for your project on git as well if you
prefer. I would not rely solely on Git for backing up your
projects - keep multiple backups in multiple places.
For example I could take my Vuforia project above and move it up to a new git repository:
-
I already have a Git account so I can use my favorite web
browser to go to github.com and sign in and click the green New
button to add a New repository
- I can give it a name like Week2, make it private for now, and
add a .gitignore file of type Unity. Then I click the green
button to Create repository
- Keep this tab open in your browser - we will come back to it.
Note
that for your projects please give them a unique name so we can
identify your project from your zip file rather than having 40
Project 1s. A good name is yourLastName.yourFirst.Name.Project1.
- If you are running on a mac you can Open the Terminal and type 'git --version'. If you get something like 'git version 2.16.2' back then you are all set, otherwise you may get prompted to install the command line developer tools. Install them, then try 'git --version' again. On Linux git is available through the common package managers. On windows its probably best to download from https://git-scm.com/downloads
-
Back in my Unity project I need to set things up so the project
plays nice with git so I am going to Edit / Project Settings /
Version Control / Mode should be Visible Meta Files, and Project
Settings / Editor / Asset Serialization Mode should be Force
Text.
-
Go to the terminal and change the current directory to the one
for your Unity project, e.g. cd Documents/unity
folder/Vuforia F22
- If you look at the files in that directory you should see an Assets folder, Packages, Logs, etc. type git init to create a new .git folder.
- Now we need to link this local repository to GitHub so if you go back to GitHub and look at the Code tab and then click on the green Code button you can get the https link which will look something like https://github.com/YourGitAccountName/YourGitProjectName.git - back in the terminal you can use the command git remote add origin https://github.com/YourGitAccountName/YourGitProjectName.git so in my case git remote add origin https://github.com/andyevl/Week2.git- Before we can push our project code up to GitHub we need to pull that .gitignore file we added to the repository when we created it. The .gitignore file tells git not to backup files that Unity can recreate (Library, Temp, Build, etc.) which will save a LOT of space in Git, but will increase the time when you open the project for the first time. We can do that with the command git pull origin main --allow-unrelated-histories
- Now that we have the .gitignore file we need to add something else to it. Vuforia adds a rather large package into your unity project that is larger than git accepts so we need to tell Git to ignore it. Since we are all using the same library we can just add it in back later after downloading - remember this for your project 1 installation instructions-
You can then commit the changes with an initial comment (feel
free to modify the comment) with git commit -m 'starter
project'
-
You can check the status with git status.
Status is helpful to tell you which files are being tracked, and
which are untracked, which have been modified, etc.
-
Another helpful command with the recent switch from master to
main is git branch. This gives you the name of
the branch you are linked to. After October 2020 it should be
'main'. if it is 'master' then a handy command is git
branch -mv master main to rename the branch to main
in order to match Git's new default.
-
Now we can finally push our code up onto GitHub with git
push origin main
-
If you now go back to GitHub and refresh the page you should see
a lot more files there with their modification dates.
- Whenever you want to update the repository at GitHub with your latest version you would go to the top level of your Unity project directory and type this sequence to update only those files that have changed (or added to the repository):
-
git add --all
- git
commit -m 'new comment for this version'
- git
push origin main
- Git Large File Storage is an option if you
have files that are > 100 MB, but we have found in
past classes that it is typically more trouble than it
is worth, so I would advise that if for some reason
you have a really large file, that you convert it into
a smaller file.
- For the final submission you should make your project public so everyone can look at everyone else's code. Before each of those dates you should re-download your Project from GitHub to make sure it works. Probably the easiest way to do this is to try and Download Zip from under the green Code button, put it into a new directory on your computer, add in any necessary packages like Vuforia, and try to add it to Unity Hub and start it up in Unity to make sure everything made it to and from GitHub correctly.
One important
thing to keep in mind with VR and AR is that, unlike other
media, the size of the screen does not affect the size of the
objects in the world. If you are watching a movie then Humphrey
Bogart or Lego Batman may vary from an inch tall to 100 feet
tall depending on the display you are watching it on. In VR or
AR the display is a window into the virtual world, and changing
the size of the window just gives you a bigger or smaller
window, it doesn't change the size of the things the window
looks out on. Scale is absolute in VR or AR, so at some point
the environment you create ends up being scaled in units of feet
or meters for people to move around in. Similarly there are
various image based tricks that can be used in 2D or even 3D
movies, that don't work in VR or AR where the space is really
3D.
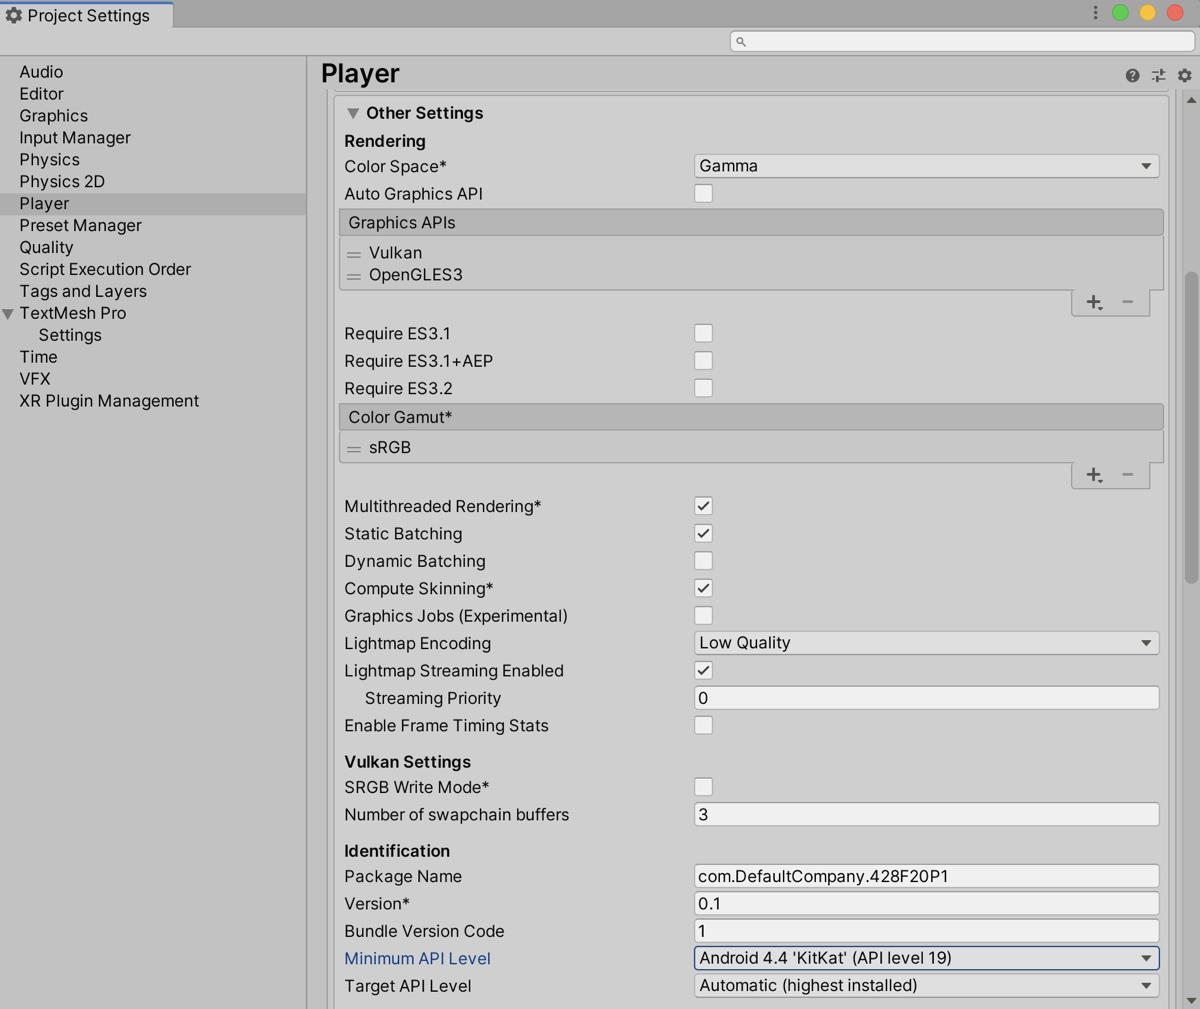
In this course you will be doing a lot of work with Unity and the content generation tools so make sure you have access to a decent computer that can run these pieces of software. For the AR assignments you will need access to a webcam for that computer - built in cameras should be OK but an external one you can move around will make your life a lot easier.
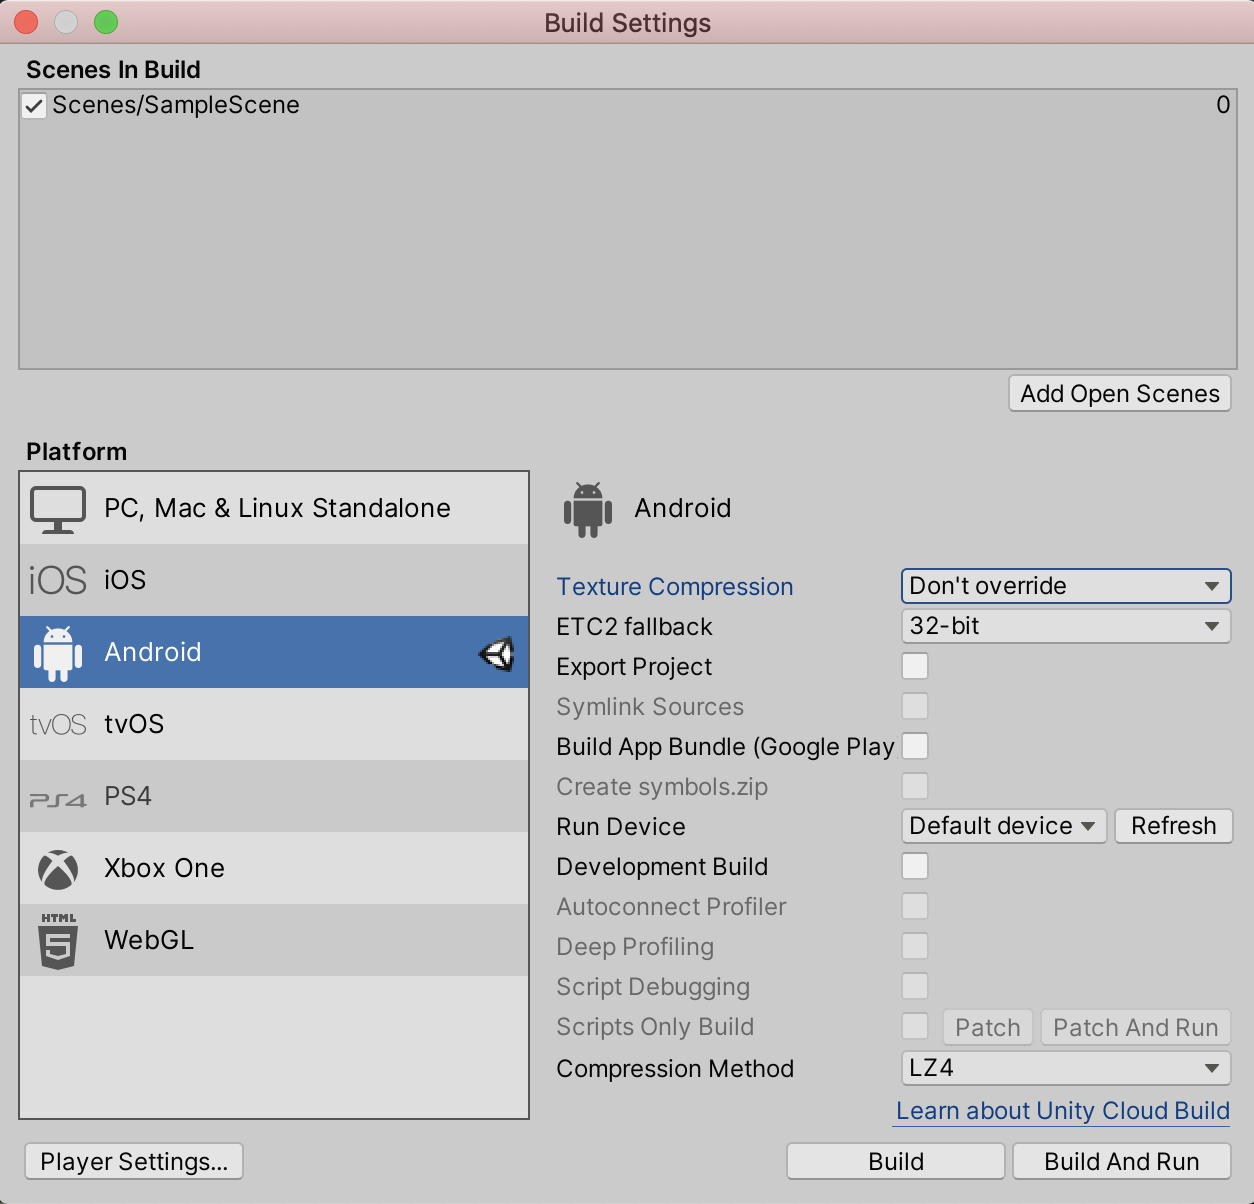
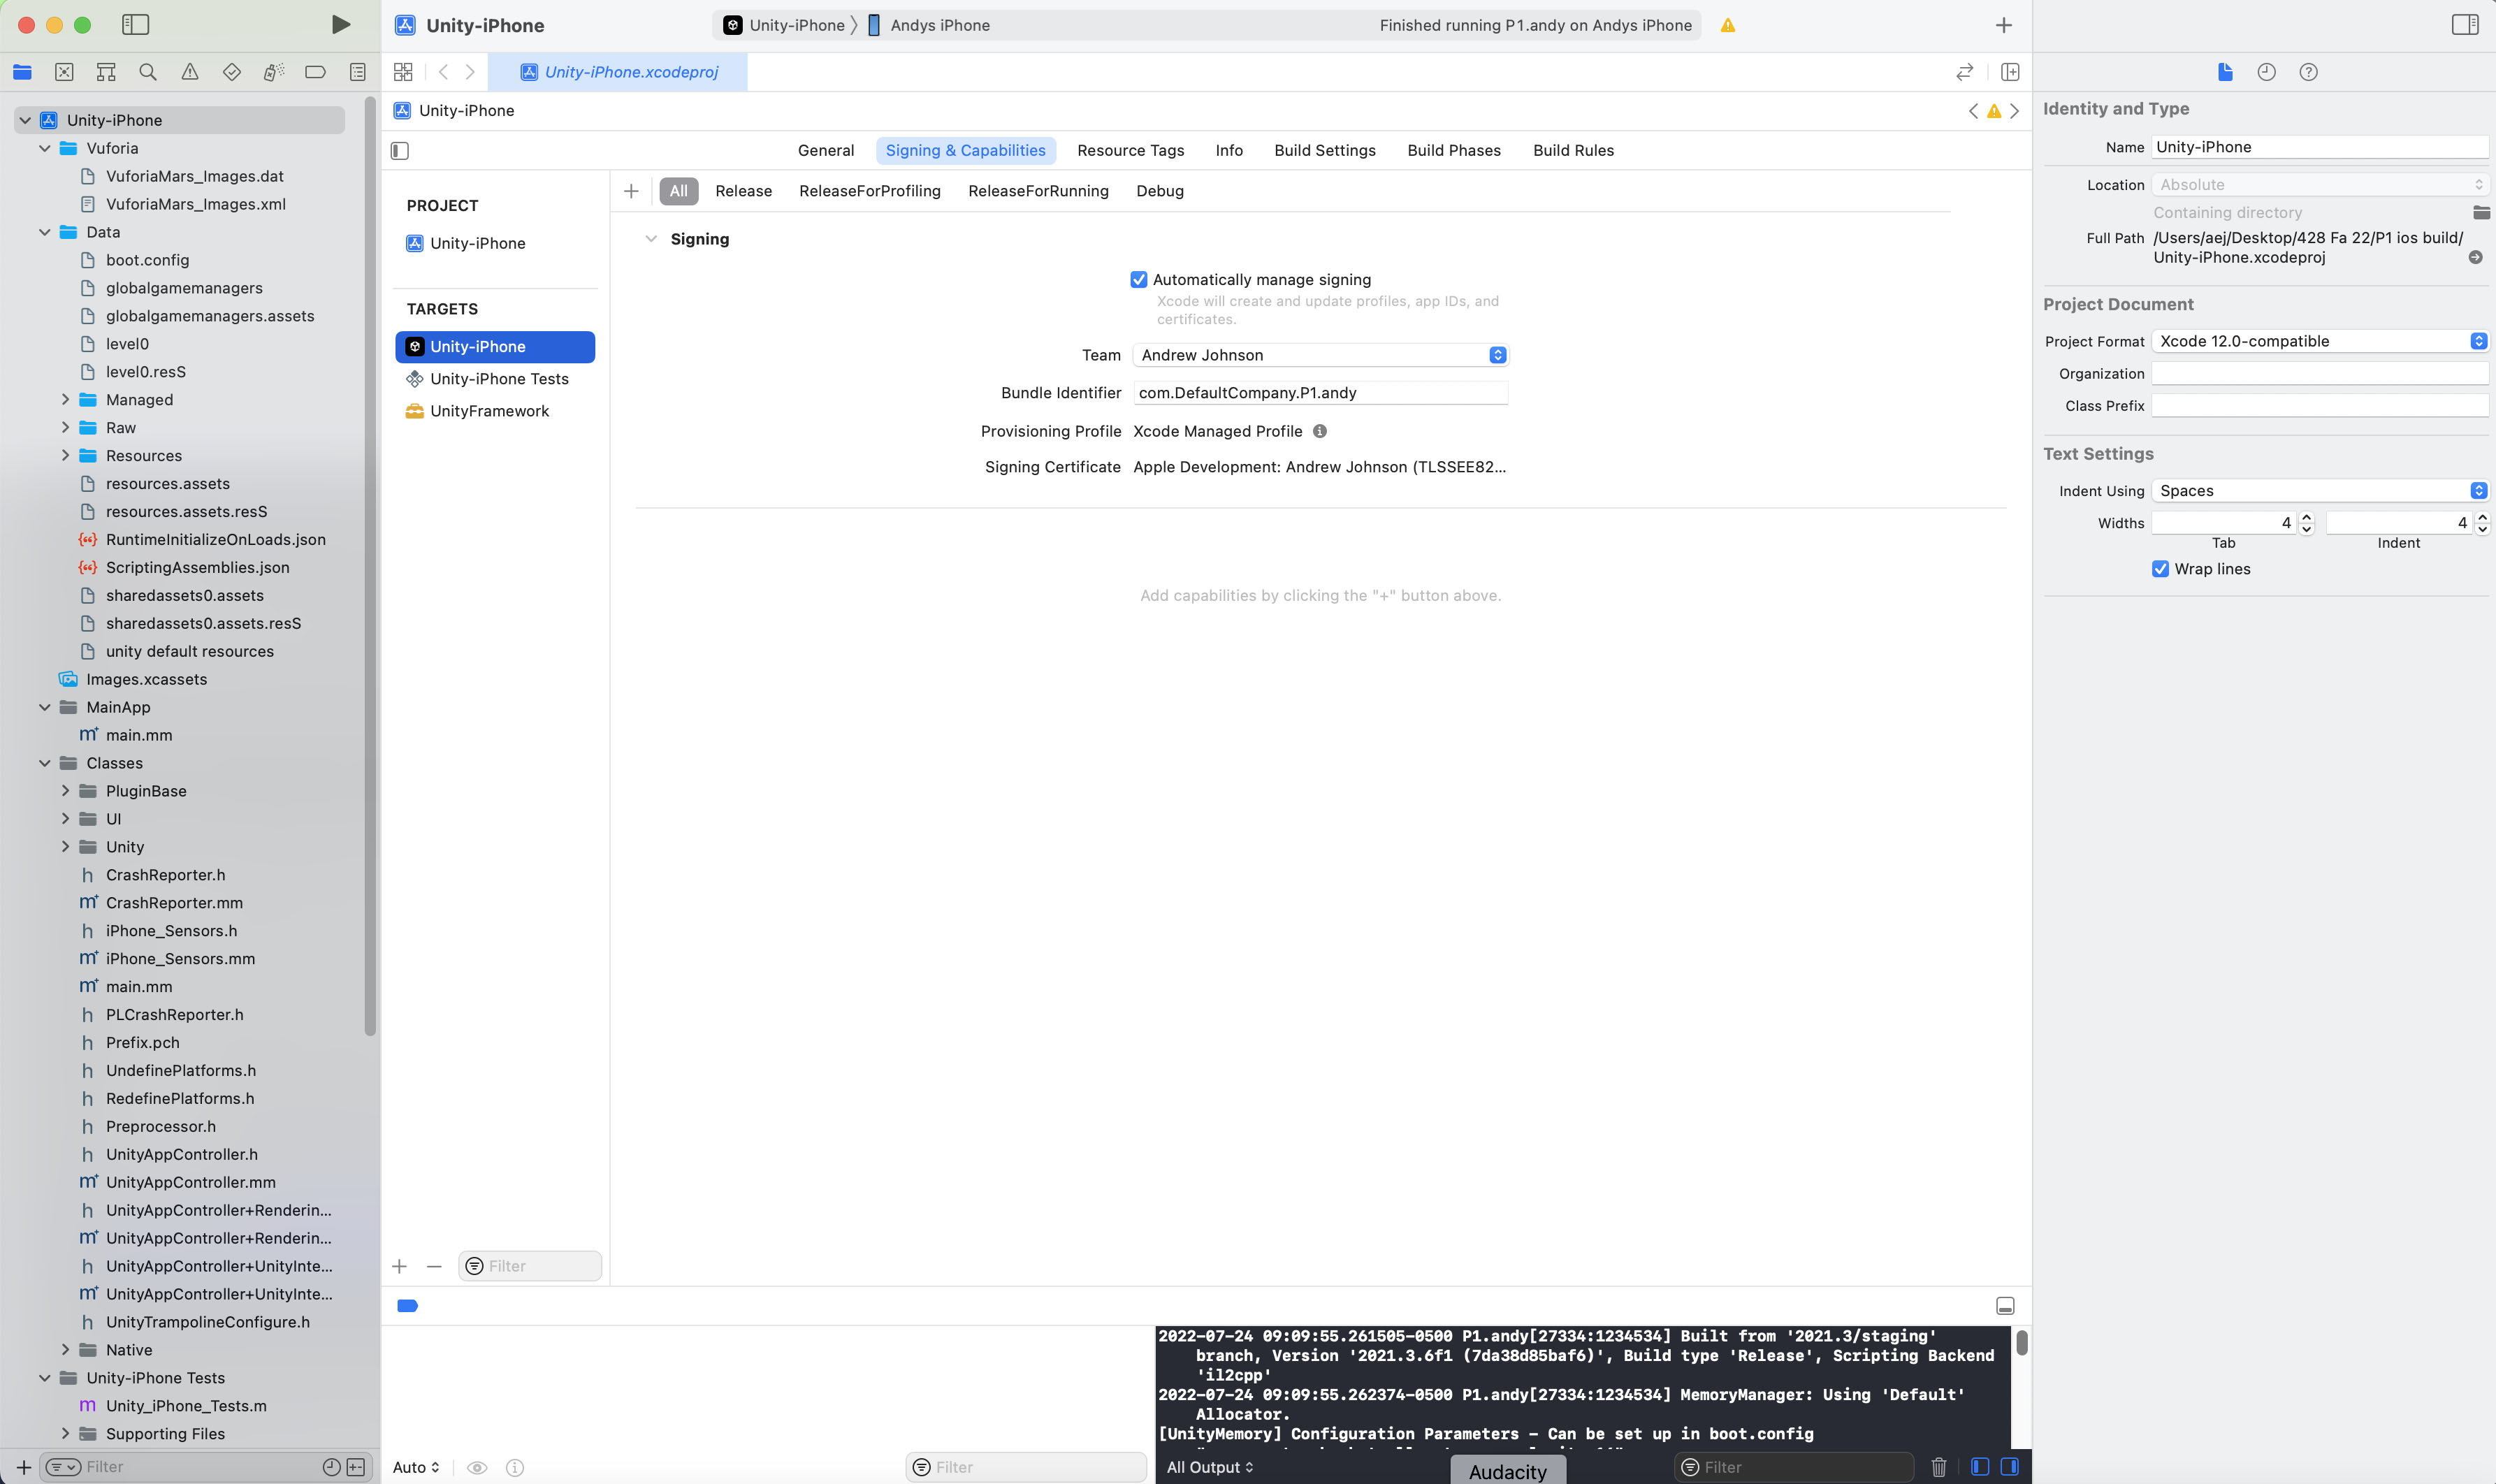
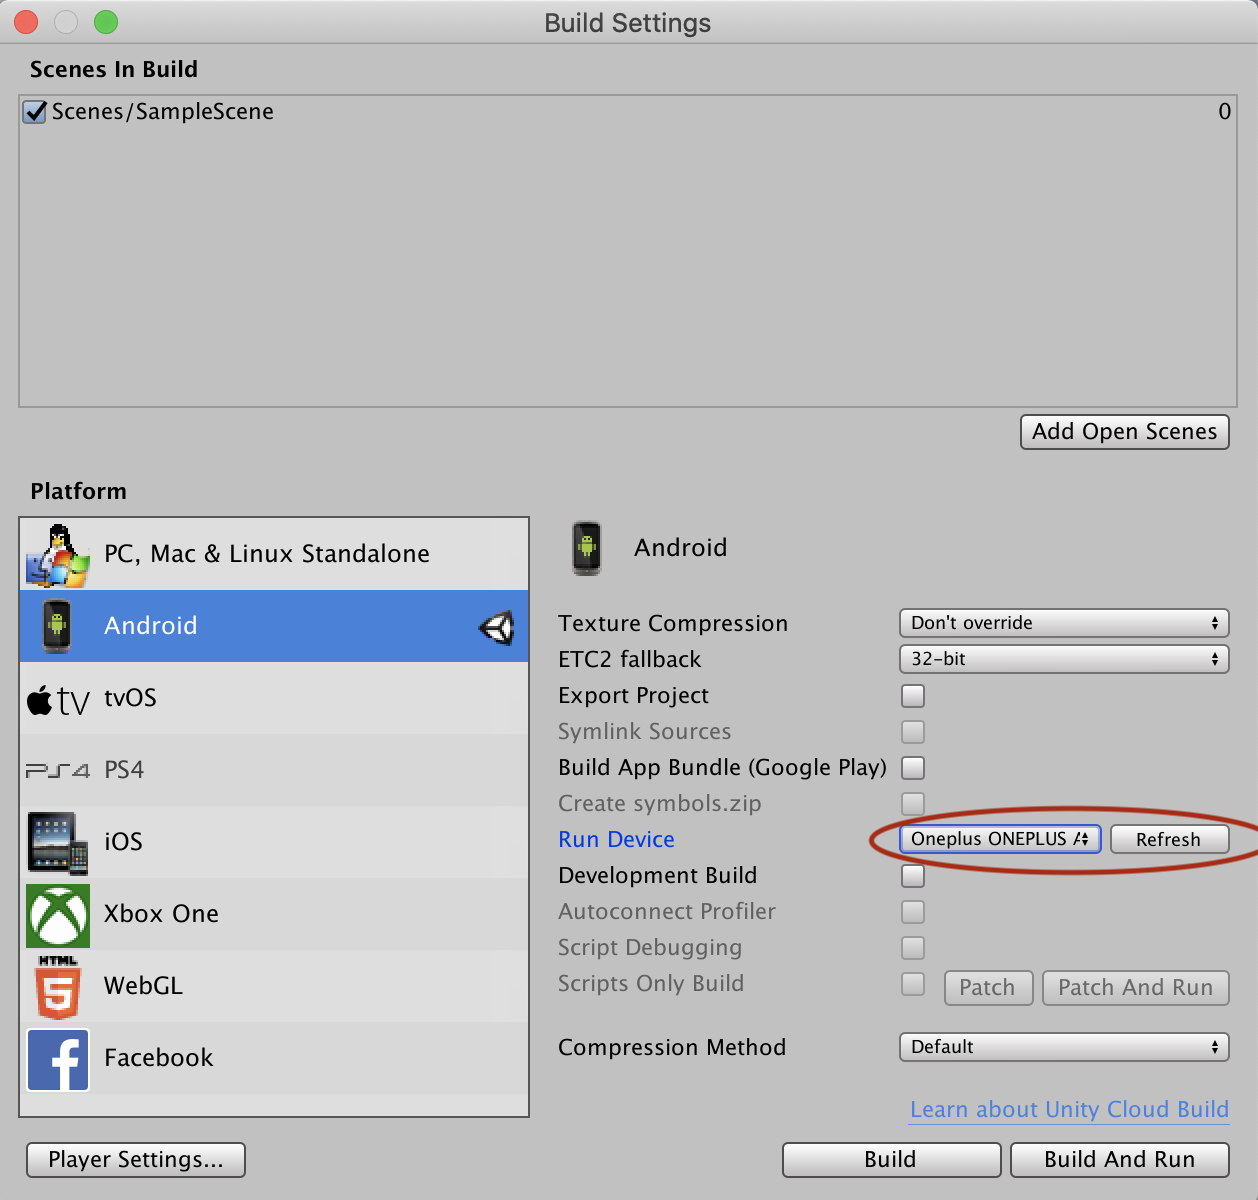
Building Vuforia apps for your phone
If you don't
have a webcam handy, or you just want to see this working on
your actual smartphone, here are the steps you can use to get
your project running on a moderately new smartphone. Note that
each of these builds is a multi-step process so its not as fast
as testing with a webcam, but its more realistic, and can be
more satisfying.
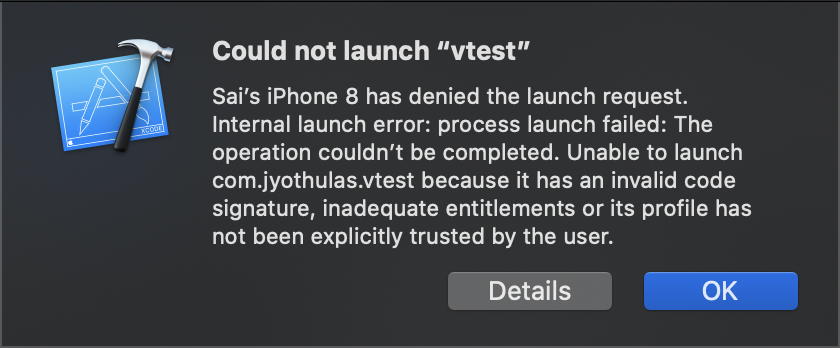
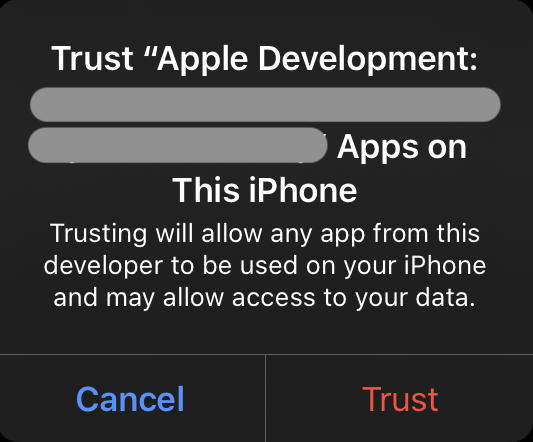
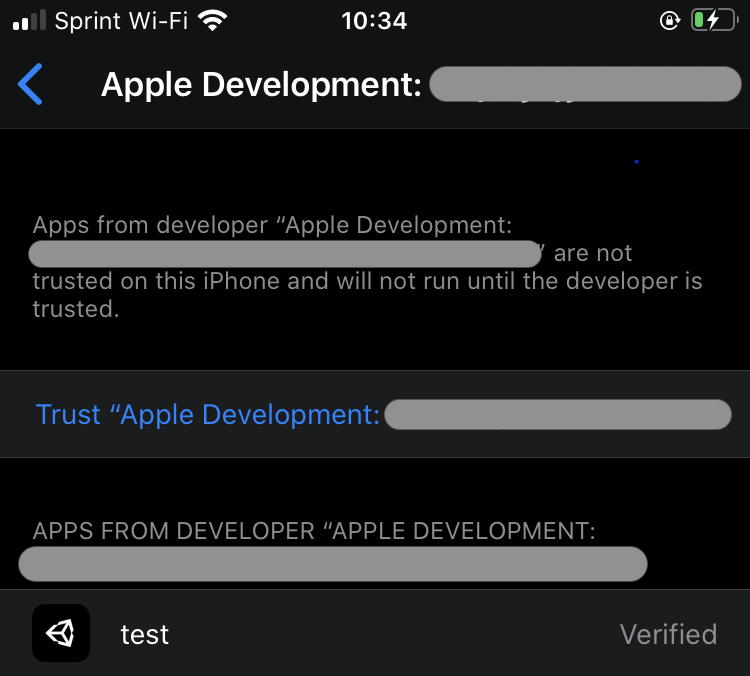
|
 |
|
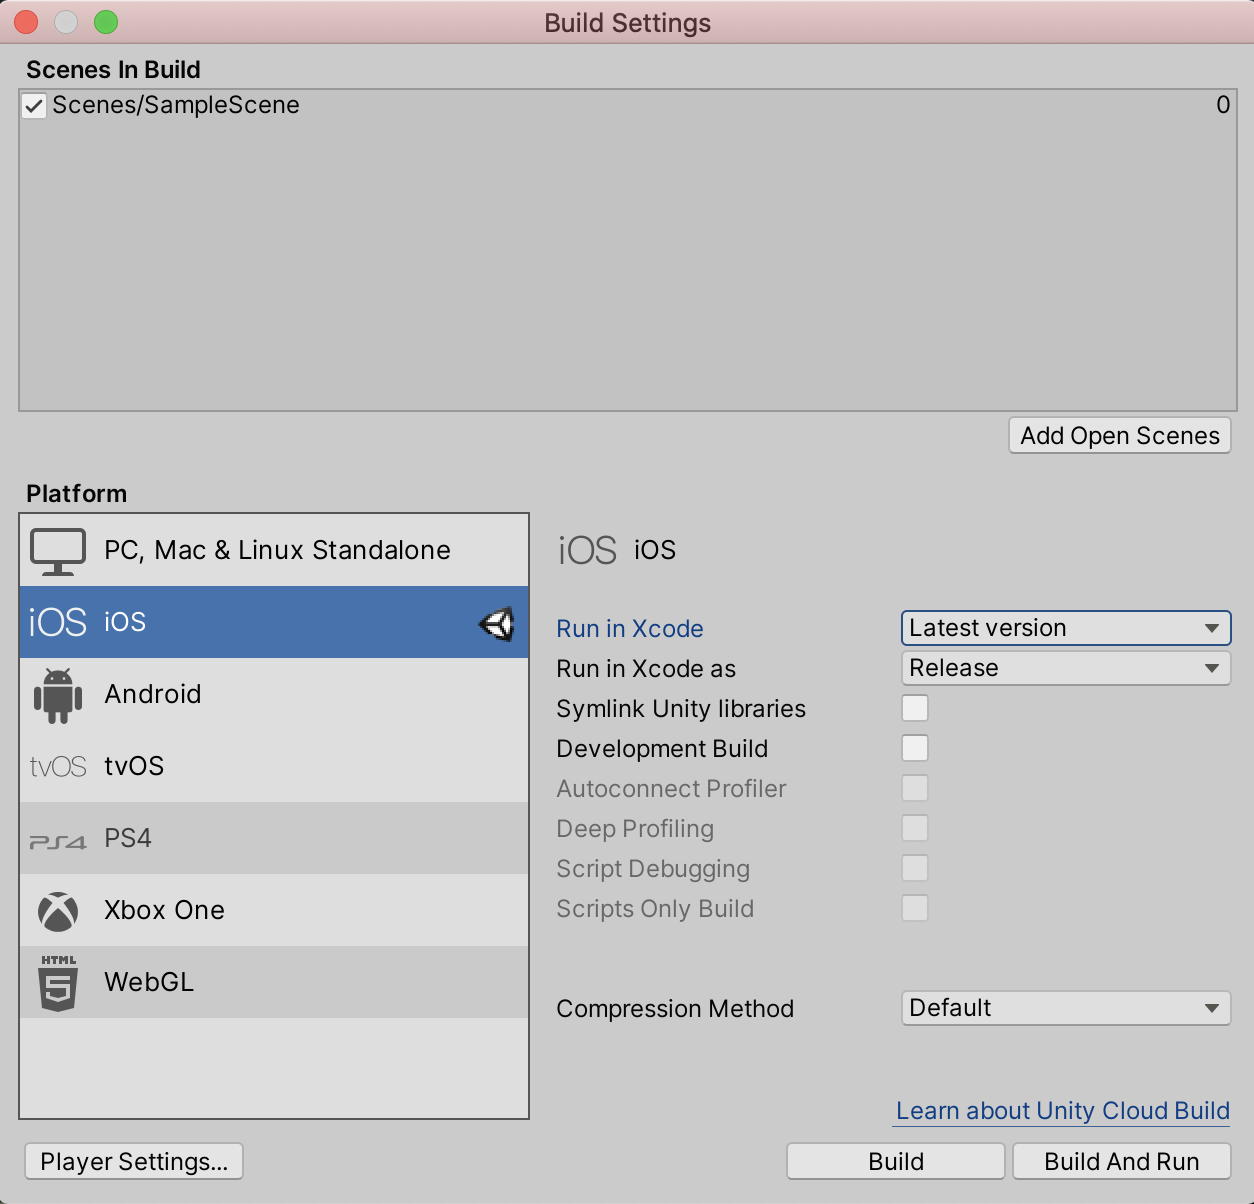  |
iOS
|
|
|
|
|
|
|
|
|
 |
|
|
|
   |
|
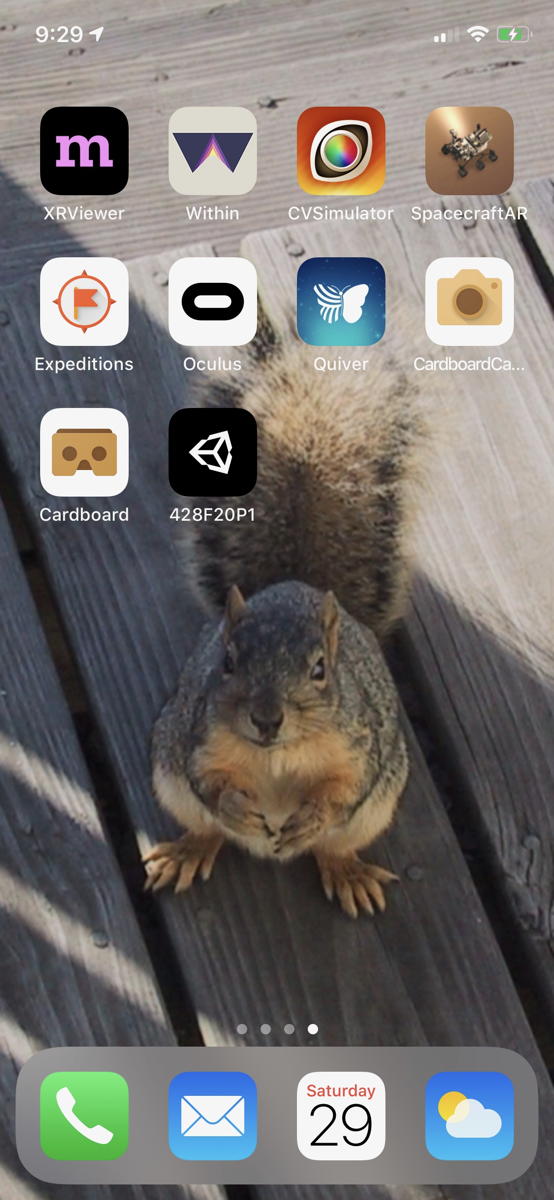 |
Android
|
 |
|
|
|
 |
History of VR and AR
last revision
8/30/2022 - added a note on Unity Hub failing to install a unity instance if you dont have admin privileges and how to fix that