Since you implemented your own line drawing routine in the first assignment, you can use the OpenGL glBegin(GL_LINE_STRIP) command to draw the polygons. You may not however use any of the OpenGL matrix commands, projection commands, or viewport commands. You are responsible for converting all of the polygon coordinates to give appropriate values to the line drawing routine for the 2D window.
The polygon clipping routine you wrote in the second assignment will come in handy here though it will require a little modification for the 3D case.
You can find a shell of the program at: here
Your program should be run as:
assignment3 polygon-file-name
You can find a sample datafile for the program at: here
where polygon-file-name contains SEVERAL polygons each of which is a series of X, Y, Z locations of the vertices. The coordinates of the polygon are again in world-space. The polygon will be drawn as a connected series of line segments. Each polygon will be simple, convex, and have less than 8 vertices and greater than 1 vertex. Each polygon will also have a colour associated with it so you can use glColor3f() in this assignment.
There will be at most 500 polygons.
note that polygons with 2 edges are legal in this assignment. This allows us to have lines without making them a special case. You should treat these like any other polygon you read in. (i.e. you only have to implement polygon clipping, and not line clipping.)
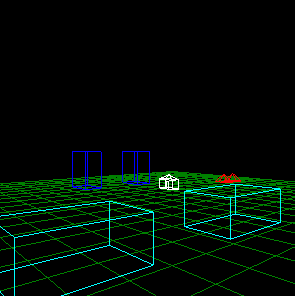
These polygons will generate a small town sitting on a plane stretching from -200, -200 to 200, 200 in world-space. The town will remain static.
The initial settings for the viewer's vehicle (camera) are:
The viewer can control the location of the vehicle:
The user's camera will always be 50 units away from the VRP. As the PRP is given in the VRC you will be moving the VRP to move the camera. You will also need to rotate the viewplane by changing the VPN.
As with assignment 2, your program should be well commented and be a good example of literate programming; again it will be submitted electronically; and again be sure it can be compiled and executed with acc and Mesa on the EECS suns.
This assignment has a lot of little problems to solve before you can see anything on the screen. Its important to take each step in turn and ensure that it is correct before moving on. It is very easy in this assignment to generate a black screen and get frustrated.
The transformations basically break down into two phases: those done before clipping and those done after clipping. At first I would ignore the clipping step, and the colours and just work to get the scene on the sceen. This will also help you understand why we need clipping (things that are behind you will look odd, and things very close to you will look very funky indeed.) You may also want to use the left and right arrow keys to do lateral motion rather than rotation at this time to check out your scene. Then add in colour, then clipping, and then add in the ability to rotate the user's view.
The samples in the textbook in the section on 'Examples of 3D viewing' are also good small test cases.
Here is a snapshot taken from above one of the corners of the plane
looking
back over all of the structures in the sample data file:
This is the hardest assignment of the course so plan accordingly.