
Walkabout
written byAndrew Johnson
Electronic Visualization Laboratory
University of Illinois at Chicago
Chicago, IL 60607
email:aej at evl.uic.edu
www.evl.uic.edu/aej
currently at version 1.3.3b
(Dec 16, 2004)
|
|
Walkabout written byAndrew Johnson email:aej at evl.uic.edu www.evl.uic.edu/aej currently at version 1.3.3b |
| Download Latest Walkabout | Importing Data into Walkabout | Walkabout on a Tile Display |
As of Mac OS 10.5 there are some issues with fltk and front not
working correctly (not coming to the front, not getting focus,
inability to use the menus, or type into the text fields.) A solution
is given here to create a real os-x bundle:
http://www.fltk.org/newsgroups.php?gfltk.general+v:26066 and applying
makebundle.sh to front will mak it work again. I'll eventually fold
this back into the official walkabout distribution.
There haven't been many updates in the last couple of years. With
the macintosh moving to intel and newer versions of fltk and Coin, here
is a new macintosh version..
ftp://ftp.evl.uic.edu/pub/software/andy/WALKABOUTmacinel.tar.gz
IMPORTANT NOTICE FOR OS-X AND LINUX USERS: As of version 1,3,2 the walkabout frontend requires libtiff to run. Please see the Related (Necessary) Library section below for details on this library.
Walkabout allows you to load in geo-referenced terrains to walk on, and then drape various textures over those landscapes.
Here are some snapshots of walkabout in action:
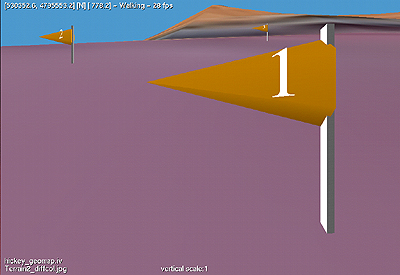
While walking on the surface you can drop frags to mark spots of interest, or you can pre-load a set of flags to appear on the surface when you start up walkabout.
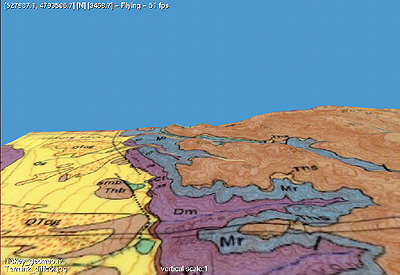
If you don't like walking, you can fly over the landscape in walkabout, and look up or down, so you can see the entire landscape as a slat map from above.
![]()
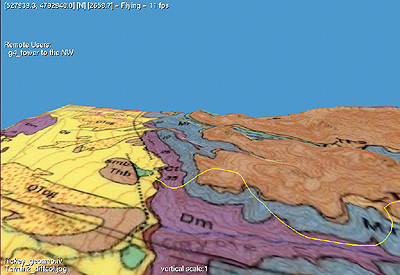
Multiple users can run walkabout simultaneously on different computers and see each other in the environment as avatars.
Walkabout keeps track of the paths that each user makes through the space and you can choose to see or hide those paths.
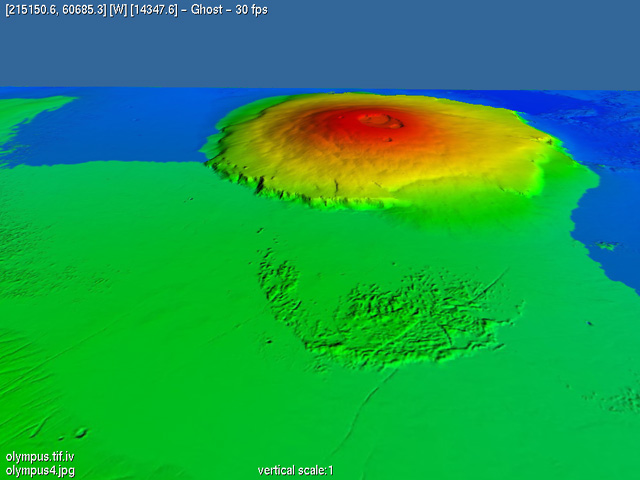 and if you get bored walking on the Earth you can walk on
Mars.
and if you get bored walking on the Earth you can walk on
Mars.
Brief History
Walkabout was originially written in 1995 as an Inventor CAVE(r) program to investigate moving around scenes with dynamic objects (floating panels, elevators, escalators) etc to get some practice writing Inventor code in the CAVE. By 1996 I had switched over to Performer which was a much easier environment to program in the CAVE. Now with more inexpensive stereoscopic projection displays available, and OpenInventor now much more cross-platform than Performer thanks to the nice Coin3D people, I have resurrected walkabout.
Much of the code was written for elementary school kids to explore and collect data from virtual environments to learn about the scientific method, which was sponsored by the National Science Foundation division of Experimental and Integrative Activities (EIA 0085946)
This effort is also supported by the National Science Foundation division of Earth Sciences (EAR 0218918 )
Getting walkabout
The latest released version (updated roughly once per month) can be found at ftp://ftp.evl.uic.edu/pub/software/andy/WALKABOUT.tar.gz
The latest beta version (updated every couple weeks) can be found at ftp://ftp.evl.uic.edu/pub/INcoming/andy/WALKABOUT.tar.gz
Getting walkabout data files
If you want to find a couple more scenes to walk on with walkabout, see this page www.evl.uic.edu/aej/macagave/samples.html
And you can also import data from other packages. Walkabout should happily load VRML-1 files. VRML-2 files are a bit trickier. Some will load fine, others need to be massaged. The front-end to Walkabout can do this massaging for some files such as uncompressed VRML(.wrl) files generated by Global Mapper and MicroDEM. It can also convert some GeoTiffs containing elevation data. For more information on importing data into walkabout please see www.evl.uic.edu/aej/macagave/importing_files.html
Legalisms
Walkabout is Copyright (C) 2002-2004 Electronic Visualization Laboratory, all rights reserved
Written by Andrew Johnson, University of Illinois at Chicago
This publication and its text and code may not be copied for commercial use without the express written permission of the University of Illinois at Chicago.
The author disclaims any representation of warranty: use this code at your own risk.
Related (Necessary) libraries
This code uses the CAVERNsoft library which is Copyright (C) 1994-2002 Electronic Visuazlization Laboratory, available from www.cavernsoft.org
The front end for walkabout uses fltk, available from www.fltk.org and since version 1.3.2 it also needs libtiff and libgeotiff, available from www.remotesensing.org. The windows version includes all of the necessary dlls. The OS-X version comes with libtiff.pkg package which will install libtiff into /usr/local/lib when it is launched. The linux version comes with libtiff.so.3 and libgeotiff.so which can be placed in /usr/local/lib or you can set your LD_LIBRARY_PATH environment variable to include ./ and leave them next to front.
This code uses OpenInventor, which is available in several flavours depending on your platform.
One option is the Coin3D libraries (http://www.coin3d.org/). You can obtain the latest versions from the Coin3D website. There are two versions of Coin3D now, Coin-1 and Coin-2. Coin 1.0 is Free Software released publicly under the GNU Lesser General Public License ("LGPL" .) Coin 2.X adds many more features and is Free Software released publicly under the GNU General Public License ("GPL" .) walkabout will compile with either one but development is focusing on Coin 2.X.
You can download coin3D for OS-X from http://www.coin3d.org/mac/
You can download coin3D for windows from http://www.coin3d.org/windows/
The walkabout download contains Coin3D for Windows. Mac and Linux users should download it separately.
You can also compile walkabout to run with TGS Open Inventor (http://tgs.com/), and it should run fine.
Installing walkabout
Walkabout is provided in a gzipped tar file containing source code and precompiled versions for Windows, Linux, and Mac OS-X.
On windows you can drop WALKABOUT.tar.gz onto winzip to get the WALKABOUT folder. Within that folder you will find versions of walkabout for the various platforms walkabout.zip. Dropping walkabout.zip onto winzip will give you another folder containing a windows installshield that you can use to install walkabout. By default walkabout will be placed in C:Program Files/GeoWall Consortium/walkabout/. Walkabout seems to run fine on Windows XP (Professional, Home, and Tablet PC editions), but has problems on Windows 2000.
On linux you can "gunzip WALKABOUT.tar.gz" and then "tar xvf WALKABOUT.tar" to get the WALKABOUT directory. Within that directory you will find versions of walkabout for the various platforms. For Linux you should gunzip and tar xvf the files from walkaboutLinux.tar.gz and then place this directory wherever you want. Walkabout seems to run fine on Red Hat 7.3 through 9.0 and on Suse 7.1 - 9.1 which are the only flavours I have been able to test on. Red Hat 9.0 is the linux version that is most actively being supported.
On OS-X you can drop WALKABOUT.tar.gz onto Stuffit Expander, or gunzip and tar xvf from the terminal as in linux. Within that directory you will find versions of walkabout for the various platforms. Drop walkabout.sit onto stuffit expander and then place the resulting folder wherever you want. At this point you should go into the WALKABOUT directory and run the OSX_CLICKABLE.sh shell script from the terminal so that the applications will accept keyboard input, which is useful. Walkabout seems to run fine on all 10.1 - 10.3 when recompiled but flavours of OS-X though 10.2 is not being actively supported. The current binary distribution is for 10.3 only
Each of the platform dependent directories comes with one example scene file - Hickey Mountain, Wyoming.
Among a variety of directories and support files you will find three applications:
| walkabout | This is the application that actually draws the landscape and lets you walk around on it and share the space with other remote walkabout users. | |
| front | This is the front-end to walkabout, allowing you to set display properties (mono, stereo, screen size) as well as choose what scene to view, create a new scene file, make changes to the attributes in that scene file, and launch walkabout. As of version 1.3 you can also use front to convert uncompressed Global Mapper .wrl files to the more optimizable .iv format for walkabout. | |
| reflector | This is a reflector to make networking multiple walkabout clients easier. Each client only needs to send information to the reflector and it will reflect that information to all of the other connected clients. This way each client only needs to know where the repeater is and not where the other clients are. |
Running Walkabout
Executables are provided for Macintosh OS-X (tested under 10.1.5 through 10.3.4), Linux (tested under Red Hat 7.3, 8, 9 and SuSE 7.1), and Windows (tested under XP home/pro and 2000).
Walkabout comes with a 'front end' program to make it easier to configure and run walkabout. The front-end program is currently called 'front' while I come up with a better name. So to start out its probably best to launch the appropriate version of 'front' for your computer.
On the Macintosh you can double-click on the front icon: ![]() or start front from the command line.
or start front from the command line.
On Windows you can either double-click on the front icon or select walkabout from the Start menu. All of the necessary libraries are included.
On Linux (with Red Hat 8 or 9) you can double-click on the front icon or start front from the command line. You should make sure that you have the Coin and simage libraries in /usr/local/lib and that your LD_LIBRARY_PATH environment variable includes /usr/local/lib where they are generally installed.
When front is running you will see a screen like this:
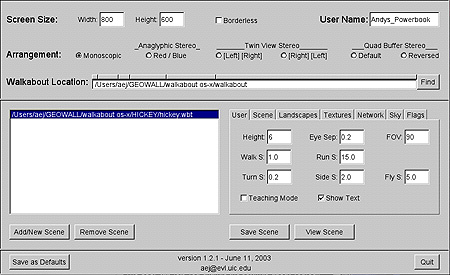
Front allows you to set the size of the (each) screen and your user name. You also set the stereo mode you want to use - whether its monoscopic, Twin View (Side by Side) Stereo or Quad-Buffered Stereo. Then you declare where the walkabout application resides. You can also add commonly used scene files to the list of scene files. Once you have these specified you can save these settings as defaults and they will be loaded in the next time you launch front.
After selecting a scene file you can change the settings of that scene file and save the changes, or just view the scene which will launch walkabout. Walkabout will use the saved version of the scene file when it runs. There are 7 tabs to let you change the various parameters of the scene file.
 |
The User tab lets you change the settings about yourself - how tall you stand above the landscape, how tall your field of view is, and the speed at which you move. Show Text shows the textual overlays. Teaching Mode turns off the display of the UTM coordinates. |
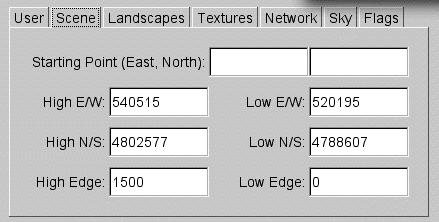 |
The Scene tab lets you change the settings on the scene. This gives the UTM coordinates of the corners of the landscape as well as the minimum and maximum elevations. By default you will start in the center of the space, but you can also specify the UTM coordinates where you start out. |
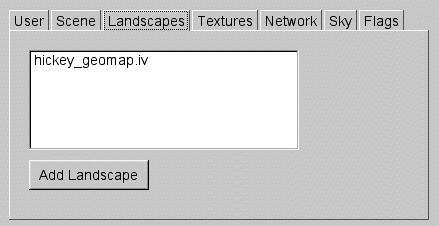 |
The Landscapes tab is where you pick the inventor (.iv) files which will make up the landscape. All of the files will be scaled to the size specified in the Scene tab. When you enter the space you will start out on the first landscape and then you can switch your view to the others. |
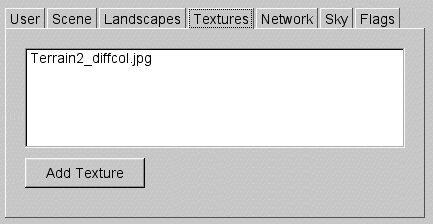 |
The Textures tab is where you pick the jpeg files to drape over the model. When you enter the space the first texture will be shown and then you can switch your view to the other textures. |
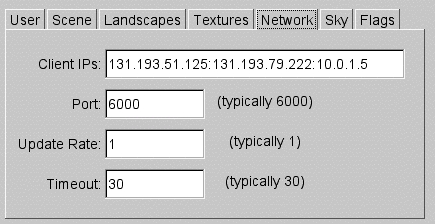 |
The Network tab is where you set up for sharing the space with other remote users. You can list as many other IP addresses where other walkabout clients are (or will be) running, separated by colons (:). All of the clients must have the same Port which we typically set to 6000 or a higher port number. The update rate sets how often (in seconds) your position and orientation is sent. This rate can be set to 0.5 or 0.2 for very smooth motion. The timeout sets how many seconds walkabout will wait before removing a 'zombie' remote user who hasnt sent any position and orientation in a while and has probably left the collaboration. |
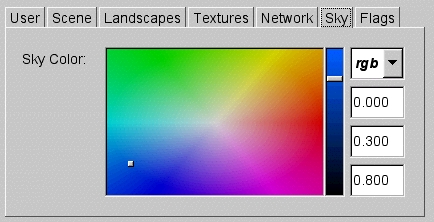 |
The Sky tab is where you set the background sky colour. |
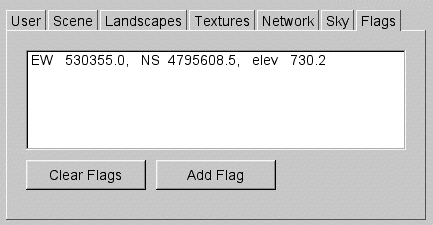 |
The Flag tab is where you can edit the flags that are visible in the space. You can add flags within the space while walkaing around or if you know the UTM coordinates to place them then you can define them here. |
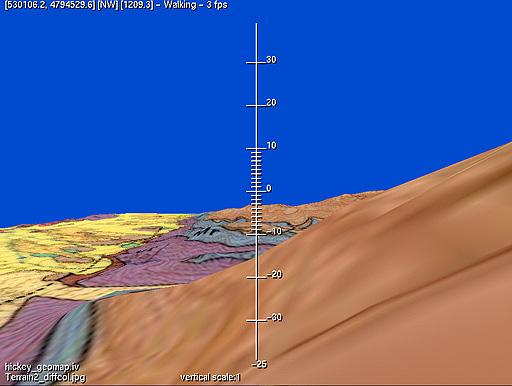
When walkabout runs it looks something like this:
There is another way that you can startup walkabout on Windows. Once you have the screen sizes, and the stereo mode and your user name set and saved, you will be able to double-click on scene files and have them automatically launch walkabout with those defaults. The first time you double-click on a scene file (with a .wbt extension) you will need to choose the walkabout application (probably in C:/Program Files/ GeoWall Consortium/Walkabout/ as the program to execute when a .wbt file is double-clicked. After that all programs with the .wbt extension will launch walkabout.
Window Settings
If you use the front end application to launch walkabout then you dont really need to deal with this, but you can also set these values yourself with a text editor, or you can write your own front end to walkabout that sets these parameters.
windows.txt defines the window(s) for the application:
By default it contains:
1 <- number of windows, should stay 1
M <-display mode - see below
0 0 1024 750 <- location and size of left (single) image - probably
something like 0 0 1024 768
Dr_Doofus <- the user name you want displayed on your avatar (with
no spaces)
0 100 0 100 <- the parts of the total image (width then height) this
client is rendering (mostly used on a tile, a single client sets 0 100
0 100)
- <- whether this is a normal client ('-') or a slave ('S') whose
display is driven from a remote walkabout
the possible display modes are M (Mono) or m (full screen mono) or S (side-by-side Stereo) or R (Reversed side-by-side stereo) , Q (Quad buffered stereo) or q (reversed Quad buffered stereo), or A (anaglyphic red/blue stereo), or a (full screen anaglyphic stereo)
so by default the file is set up to run in monoscopic mode, to make it side-by-side stereo for the GeoWall, change the M to an S, to make it work in quad-buffered stereo (if you have a card like the nVidia Quadro) change the M to a Q (or q)
You can override these settings on the command line when you launch walkabout
-master to force it to be a master
- client to for it to be a client
-mode ? to set the display mode where ? can be M, m, S, R, Q, q, A, a
-size minX minY maxX maxY to set the size of the screen
-percent lowX highX lowY highY to set the percentage of the total image
this client is rendering (0 100 0 100 to render it all)
Scene File
If you use the front end application to launch walkabout then you can modify these parameters using that interface and you dont really need to deal with this, but you can also set these values yourself with a text editor, or you can write your own front end to walkabout that sets these parameters.
Scene contains information on the scene to walk through. They are usually given the file extension .wbt
it contains a COORDINATES line giving the UTM for the corners of the scene, given in the order low east, high east, low north, high north, low elevation high elevation, e.g. COORDINATES (520195 540515 4788607 4802577 0 1500)
if the coordinates are all 0 then the default scaling from within the main landscape will be used. This is useful if you have a model that is already built where 1 unit in the model is 1 metre in the real world.
it contains the SPEED definitions - first the speed for the a/z keys, then the spped for the up/down arrow keys, and then the turning speed for the left/right arrow keys, and finally the sidestepping speed for the g/h keys e.g. SPEEDS (50 2 1 10)
it contains how tall the user is in metres - by default the user is 2 metres tall, that is, their eyes are 2 metres off the ground, e.g. USERHEIGHT (2)
it contains SHOW_TEXT if you want to see the users's current location, vertical scale, landscape file name, and texture file name overlayed on the screen
it contains NO_OPTIMIZE if you do not want walkabout to try and speed up the landscape by partitioning the geometry. NO_OPTIMIZE should make things slower, but more compatible.
it contains TEACHING_MODE if you want to turn off the display of coordinates and the ability to jaunt so that the students have to figure out where they are.
it contains the user's starting position. By default the user is dropped onto the center of the space. You can override that and drop the user where you want, e.g. STARTING_POSITION (525000 4793000)
it contains the vertical field of view of the camera in degrees- by default it is 90 degrees - the inclinometer is automatically calibrated to match the FOV value given here, e.g. CAMERA_FOV (90)
it contains the user's inter-pupil distance - by default it is 0.2. You can increase this value if you want hyper stereo to increase the stereo effect of objects that are far away. 0.2 is about right for normal human vision e.g. INTER_PUPIL (0.2)
then it contains the colour of the background given in RGB values from 0 to 1, e.g. SKY (0.2 0.4 0.6)
it contains networking information so walkabout can send information
to other viewers on the network. REALTIME_POSITIONING_TIME_INTERVAL
tells how often to update the remote display in seconds,
REALTIME_POSITIONING_PORT tells which port to use so you should be able
to leave this as 6000, and then REALTIME_POSITIONING_CLIENT tells which
clients to send the information to - there can be multiple client IP
addresses separated by colons. e.g. for all 3:
REALTIME_POSITIONING_TIME_INTERVAL (1)
REALTIME_POSITIONING_PORT (6000)
REALTIME_POSITIONING_CLIENT (131.193.51.152:127.0.0.1)
it contains the names of the texture files to load in, all in JPG or
RGB format, each in its own line eg:
TEXTURE_MAP (MODELS/DavisTM322.rgb)
TEXTURE_MAP (MODELS/DavisTM543.rgb)
TEXTURE_MAP (MODELS/DavisTM742.rgb)
TEXTURE_MAP (MODELS/cc_aerial_4096.rgb)
it contains the names of the inventor files to load in, each in its
own object line eg:
OBJECT (file(hickey_geomap.iv))
the models may not be in the correct orientation for use in
walkabout so you can rotate them.
For example, from Explorer you may need the following to do a 90 rotate
about X and a 180 rotate about Z: object (file(DavisWhite5.iv)
orientation(90 0 180))
For example, from Bryce you may need the following to do a 180 rotate
about Z: object (file(hickey_geomap.iv) orientation(0 0 180))
by default North is assumed to be at the top of the texture map, east to the right.
The models (in .iv format) and textures (in .rgb format) are typically stored in the same directory as the scene file but they can be wherever you want.
To learn how to create your own scene files, there is a short tutorial here.
Scaling the Landscape
Walkabout will automatically scale the objects to match the UTM coordinates and the elevation.
Keyboard Controls
The keyboard controls are a little scattered right now, with creeping featuritis. Once things settle down they may move a bit. You may prefer to use a game controller to move around the landscape and toggle the various options. Under OS-X GamePad companion from www.carvware.com seems to work very nicely, under Linux joy2key works fine.
As of version 1.3 the user can reconfigure the keyboard controls using a keys.txt file. A keys.txt file that sets the defaults looks like this:
MOVEFORWARD *U
MOVEBACKWARD *D
TURNLEFT *L
TURNRIGHT *R
RUNFORWARD A
RUNBACKWARD Z
MOVELEFT G
MOVERIGHT H
TILTUP E
TILTDOWN C
MOVEUP I
MOVEDOWN K
SCALEUP M
SCALEDOWN N
INCLINE D
FLYMODE F
FLAG P
LANDSCAPE L
TEXTURE T
SNAPSHOT S
JAUNT J
TRAILS R
The *R *L *U *D represent the arrow keys. All other alphabetic keys use their upper or lower case letter. I would advise against mapping the number keys to any actions since they are used to set the jaunt destination.
Compiling the Source Code
Walkabout and front have been compiled and tested on a macintosh under OS-X, a Linux box with SUSE 7.1, SUSE 9.2, Red Hat 7.3, and Red Hat 8.0, and most recently on windows machines running XP and 2000. Thanks to Yong-Joo and Javier for the assist with the Windows code.
If you want to compile walkabout and/or front yourself, then the source code is provided.
For OS-X and Linux you should be able to go to the WALKABOUT SRC directory for walkabout or the FRONT SRC directory for front or the REFLECTOR SRC directory for the reflector and "configure" and then "make". If you want to recompile front then you will need to download libgeotiff for your particular platform and install it. This may also require you to install libtiff which can also be found at www.remotesensing.og. You will also need a static version of libjpeg and libpng. If you want to recompile walkabout you will need glut.
For windows you can go to the win32 directory and use the Field.dsw project workspace file to compile walkabout under Microsoft Visual C++. With windows you may also need to compile libjpeg that can be found under the win32/jpeg-6b directory. You can similarly compile front and the reflector from within their source code directories.
The coin libraries are included for windows. For OS-X and Linux you will need to download them from www.coin3d.org.
Multiple Users Sharing the Same Scene
Several walkabout clients can explore the same scene at the same time and each client can see where the other clients are on the surface. Each of the remote users is represented by an avatar, allowing you to see where the avatar is facing. When there are other users in the space, the textual overlay shows the remote user's name and what direction they are in.
When you run front, you can use the network tab to list a series of IP addresses (separated by colons :, e.g. 131.193.51.125:131.193.79.222) that this walkabout will send data to. If you want to connect up more that two or three walkabout applications this can get cumbersome, so I've included a reflector program.
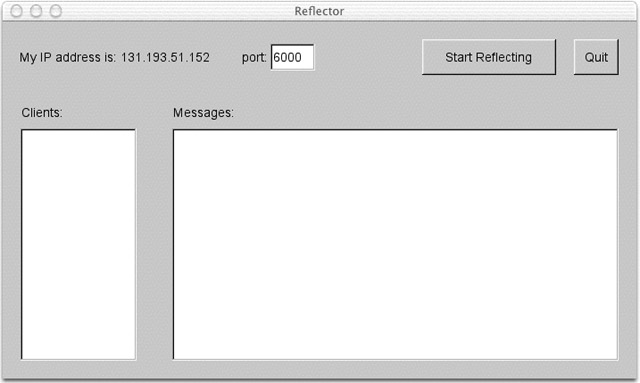
Running the Reflector
The reflector acts as a central message passing station. Multiple walkabout clients can connect to the reflector and the reflector will reflect the data sent to it to all the other currently connected clients. This way you only need to specify the IP address of the reflector in each of the walkabout clients. You can run the reflector on OS-X, or Windows, or Linux and you will see the screen below. When you press the 'Start Reflecting' button the reflector will start operating.
Running walkabout on other displays
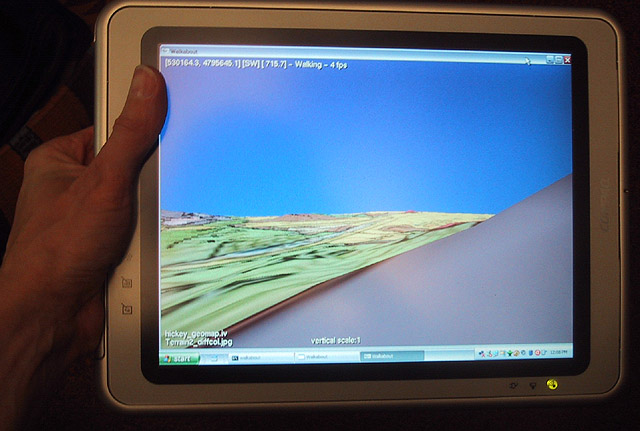
I have tried rtunning walkabout on a few different tablet PCs.
On the Toshiba Portege 3500 with a 1.3Ghz processor, and 496 MB of RAM, it is pretty much unusable at 2 frames per second due to the weak graphics card.
On the Compaq TC1000 with a 1Ghz processor, GeForce2Go, and 744MB of RAM, it runs at 10 frames per second, which isnt great, but it is sort-of usable.
On the Toshiba Portege m200 with a 1.5Ghz processor, GeForce FX Go5200, and 1GB of RAM, it runs at over 30 frames per second and is very very usable.
If anyone has any other tablet experiences, then please let me know.
I have also run walkabout on our 5 x 3 (roughly 6000 x 3000) tiled LCD display - the GeoWall 2 - where each display is driven by its own PC with very nice results.
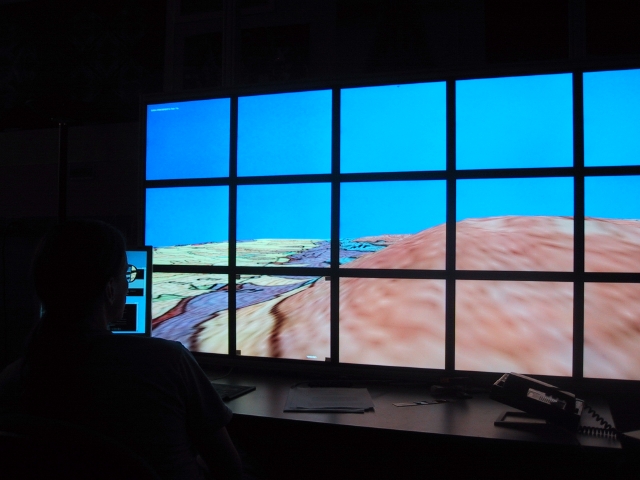

For more information on configuring walkabout for a tile display, click here
Java Map Client
The new java map client is included with this distribution in the FieldInterface directory!
As discussed above, Walkabout can send the user's position over the network to clients that can monitor the user's position. These clients may be other walkabout applications so you can see the remote user(s) on the landscape or they can be 2D top-down view desktop clients written in java. This 2D client is called the FieldInterface, and it can also be found in this distribution.
To run the java client you can go to the FieldInterface/src directory and type "java -cp ./ FieldInterface" and there is also a RUN.bat file which does the same thing.
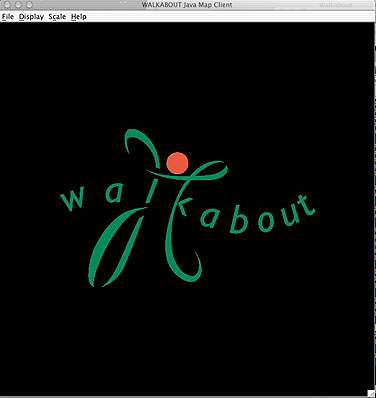
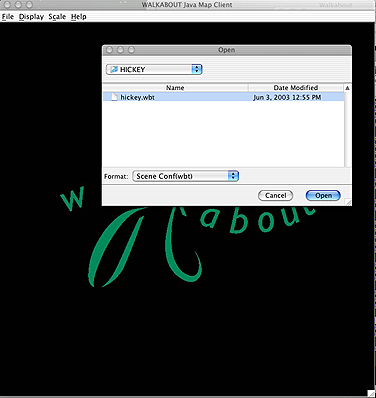
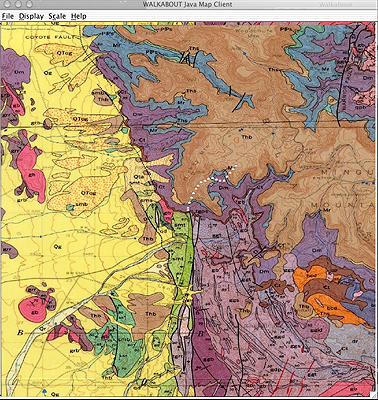
The java client will load up and show the walkabout logo. You can then go to the file menu, choose open and then locate a standard walkabout scene file (e.g. hickey.wbt) and it will display the first texture map in that scene file. If the file contains multiple textures then you can select which texture to view at any time from the Display menu.
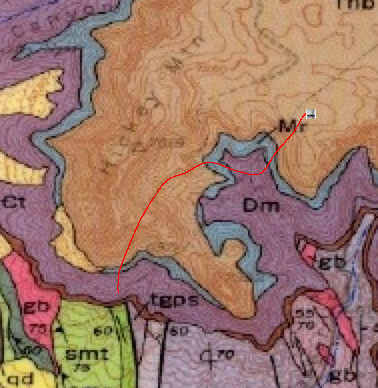
This java interface can show either the current position of the user, or show a trace of the users past positions, or show a line indicating the users past motions. When there are multiple users in the space there are multiple lines.

You can also zoom in or zoom out on the maps.
You can start up the clients in any order and just as you can have multiple walkabotu clients receiving data, you can have multiple FieldInterface clience monitoring.
To compile the java interface you can type
javac *java
For those that are curious, the position information is sent via UDP, which is unreliable, but if you miss a piece of position data there is likely to be another one coming in a couple seconds, and for our Virtual Reality work where the position info is sent 15-20 times per second UDP is much preferable to TCP. The networking code comes from the CAVERN group at EVL and was implemented for the Field by Yong-Joo Cho.
You can run both the java interface and walkabout on the same computer, if you wish (set the REALTIME_POSITIONING_CLIENT to 127.0.0.1), or on different computers (set the REALTIME_POSITIONING_CLIENT to the IP of the other computer.)
The original (very primitive) FieldInterface was written by me, then Yong-joo did a major rewrite, and it was most recently modified by Jungmin.
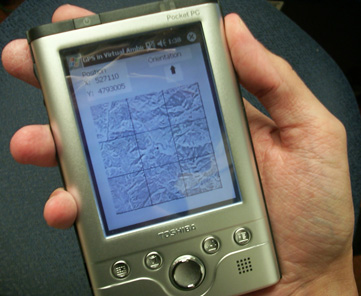
PocketPC Client
You can also send the user's position in walkabout to a PDA which acts like a GPS receiver for the virtual environment. The files are availale in the GPS_PDA_Only.zip file which can be installed on a Pocket PC.
On the PocketPC the virtual GPS is called GPS_ITR_2002-1
To communicate with the PocketPC add the IP address of the Pocket PC to the REALTIME_POSITIONING_CLIENT line of the SCENE file. You can send the position information to multiple java map clients and PDA clients simultaneously.
The PocketPC GPS code was written by Yong-Joo Cho here at EVL
Version Changes
Changes since 1.3.2
Changes since 1.3.1
Changes since 1.3
Changes since 1.2.2
Changes since 1.2.1
Changes since 1.2
Changes since 1.1
Changes since 1.0.1
Changes since 1.0
Changes since 0.26
Changes since 0.25
Changes since 0.24
Changes since 0.23
Changes since 0.22
Changes since 0.21
Changes since 0.20
Changes since 0.19
Changes since 0.18
Changes since 0.16
Changes since 0.15
Changes since 0.14
Changes since 0.13
Changes since 0.12
Changes since 0.11
Changes since 0.1
If you have any questions, comments, or suggestions please let me know - aej at evl.uic.edu
last update August 15, 2008.