| |
Compiling
Immersaview Using CMake for Linux Using Curses CMake (ccmake) |
| |
Compiling
Immersaview Using CMake for Linux Using Curses CMake (ccmake) |
Introduction
Before beginning using CMake, make sure that Coin3D is installed and that the QUANTA library named libquanta_32.a is available. Additionally, make sure that the Coin3D libraries named libCoin.so and libsimage.so are also available. More importantly, make sure that these libraries appear in the same directory. Because CMake only specifies where libCoin.so resides, it also assumes that libsimage.sois also there. As a result, it is best to make sure that all the contents of the simage/lib get copied or moved to Coin-2/lib. If this is not done, none of the textures that are used by the model will appear...which will give a very strange appearance as opposed to what one would expect to see. CMake is a program that creates make files, or instructions to your compiler, about where to find files when taking the source code of Immersaview and turning it into a usable executable. Mac OS and Windows can run CMake as a GUI. Unfortunately, at this time, it is not possible on Linux (as far as this author knows).
There
are two parts to compiling Immersaview. The first part involves
creating a file named libQAvatar.a which is used
to manage remote mouse pointers during a collaborative session. The
second part involves creating the immersaview and immersaviewserver
executables. This example is going to assume that the immersaview ZIP
file was uncompressed in /usr/local/immersaview.
As a result, the "base" immersaview directory is /usr/local/immersaview/immersaview0.40. Additionally, for
this example, all supporting software like QUANTA are assumed to be
located in /usr/local/immersaview/QUANTA-0.4. Finally, it is assumed
that CMake was installedthat it is
available in your environment path such that you only have to type ccmake, and CMake will start
properly. The paths given here and
throughout this document should change based on the locations where
these and other appropriate files reside. However, to give some frame
of reference, the paths already described will serve as the example
throughout this document.
Creating the Makefiles for libQAvatar.a
The
first task that must be completed is specifying where the QAvatar
source code and binaries will reside. In order to use CMake to
accomplish this task, it is going to be necessary to run CMake from the
command prompt. In general, to run CMake from the command line, it is necessary to change to the directory
where the build will occur.
In this case, make a directory named /usr/local/immersaview/immersaview0.40/build-qavatar
and move to that directory. It is not sufficient to then just type the
path to ccmake at the command line because it is necessary to give the
relative (or absolute) path to the source directory used for this
build. For this part, the source directory named qavatar-src will be used and should
be located in /usr/local/immersaview/immersaview0.40/qavatar-src.
To begin this process, type the following from build-qavatar:
ccmake ../qavatar-src
CMake
appears with not much to see. The first thing that should be done is
to configure the initial CMake files by pressing the 'C' key. This
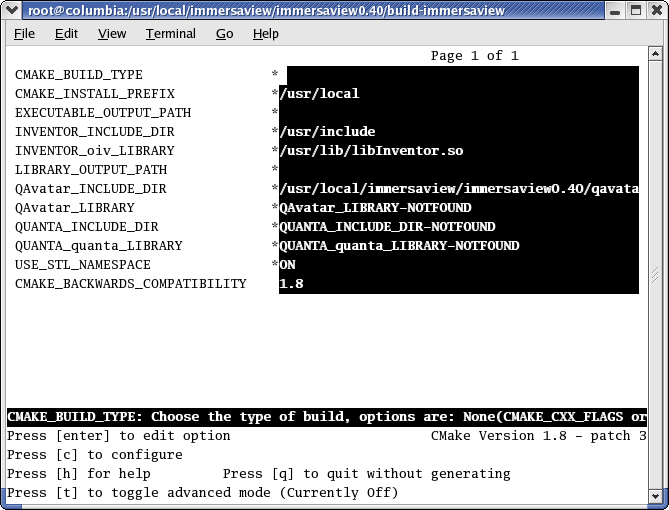
will fill the area with many fields with different names as seen below:
Each field listed here represents a directory or a filename that should
be specified in order to have CMake create the proper makefile to
generate libQAvatar.a. There
are CMake scripts that attempt to search and find these files and
directories. If they are successful, then everything will appear as you
see above (but that does not mean that the scripts chose the correct
locations). Usually the first time that configuration occurs, all of
the fields become marked with an asterisk '*' regardless of whether or
not they are correct. Typically, whenever there is incomplete,
uncertain, or erroneous information for one of these fields, CMake
marks the field with an asterisk. If the information is correct, CMake
will remove the asterisk. Typically after configuring CMake for the
first time, just about every field is marked with an asterisk unless
CMake seemed to have found the appropriate file or directory. Even
though the asterisk would imply that the field must have some new
information specified, it may not be necessary since not every field
needs to be updated in order to be correct with reference to CMake. As
a result, the fields that must be changed will be directly specified in
this document; otherwise, it would probably be best to leave the field
as it is. It is possible that additional fields may cause errors that
may be related to one's local configuration. For this reason, it is up
to the user to determine and correct the source of these errors. To
change the information of a particular field, one needs to move the
cursor to the field and press the Enterkey. To delete the field
completely, one can press the key combination Control-K. Afterwards, one can
type the information into the field or copy it into that location from
another source. When one is done entering this infomation, press the Enter key.
Now it is time to make the necessary changes to the following fields so that the correct information is given to generate the makefile:
QUANTA_INCLUDE_DIR: There is a directory named include that should reside inside the directory where QUANTA was downloaded. For this example, this directory can be found in the following location: /usr/local/immersaview/QUANTA-0.4/install/include.
QUANTA_quanta_LIBRARY: The QUANTA library that must be found is
named libquanta_32.a. To help
keep things organized, when the author compiled QUANTA from source, an install directory was made from the
base QUANTA directory. It is in the installdirectory
that libquanta_32.a should
exist. If someone installed
QUANTA to a different location, then this path would probably differ.
So, for this example, the absolute path to the library is: /usr/local/immersaview/QUANTA-0.4/install/lib/libquanta_32.a.
Once
the information has been entered, it will be necessary to configure
CMake again with this new information by pressing the 'C' key. As long
as the information in the specified fields is acceptable to CMake, any
asterisks that may have appeared should now have gone away. If an error
does occur, CMake will place an asterisk to the left
of the field's information. In this case, one can either make the
change to the erroneous field(s) or ignore the error(s). If one
desires to fix these problems, simply make the appropriate changes to
the erroneous fields and configure CMake again by pressing the 'C' key
again. Repeat this process until the error stops occurring. Once
things are configured as one would like, press the 'G' key to generate
the makefile. This should make the CMake end and return the window to
the command line.
Using the Makefiles to Create libQAvatar.a
Since the directory that one currently
resides in is where the Makefile was created, all that is needed to
create libQAvatar.a is to type
the following:
make libQAvatar.a
If all of the files and directories were specified correctly, the end
result should involve libQAvatar.a being
present in the directory named build-qavatar.
For this particular example, the location to this file is /usr/local/immersaview/immersaview0.40/build-qavatar/libQAvatar.a. Remember the location of this file since it will be
used in the next section.
Creating
the Makefiles for immersaview and
immersaviewserver
Now it
is time to create the binaries named immersaview and immersaviewserver. Again, to run CMake from the command line, it is necessary to change to the directory
where the build will occur.
In this case, make a directory named /usr/local/immersaview/immersaview0.40/build-immersaview
and move to that directory. It is not sufficient to then just type the
path to ccmake at the command line because it is necessary to give the
relative (or absolute) path to the source directory used for this
build. For this part, the source directory named immersaview-src will be used and
should be located in /usr/local/immersaview/immersaview0.40/immersaview-src.
To begin this process, type the following from build-immersaview:
ccmake ../immersaview-src
As before, CMake appears with not much to see. The
first thing that should be done is to configure the initial CMake files
by pressing the 'C' key. One thing that may happen is that the GLUT
installation may not be found and an error will appear. Simply press
the 'E' key to exit this help section. Then one will see the following:
Recalling
the possible GLUT directory error, it seems that there is no field for
specifying anything related to GLUT. For this reason, it is necessary
to view the more advanced options by pressing the 'T' key. Many more
fields appear below:
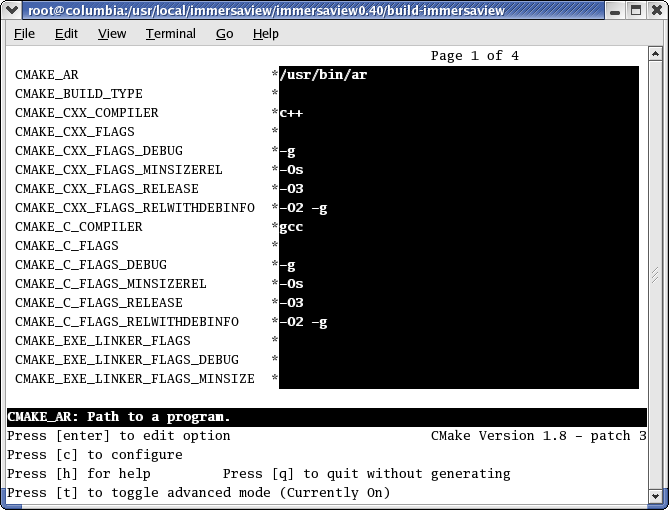
There are now multiple "pages" of fields that can be specified
that can be navigated by pressing the Page
Up and Page Down keys.
One should also notice that almost every field has an sterisk
indicating that changes may need to be made in order for CMake to
generate the makefiles. However, keep in mind that it is only necessary
to change the relevant fields and leave the other fields alone.
Additionally, one can simply ignore erroneous fields as irrelevant. If
it is uncertain where directories might reside, it is recommended to
take the "advice" of CMake when it gives hints as to what specific
header file would reside in a given directory. With this in mind, do a
file search if all else fails and use the file with the most recent
date. The following fields should be changed:
GLUT_INCLUDE_DIR: Only change this information if you
received an error from CMake. According to CMake,
it is necessary to find the directory that contains glut.h.
Since this is something that may not be well known, it may be best to
search for glut.h. A
directory that would probably contain glut.h
is /usr/include.
INVENTOR_INCLUDE_DIR: Given the assumption mentioned in the beginning of this document, Coin3D files and directories reside in /usr/local/immersaview/Coin3D. For this example, the path to the include directory is the following: /usr/local/immersaview/Coin3D/install/Coin-2/include.
INVENTOR_oiv_LIBRARY: Based on the base directory of Coin3D listed for the previous field, the library named libCoin.so should be found in a similar location. For this example, the path to this file is: /usr/local/immersaview/Coin3D/install/Coin-2/lib/libCoin.so.
QAvatar_INCLUDE_DIR: Just reuse the source directory that was used to specify the location of qavatar-src. For this example, this directory can be found in the following location: /usr/local/immersaview/immersaview0.40/qavatar-src.
QAvatar_LIBRARY: This is where that request to remember where libQAvatar.a comes in. This library is going to be located in build-qavatar. For this example, this library can be found in the following location: /usr/local/immersaview/immersaview0.40/build-qavatar/libQAvatar.a.
QUANTA_INCLUDE_DIR: Use the same directory that was used when building libquanta_32.a. For this example, this directory can be found in the following location: /usr/local/immersaview/QUANTA-0.4/install/include.
QUANTA_quanta_LIBRARY: Use the same directory that was used when
building libquanta_32.a. For this example, the absolute
path to the library is: /usr/local/immersaview/QUANTA-0.4/install/lib/libquanta_32.a.
Once the information has been entered, configure CMake by pressing the 'C' key again. As long as the information in the specified fields is acceptable to CMake, all of the fields should not have any asterisks near them. If an error does occur, CMake will put an asterisk by the problematic field. In this case, one can either make the change to the erroneous field(s) or ignore the error(s). If one desires to fix these problems, simply make the appropriate changes to the erroneous fields and configure CMake again by pressing the 'C' key. Repeat this process until the error stops occurring.
Once
things are configured as one would like, have CMake generate the
appropriate makefiles by pressing the 'G' key. This should make the
CMake disappear and allow the command line to return to the window.
Using the Makefiles to Create immersaviewand immersaviewserver
Since the directory that one currently
resides in is where the Makefile was created, all that is needed to
create immersaview is to type
the following:
make immersaview
Similarly, to create immersaviewserver,
just type the following:
make immersaviewserver
Both of these executables should now reside in build-immersaview.
Filling the bin Directory
The pieces are now in
place to get things running. Now, it is just necessary to run one more
script that will take care of the remaining things to setup and
cleanup. The name of the script to run is called setup, but at this time, setup does not do anything because
it needs to have executable permissions. As a result, type the
following at the command line from /immersaview/immersaview0.40:
chmod
755 setup
Run the script by
typing:
./setup
Now, things should be ready to go.
If there are any questions or feedback on this document, please send mail to cavern@evl.uic.edu. This document was last revised in August 2004.