|
|
Compiling Immersaview Using CMake for Windows Using the CMake GUI |
|
|
Compiling Immersaview Using CMake for Windows Using the CMake GUI |
Introduction
Before beginning using CMake, it will be necessary to have the following library files available: pthreadsVC.lib, quanta.lib, coin2.lib, simage1.lib. Another file that should be available include: glut32.dll, opengl32.dll (both should be located in C:\WINDOWS\SYSTEM32). For almost all cases, all of these files should be built as "Release". If for some reason, it is necessary to make a "Debug" version of Immersaview, then it is necessary to make sure that each library file that was generated is a "Debug" version. This will likely result in the letter 'd' appearing before the dot. For example, coin2.lib will become coin2d.lib. One other item to note, if creating pthreadVC.lib was problematic in Microsoft Visual C++, make sure that the intermediate files created when compiling are deleted. The author of this document received an error where it was necessary to delete some intermediate files for the creation of this file to occur. Do not worry, Microsoft Visual studio will gladly indicate which types of files need to be deleted.
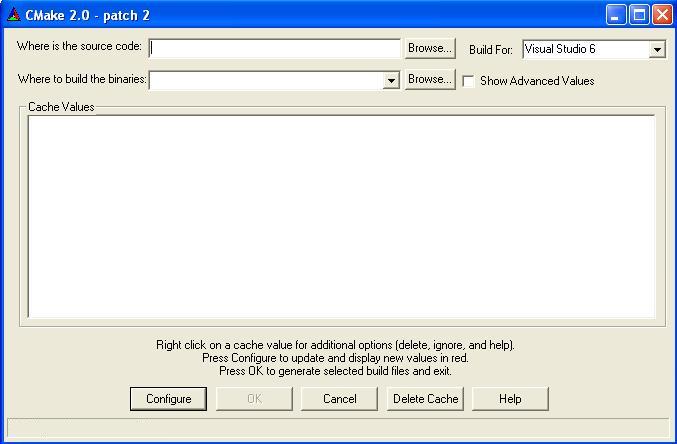
Once it is certain that all of the above mentioned files are available and of the correct type (that is, "Debug" or "Release"), start the CMake GUI. CMake is a program that creates make files, or instructions to your compiler, about where to find files when taking the source code of Immersaview and turning it into a usable executable. After CMake loads, you should see something like the following:
There are two parts to compiling Immersaview. The first part involves creating a file named QAvatar.lib which is used to manage remote mouse pointers during a collaborative session. The second part involves creating the immersaview and immersaviewserver executables. This example is going to assume that Microsoft Visual C++ version 6 will be used as the compiler and that the immersaview ZIP file was uncompressed in C:\immersaview. As a result, the "base" immersaview directory is C:\immersaview\immersaview0.40. Additionally, for this example, all supporting software like QUANTA and Coin3D are assumed to be located in C:\immersaview.
Creating the Makefiles for QAvatar.lib
The first task that must be completed is specifying where the QAvatar source code and binaries will reside. This is done by filling in the two fields at the top of the CMake window. This information can either be directly typed into the fields or can be found by browsing the computer's directories. For this example, the following information will be given:
Source Code Directory: C:\immersaview\immersaview0.40\qavatar-src
Binaries Directory: C:\immersaview\immersaview0.40\build-qavatar
Once this information has been entered, press the Configure button. This makes a lot of fields appear in the main part of the CMake window that are highlighted red. Usually the first time that the Configure button, all of the fields become highlighted with a red color regardless of whether or not they are correct. Typically, whenever there is incomplete, uncertain, or erroneous information for one of these fields, CMake highlights the field with a red color. If the information is correct, CMake colors the field with a gray color. Typically after configuring CMake for the first time, just about every field is highlighted red. Even though the red color would imply that the field must have some new information specified, it may not be necessary since not every field needs to be updated in order to be correct with reference to CMake. As a result, the fields that must be changed will be directly specified in this document; otherwise, it would probably be best to leave the field as it is. It is possible that additional fields may cause errors that may be related to one's local configuration. For this reason, it is up to the user to determine and correct the source of these errors. Below is what CMake may look like after pressing the Configure button:
The following fields should be changed:
QUANTA_INCLUDE_DIR: There is a directory named include that should reside inside the directory where QUANTA was downloaded. For this example, this directory can be found in the following location: C:\immersaview\QUANTA-0.4\include.
QUANTA_PTHREADS_INCLUDE_DIR: The pthreads source that came with the QUANTA package is a Windows-specific library that is used to maintain compatability with some functionality found on the Linux and Mac operating systems. Unlike finding the QUANTA include directory, the header files typically found with pthreads do not reside in a separate directory named include. Instead, they appear directly in a subdirectory of the QUANTA base directory named WIN32\pthreads. For this example, the directory appears in the following location: C:\immersaview\QUANTA-0.4\WIN32\pthreads.
QUANTA_PTHREADS_LIBRARY: Whenever it is necessary to find a library, it will be necessary to give the absolute path to the file, as has been done before, but to also give the name of the library. Here, one should look for the library named pthreadVC.lib. From the QUANTA base directory, it should be found in WIN32\pthreads. For this example, the path to the library is: C:\immersaview\QUANTA-0.4\WIN32\pthreads\pthreadVC.lib.
QUANTA_quanta_LIBRARY: The QUANTA library that must be found is named
quanta.lib. From the QUANTA base directory, it should be found in
WIN32\QUANTA\QUANTAlib\Release assuming that the library was created in a
"Release" compilation. For this example, the absolute path to the library
is: C:\immersaview\QUANTA-0.4\WIN32\pthreads\quanta.lib.
Once the information has been entered, press the Configure button again. As long as the information in the specified fields is acceptable to CMake, all of the fields should turn into a gray color. If an error does occur, CMake will highlight that field a red color. In this case, one can either make the change to the erroneous field(s) or ignore the error(s). If one desires to fix these problems, simply make the appropriate changes to the erroneous fields and press the Configure button again. Repeat this process until the error stops occurring.
Once things are configured as one would like, press the OK button. This should make the CMake GUI disappear.
Using the Makefiles to Create QAvatar.lib
Next, one can either open Microsoft Visual C++ on its own and then search for the workspace to open or look for the workspace in the appropriate directory and double-click on its icon to open it with Visual C++. Either way, the file that one should be looking for is in immersaview0.40\build-qavatar. The name of the Visual C++ workspace is named QAVATAR.dsw. For this example, the path to this file is: C:\immersaview\immersaview0.40\build-qavatar\QAVATAR.dsw. From there, select from the menu Build and then Batch Build. A small window should appear with everything checked. The only option that should be selected in this box is QAvatar - Win32 Release. Everything else should be unchecked. This is not required, but one may waste unnecessary processor time and effort on compiling this that will not be used. One quick way to uncheck everything is to first scroll to the top of the list. Next, hold the Shift key down and then repeatedly press the Page Down key until the entire list is highlighted. Then, press the Space Bar. This should uncheck every item in the list. Finally, scroll up to QAvatar - Win32 Release and check it. The contents of the window should appear similar to what is shown below:
![]()
Once this task has been completed, press the Build button. Visual C++ should start churning away with the result being seeing the following message: QAvatar.lib - 0 error(s), 0 warning(s). The next step is to locate this file. Since this build was a "Release" version, QAvatar.lib should reside in a subdirectory named build-qavatar\Release. For this particular example, the location to this file is C:\immersaview\immersaview0.40\build-qavatar\Release\QAvatar.lib. Remember the location of this file since it will be used in the next section.
Creating the Makefiles for immersaview and immersaviewserver
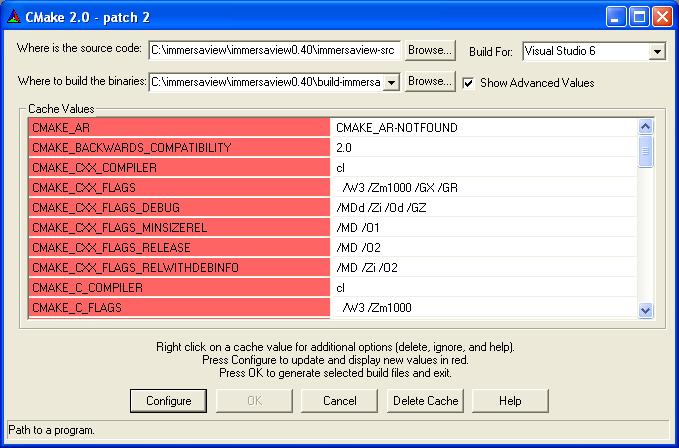
Now it is time to create the binaries named immersaview and immersaviewserver. This task can begin to be completed by filling in the two fields at the top of the CMake window. This information can either be directly typed into the fields or can be found by browsing the computer's directories. For this example, the following information will be given:
Source Code Directory: C:\immersaview\immersaview0.40\immersaview-src
Binaries Directory: C:\immersaview\immersaview0.40\build-immersaview
Once this information has been entered, press the Configure button. Again, this makes a lot of fields appear in the main part of the CMake window that are highlighted red and this is because the Configure button was pressed for the first time. Unlike the last time, there are going to be some additional options that do not appear in this shorter list because its setting is considered by CMake to be an advanced setting. For this reason, please make a checkmark appear for the option labeled Show Advanced Values. Below is what CMake may look like after pressing the Configure button:
The following fields should be changed:
CMAKE_EXE_LINKER_FLAGS: If you are not using Visual C++, you may be able to leave this field as it is. The information given in this field is correct, so it will only be necessary to append the following information (leave a space between the last item and this new information): /nodefaultlib:"libcmt.lib". The reason for this is that there is a library conflict that occurs when building the binaries. The simplest way to make this problem go away is to tell Visual C++ to ignore libcmt.lib. The name of this file assumes that a "Release" version of the binaries will be generated. If a "Debug" version of the binaries are going to be generated, then use the debug version of this library named libcmtd.lib.
GLUT_INCLUDE_DIR: Since OpenGL generally supports GLUT, the location of its header files may probably reside in the same directory as the OpenGL headers, which is the case for Visual C++. Look for a directory named GL that minimally contains the file glut.h. For this example, the directory appears in the following location: C:\Program Files\Microsoft Visual Studio\VC98\Include\GL.
INVENTOR_INCLUDE_DIR: Although the field name would seem to imply to search for something named "Inventor", this is not going to be the case. The name originates from Silicon Graphics, the creators of OpenGL, who made a library called Open Inventor. Its popularity led to the creation of an open-source version that is released under the name of Coin3D. As a result, one only has to look for an include directory in the directory where Coin3D was downloaded. For this example, this directory can be found in the following location: C:\immersaview\Coin3D-2\include.
INVENTOR_oiv_LIBRARY: Here, the task involves looking for a library named coin2.lib in a subdirectory named lib. Please note, if this is going to be a "Debug" version of immersaview and immersaviewserver, use the library named coin2d.lib instead. For this example, this directory can be found in the following location: C:\immersaview\C:\immersaview\Coin3D-2\lib\coin2.lib.
QAvatar_INCLUDE_DIR: Just recycle the source directory that was used to specify the location of qavatar-src. For this example, this directory can be found in the following location: C:\immersaview\immersaview0.40\qavatar-src.
QAvatar_LIBRARY: This is where that request to remember where QAvatar.lib comes in. This library is going to be located in build-qavatar\Release since it was recommended to build a "Release" version of the library. For this example, this directory can be found in the following location: C:\immersaview\immersaview0.40\build-qavatar\Release.
QUANTA_INCLUDE_DIR: Use the same directory that was used when building QAvatar.lib. For this example, this directory can be found in the following location: C:\immersaview\QUANTA-0.4\include.
QUANTA_PTHREADS_INCLUDE_DIR: Use the same directory that was used when building QAvatar.lib. For this example, the directory appears in the following location: C:\immersaview\QUANTA-0.4\WIN32\pthreads.
QUANTA_PTHREADS_LIBRARY: Use the same directory that was used when building QAvatar.lib. For this example, the path to the library is: C:\immersaview\QUANTA-0.4\WIN32\pthreads\pthreadVC.lib.
QUANTA_quanta_LIBRARY: Use the same directory that was used when
building QAvatar.lib. For this example, the absolute path to the
library is: C:\immersaview\QUANTA-0.4\WIN32\pthreads\quanta.lib.
Once the information has been entered, press the Configure button again. As long as the information in the specified fields is acceptable to CMake, all of the fields should turn into a gray color. If an error does occur, CMake will highlight that field a red color. In this case, one can either make the change to the erroneous field(s) or ignore the error(s). If one desires to fix these problems, simply make the appropriate changes to the erroneous fields and press the Configure button again. Repeat this process until the error stops occurring. The only "error" that may persist is whether or not to use OpenGL DLL. It would be recommended to indicate YES.
Once things are configured as one would like, press the OK button. This should make the CMake GUI disappear.
Using the Makefiles to Create immersaview and immersaviewserver
Next, one can either open Microsoft Visual C++ on its own and then search for the workspace to open or look for the workspace in the appropriate directory and double-click on its icon to open it with Visual C++. Either way, the file that one should be looking for is in immersaview0.40\build-immersaview. The name of the Visual C++ workspace is named immersaview.dsw. For this example, the path to this file is: C:\immersaview\immersaview0.40\build-immersaview\immersaview.dsw. From there, select from the menu Build and then Batch Build. A small window should appear with everything checked. Only two optionsshould be selected in this box which include immersaview - Win32 Release and immersaviewserver - Win32 Release. Everything else should be unchecked. This is not required, but one may waste unnecessary processor time and effort on compiling this that will not be used. As stated before, one quick way to uncheck everything is to first scroll to the top of the list. Next, hold the Shift key down and then repeatedly press the Page Down key until the entire list is highlighted. Then, press the Space Bar. This should uncheck every item in the list. Finally, scroll up to check both immersaview - Win32 Release and immersaviewserver - Win32 Release. The contents of the window should appear similar to what is shown below:

Once this task has been completed, press the Build button. Visual C++ should start churning away with the result being seeing the following messages: immersaview.exe - 0 error(s), 0 warning(s) and immersaviewserver.exe - 0 error(s), 0 warning(s). The next step is to locate these files. Since this build was a "Release" version, immersaview and immersaviewserver should reside in a subdirectory named build-immersaview\Release. For this particular example, the location of these files is C:\immersaview\immersaview0.40\build-immersaview\Release.
Filling the bin Directory
The pieces are now in place to assemble into the bin subdirectory found in immersaview0.40. Copy into the bin directory the following items: pthreadVC.dll, immersaview, and immersaviewserver. Optionally, coin2.dll and simage1.dll may also be copied to the immersaview0.40\bin directory. The file named pthreadVC.dll should appear in the subdirectory QUANTA\WIN32\pthreads. The executables immersaview and immersaviewserver will appear in the subdirectory named build-immersaview\Release. The DLL files named coin2.dll and simage1.dll will appear in the Coin3D subdirectory named bin. Assuming that everything is in the right location, try one of the batch files and see if things work. If errors occur indicating that files are missing, a simple fix would involve copying the appropriate files to the immersaview0.40\bin directory.
If there are any questions or feedback on this document, please send mail to cavern@evl.uic.edu. This document was last revised in August 2004.