Week 10 Notes
Project Progress Report / Critique II Guideline
As we discussed several times in class, we will have the second iteration of project progress review on 29 Mar. This is roughly two third point in our development process. After this second critique, we have four more weeks that we must allocate fair amount time to test / debug / polish our application for the final presentation. To help your preparation of this event, followings are a brief guidelines. Each milestone items may vary by each individual project.
- Functional interactive application. Most of important components are in place. (the way how the interation implemented may not be the final version. however, you should be able to demostrate / simulate core concept of your application)
- A few of sound source choosen (strongly recommended)
- Plan for remaining schedule: What do you want to accomplish in 4 weeks including test/debug/polishing?
(at this point, do not be too ambitous! Be practical and make things feasible. Remember that we have already spent two months and only have one month left.)
Virtools Review
Review of Shader Demo in Virtools
Virtools comes with various examples of shader in documentation directory. We've seen some of them during our class. It is very interesting to review its demo composition because we like to know its current capabilities.
One nice demo including various kind of shader effect is Shaders_Effects_Demo.cmo (you can find it in C:\Program Files\Virtools\Virtools Dev 4.0\Documentation\CMOS\Demo ). Let's review this demo first before we get into more detials of each individuals.
Use of Virtools Shader (shader materials available in resources)
During week 4 and 8, we reviews some material regarding SFX and rendering techniques (shader associated) in Virtools. It were mostly reviewing samples and demo composition files that come with Virtools installation. This week we will take a look at how we can use those effect in our application.
Some part of details in these shaders may be beyond your knowledge or too much to lean within a short time period. We will try to see minimal set of its basics and change some parameters to make in applicable to our application.
First of all, we will use shader material available in Virtools Resources. We can simply apply this material to the object in our scene by drag and drop it onto the mesh object in our level. We will also review more details of each shader and its parameters. (find two buttons, edit shader & shader parameter.available in material setup panel.)
Following example scenes are made with potato character composition file we used in Week 2. You can find all these files in class pickup directory.
Reuse Shaders from Demo / Example composition
Different from grabbing available shader material from resources, we can resue some of interesting effects from demo composition files too. To do so, we need to save out the material in demo app that we want to use. Then, put those files into your resources directory. Finally, we surely need to adjust its parameters and tweak things around to make it work with our object.
One more complicated example is one from post-pocessing type shader. It uses render target rendering to produce rendering result in framebuffer and passes this resulting image to the next rendering pipeline as texture and so on. This essentially means more work in script part (adding more BBs to make this work).
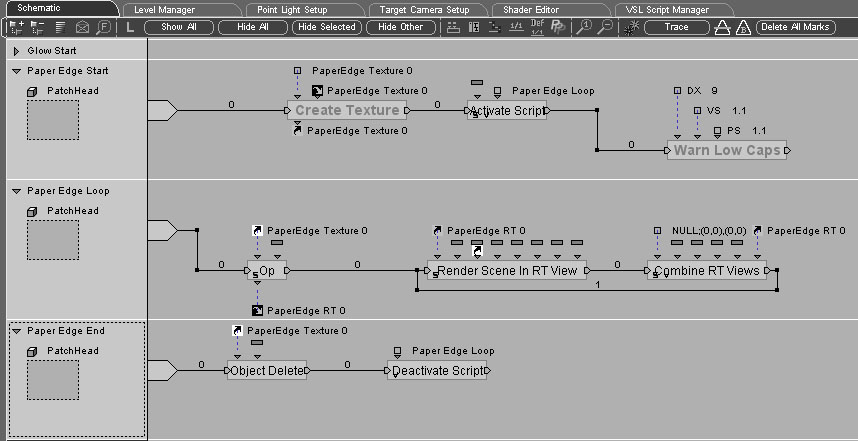
Here is one snapshot of this kind of script from technical demo. We will re-produce or apply this material in our scene during class. Especially the Paper Edge Loop script is important as it set RT and combine it to the final framebuffer to swap and show on computer screen.
Single Pipeline Example: Per-Pixel Lighting with Texture
More or less, this is rather simple shader since it's directly apply to object as material that include shader. You do not need to add or change BBs in script. We will see more complicated example in the next sample.
a. per-Vertex lighting : default
b. per-Pixel lighting : material with shader
c. apply per-Pixel shader to potato man scene
Post-Processing Example: Edge-Drawing
This is more complicated example. We glanced at this one's script in above. Fundamentally, we need to create a texture to store realtime render target result and use it to draw final image. Implemented scripts in demo are composed of three parts, start / loop / end.
a. Start : create a texture & activate Loop script
b. Loop : render scene in RT & combine it to final result (use RTT to draw quad with the edge shader)
c. End : delete the texture and deactivate Loop script
If we use this shader material all the time, we do not need to separate these three steps. also no need of Start / End script. (make a texture offline and use it)