- Turn power on for overall edit system
- Switch betacam recorder to LOCAL mode (local/remote switch upper right corner of deck front panel)
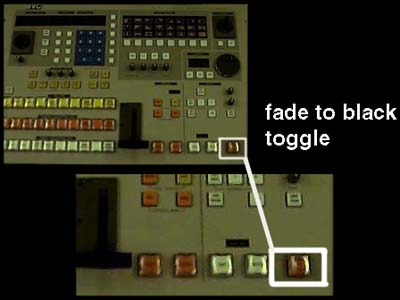
- Press the "Fade to black" button once. This button is located on the lower right of the JVC switcher (see figure above).
- Lift Betacam recorder front control panel to upright position 8)
- Under the front control panel, on the top circuit board, the 4th switch is labelled regen/preset. This should be set at 'preset' mode. (If you want an assembly edit, set it to 'regen').
- On the front control panel hit the record button to display the existing preset time code value.
- To zero the preset value, use the reset button (to the right of the time code display).
- Hit the PRESET button to enter the zeroed time code (to the left of the time code control section).
- Finally hit Play & Record simultaneously on the recorder deck.
- Let it record as long as you want. You cannot speed it up or start and stop, so go for a cup of coffee and come back later. Make sure you leave a sign saying that you're recording...
- When finished, turn the TC Generator switch back to REGEN.
Color bars usually should be 45 secs long followed by 15 secs. of black before you start the main program.
- Select color bars on JVC switcher
Program bus - either CBARS/Blk for NTSC bars or SMPTE (split) bars from
NOVA 950
NOTE: JVC switcher bars (NTSC) toggles between color bars and black. The NOVA 950 can output SMPTE bars, but CBARS must be selected on the NOVA950 control panel.
- Regardless of the type of color bars selected, the record monitor should show color bars when the recorder is 'stopped' (E-to-E mode)
- Set tone for video programs that will include audio. Otherwise, proceed with marking in/out points, etc.
When dubbing or editing, you
should check your color bars on the waveform, to actually adjust the signal
to correct level:
Split-field color bars: white should be at 100%;
Regular bars: white should be set to ~80 ire. Black or 'pedestal'
level should be set to 7.5 ire or 'cheated' to 5 ire for 'richer' blacks
(black is a 'legal' broadcast signal if it is somewhere between 0 and 7.5
ire).
Tone and color bars are recorded simultaneously.
- Turn tone generator 'on'. It is the 'microphone-like' device connected to Input 6 on the Mackie mixer. The power switch is located on the side of the tone generator; 'on' is when the switch is positioned towards the red dot.
- Adjust Mackie mixer tone level (input 6 and output sliders) to 0db
- Check audio level inputs on recorder. Adjust audio levels to 0db by pulling record control knobs out to variable position.
- Once the audio levels are set, proceed with marking in/out points to record.
- Do not forget to turn the tone generator off when you finish.