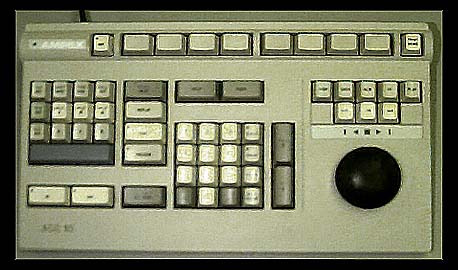
Using the ACE 10 Computerized Editing System

The default configuration of
the EVL video editing suite is BETACAM A/B Roll.
Major changes in editing configurations should be addressed to editroom@evl.uic.edu
On-line help can be obtained
by pressing HELP located on the dedicated ACE10 keyboard above the data
entry keypad.
Prepare:
- Reset ACE10 for a new edit:
Make sure the ACE10 is reset for a new edit; any previous hardware configuration
and/or edit decision list (EDL) is erased. To reset the controller:
- Go to the INIT menu
(the INIT key is in the upper left next to the logo on the control unit)
- Select USER1 (EVLDEFAULT)
using the 'soft keys' at the top of the control unit. This will load the
default hardware configuration for betacam A/B roll editing. The 8 'soft
keys' correspond to the 8 rectangular menu boxes located at the bottom
of the status monitor.
- Select SESSION RESET
and then CONFIRM. This will clear the previous EDL.
- To enable the ACE 10 to control
the JVC Switcher hit the * + 0 key on the switcher numeric control pad.
Cuts Editing:
A CUT is a zero duration transition
and the foundation of editing.
- Select the recorder - R
(transition and effects keypad)
- Use the transport control VAR
to find position of the recorder in point*
- Hit IN to set the record
entry/in point
- Select CUT (transition
and effects keypad)
- Select the source by hitting A,
B or Aux (depending on where your source is).
- Use the transport control VAR
to position of the source in point (this is not relevant to using AUX as source,
since it is the input from Sirius)*
- Hit IN to set the source
entry/in point
- Use the transport control VAR
to find position of source out point* NOTE: an out point is not necessary
to perform an edit. An open-ended edit can be made terminated by hitting STOP
during the edit; time code values at the 'stop' point will be automatically
loaded as the recorder and source deck out points and as the next edit's in
points.
- Hit OUT to set the source
exit/out point
- To preview the edit hit PREVIEW
- To perform the edit hit PREVIEW
and EDIT simultaneously
- To review the edit hit REVIEW
* In and out points can also be
entered using the data entry keypad. Time code value digits should be separated
by a colon or semicolon (1:20:10 = one minute, 20 seconds, 10 frames). A keypad
value will over ride tape position when hitting IN or OUT.
Once the edit has been performed,
the ACE10 will automatically advance to the next edit, move the completed edit
data into the EDL, and load the previous edit's out points as the subsequent
in points.
A/B Roll Editing with Effects:
Dissolve:
A Dissolve, like a cut, is a transition
between two sources, but unlike a cut, a dissolve has a durration and is represented
visually by a crossfade between the two sources. The from machines inpoint is
automatically loaded.
- Select the recorder - R
button (recorder in-point has been automatically loaded from the previous
edit, so there is no need to make another entry)
- Select CUT (to 'match cut'
from the out point of the previous edit)
- Select the previous source - A,
B, or Aux from which the dissolve to the new source will occur (the in
point has been automatically loaded from the previous edit)
- Select DISS for the dissolve
effect To modify the effect duration - enter the number of frames for the
effect using the keypad, followed by the EFFECT DURATION 'soft key'
- Select the source to dissolve
to - A, B or Aux
- Use the transport control or keypad
to find/mark the source in point
- Hit IN to mark the entry/in
point
- Use the transport control or keypad
to find/mark the source out point
- Hit OUT to mark the exit/out
point
- Use PREVIEW to preview
or PREVIEW+EDIT to perform the edit.
Once the edit has been performed,
the ACE10 will automatically advance to the next edit, move the completed edit
data into the EDL, and load the previous edit's out points as the subsequent
in points.
Fades:
A FADE is a transition from or to
black, and to or from source video. A fade has a duration. FADE UP:
- Select the recorder -R-
button.
- Use the transport control or keypad
to find/mark the recorder in-point.
- Hit IN to set the record
entry/in point
- Select CUT (transition
and effects keypad)
- Select the source by hitting A,
B or Aux
- Use the transport control or keypad
to find/mark the source in point
- Hit IN to set the source
entry/in point
- Use the transport control or keypad
to find/mark the source out point
- Hit OUT to set the source
exit/outpoint
NOTE: an out point is not necessary
to perform an edit. An open-ended edit can be made terminated by hitting
STOP during the edit; time code values at the 'stop' point will be automatically
loaded as the recorder and source deck out points and as the next edit's
in points.
- Select FADE, using blue
shift key (transition and effects keypad)
- Select BLK, using blue
shift key (transition and effects keypad) There is no need to enter an in
or out point for the black, since it is a static source coming from the switcher
- Select FADE UP from the
'soft keys' menu. To modify the effect duration - enter the number of frames
for the effect using the keypad, followed by the EFFECT DURATION 'soft key'
- Use PREVIEW to preview
or PREVIEW+EDIT to perform the edit.
FADE DOWN:
- Select the recorder -R-
button (recorder in-point has been automatically loaded from the previous
edit, so there is no need to make another entry)
- An out point can be set on the
recorder using the transport control or keypad, followed by OUT...or
the edit can simply be terminated during the edit by hitting STOP once the
fade down has been completed
- Select CUT (transition
and effects keypad)
- Select the previous source by
hitting - A, B or Aux from which the fade to the black will occur (the
in point has been automatically loaded from the previous edit)
- Select FADE, using blue
shift key (transition and effects keypad)
- Select BLK, using blue
shift key (transition and effects keypad)
- Select FADE DOWN from the
'soft keys' menu
- Use PREVIEW to preview
or PREVIEW+EDIT to perform the edit.
- Use STOP to terminate the edit
if an outpoint has not been previously entered.
Wipes:
A WIPE is a patterned transition
between two sources and has a duration. The following instructions assume that
an edit has already been made and the previous edit out points (recorder and
source) have been loaded as the new edit's in points.
- Select the recorder -R-
button (recorder in-point has been automatically loaded from the previous
edit, so there is no need to make another entry)
- Select CUT (to 'match cut'
from the out point of the previous edit)
- Select the previous source - A,
B, or Aux from which the wipe to the new source will occur (thein point
has been automatically loaded from the previous edit)
- Select WIPE for the wipe
effect
- Enter the wipe pattern number
using the keypad, followed by the WIPE PATTERN 'soft key'.
The switcher has 24 wipe patterns
numbered starting with 1 from left to right/top to bottom.
NOTE: Various other wipe attributes
can be specified using the WIPE 'soft keys'. The current settings
are denoted in the edit construction list (ECL) under 'PAT'. The wipe 'edge'
can be either hard, soft, outlined - the EDGE 'soft key' toggles between
the selections. Reversing the direction of the wipe can be made using the
NORMAL/REVERSE 'soft key'. It is also a toggle between modes. A border can
be specified by entering a pixel value into the keypad, followed by the
BORDER WIDTH 'soft key'.
The effect duration can be modified by entering the number frames
in the keypad, followed by the EFFECT DURATION 'soft key'.
- Select the source to wipe to -
A, B or Aux
- Use the transport control or keypad
to find/mark the source in-point
- Hit IN to mark the entry/in
point
- Use the transport control or keypad
to find/mark the source out-point
- Hit OUT to mark the exit/out
point
- Use PREVIEW to preview
or PREVIEW+EDIT to perform the edit.