The Inversion Proof
[Loomis 9]
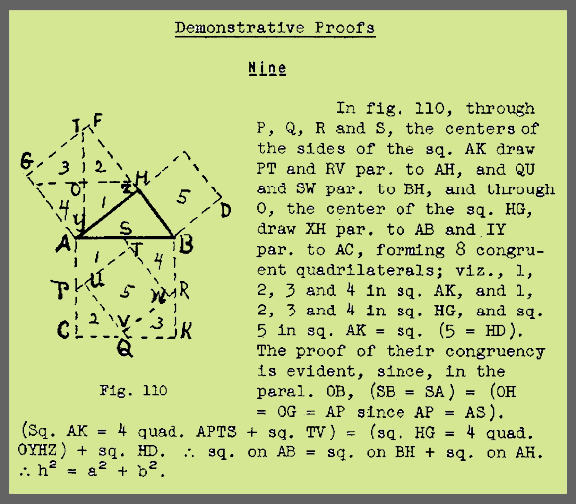
Part II, Proof 9, page 104 from E.S.Loomis, The Pythagorean Proposition (1940)
The Inversion Proof In Four Parts
The Loomis 9 demonstration and its figure 110, above, are nearly impossible to comprehend. One gets the feeling, while reading Loomis that he wants you to struggle to understand the proofs. But these proofs are not difficult. It is only the diagrams and the truncated writing which forces the reader to repeatedly shift focus between the text and the diagram. Below , I have taken the pain out of this demonstration, not only to take pity on struggling readers, but also to show its remarkable symmetry and the pure beauty of its conception.
 |
 |
 |
 |
| The hypotenuse square is set on top of the base square. Both are subdivided into four equal squares and colored (yellow & orange). The proof is ready to demonstrate itself. | As our four part animation begins, a right triangle and two small black squares appear. The one growing inside the hypotenuse square shows the added area, while the other black square is the riser square. | Also, the right-triangle is growing inside the three squares. With each increment of growth, the riser square and the "captured" square of the hypotenuse maintain equality. | Finally, at 45 degrees the animation is complete. The base and the riser squares are of equal area as are the "captured" square and the original parts of the hypotenuse square. |
Throughout the animation, the base plus riser squares have maintained eqaulity of area to the hypotenuse, which, of course, elegantly demonstrates the Pythagorean theorem.
| Now we can return
to Loomis 205, (to the left) and see that it looks a lot like the proof above (and to the right.) |
|
Press on to unpack Loomis 205, finding that it is a variation of Loomis 9.
![]()
